-
Veeam Backup & Replication 9.5 Update 4 RTM to GA Upgrade
Like a lot of you out there I have been running the RTM release of Veeam Backup & Replication 9.5 Update 4 and have been waiting for the Day 0 Release. This release allows you to do an in-place upgrade of the RTM deployment which saves you having to reinstall and point back to the configuration database.
That release is finally available and you can download a copy here KB2883
Now that it’s time to move to the GA release I thought I would put together a quick walk through on what is involved.
Check your version number, the RTM version should 9.5.4.2399
If the server is busy in any way you will get the following prompt when you try to start the upgrade,
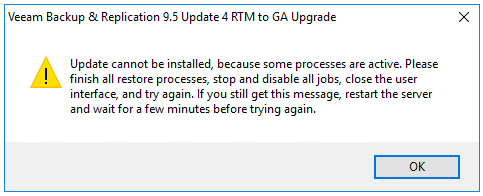
It recommends to stop and disable any jobs that you currently have setup. If you get this prompt and your Veeam server is sitting idle just disable the current job list then restart and try the upgrade again.
Here is a walk-through video of the upgrade process, apologies in advance as I haven’t added in a cool soundtrack over the top.
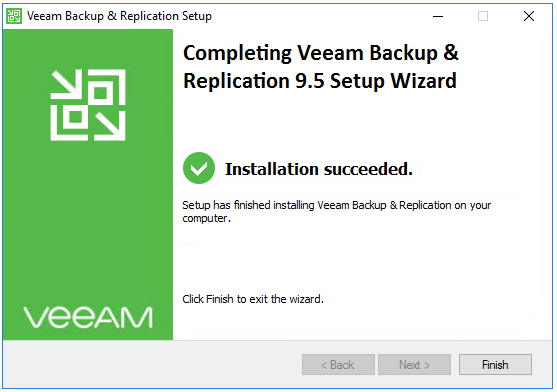
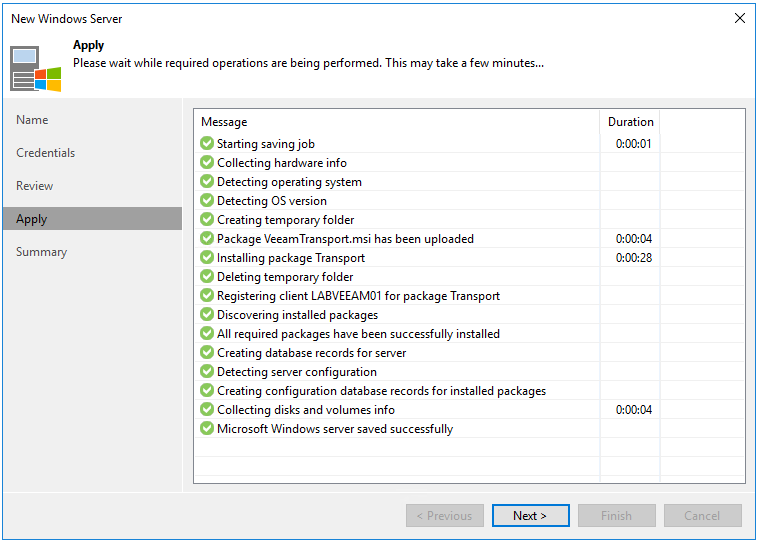
Once the upgrade is complete you can launch Veeam Backup & Replication and any connected components will now be automatically upgraded.
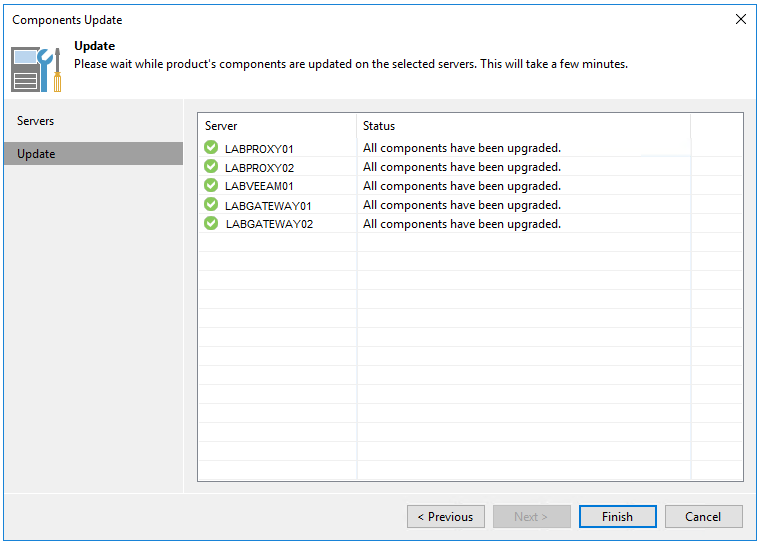
Then just to be sure everything has gone through as expected check the version number one more time. It should now be 9.5.4.2615

As always use the subscribe box above for new post notifications and follow me on twitter @steveonofaro
-
Capacity Tier in Veeam Backup & Replication 9.5 Update 4
There has been some great new functionality announced with Veeam Backup & Replication 9.5 Update 4 and for this post I wanted to check out the Capacity Tier options for Scale-Out Backup Repositories.
I will be walking you through setting up an Amazon S3 Repository along with a new Scale-Out Repository on your Veeam Backup & Replication Server. Then we will go through configuring the Capacity Tier options.
To begin you will need to login to your AWS account or create one if you haven’t already. Then create yourself an S3 bucket to use as your object store. I have already created an S3 bucket on my AWS account, there are plenty of guides on how to do this and what security you implement is up to you.
So first off we need to create a backup repository using our Amazon S3 Bucket.
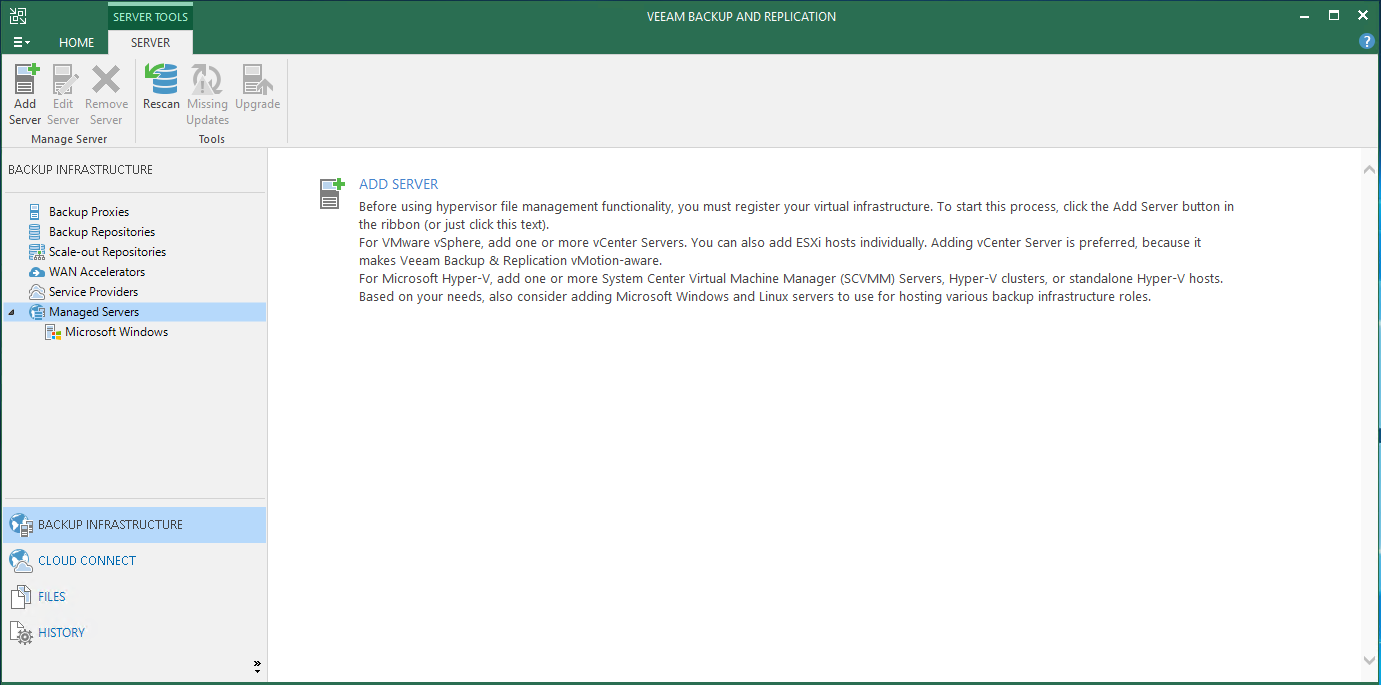
From your Veeam Console click on Backup Infrastructure and select Add Repository
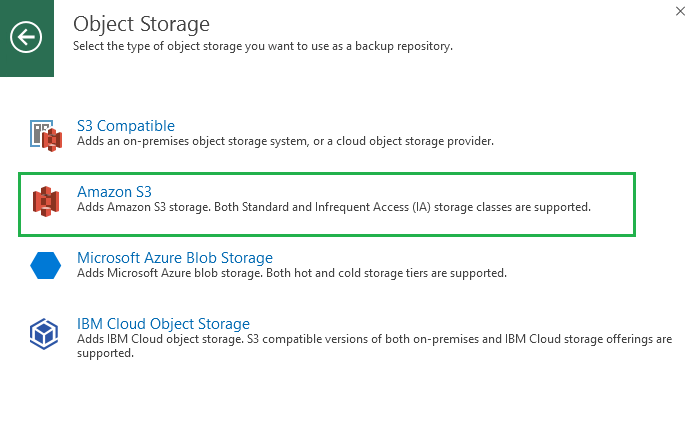
Select Object Storage from the add repository window
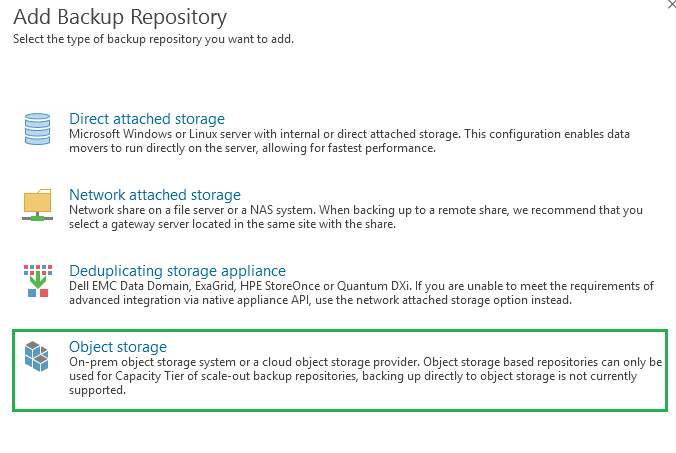
From the Object Storage window you can take your pick from the list. If you have access to an E-Series backed NetApp Storage Grid you could select option one and connect to that or if you prefer AWS S3, Azure or IBM those options are also available.
For this example we are going to use an S3 bucket in AWS so select Amazon S3
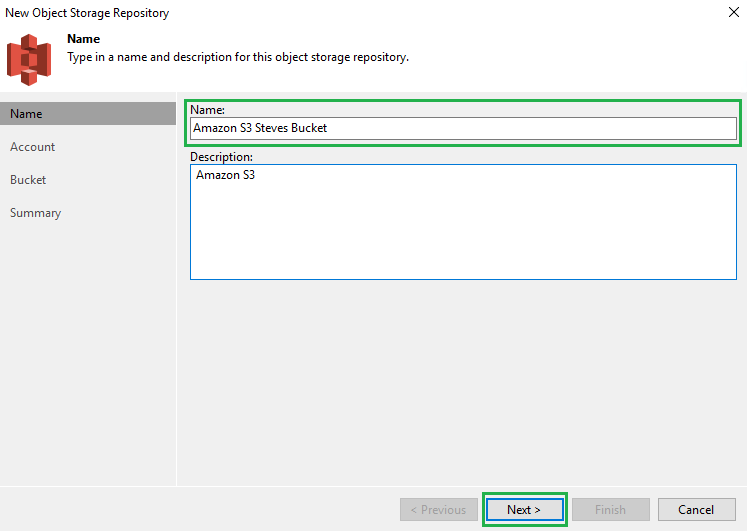
Enter a Name for the Object Store and click Next
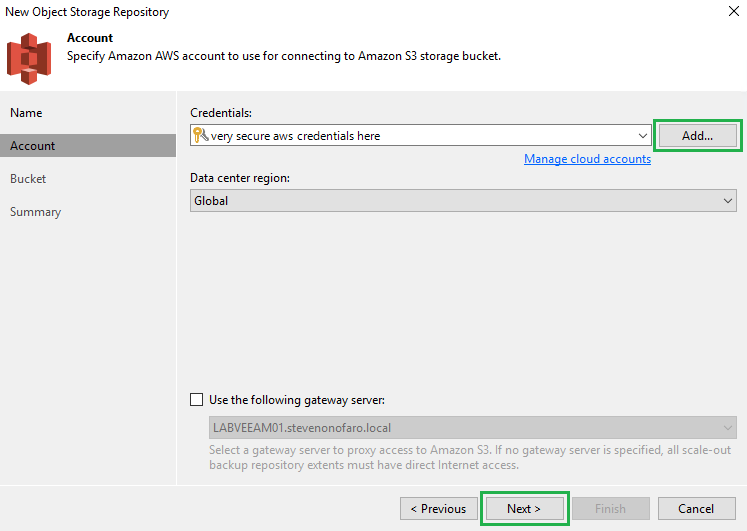
Click Add and enter your AWS Credentials, you will be prompted to enter your Access Key and Secret Key.
Then click Next.
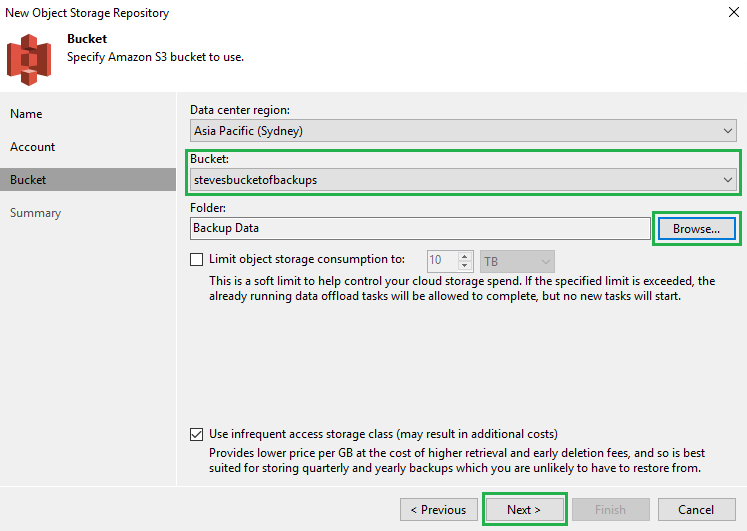
The connection will now be made to AWS and the Specify S3 Bucket screen will appear. Click on the drop down menu next to bucket and select the S3 bucket you would like to use. Then click Browse to select or create a folder to store the data in and click OK.
You can also set an object storage limit here and by default the Use infrequent access storage class checked is selected.
Then click Next
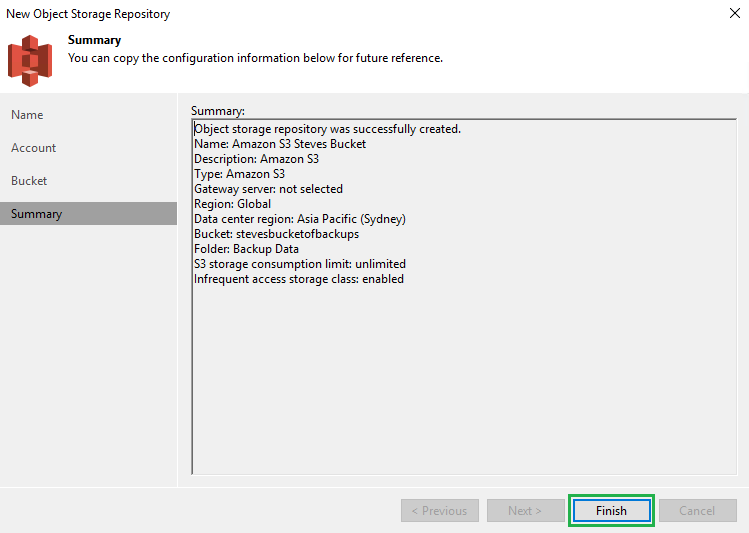
The configuration will now be saved and the Summary screen will appear.
Click Finish
Our shiny new S3 Backup Repository will now be displayed

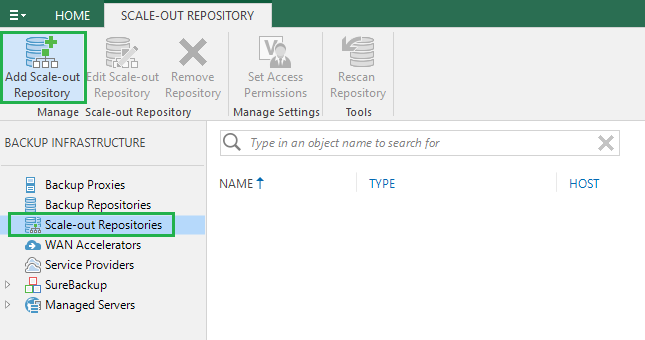
The next step is to click on Scale-Out Repositories, then select Add Scale-Out Repository
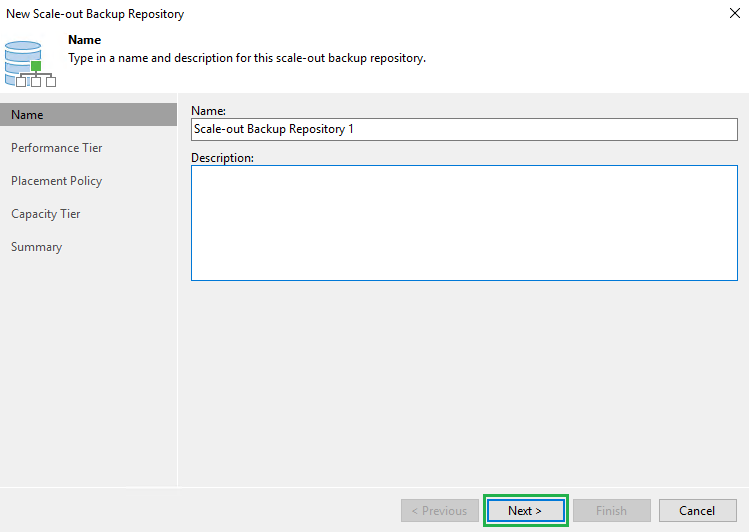
Give your Scale-Out Repository a creative name and click Next
Then on the Select Backup Repositories screen click Add. Then select the backup repositories you would like to use and click OK
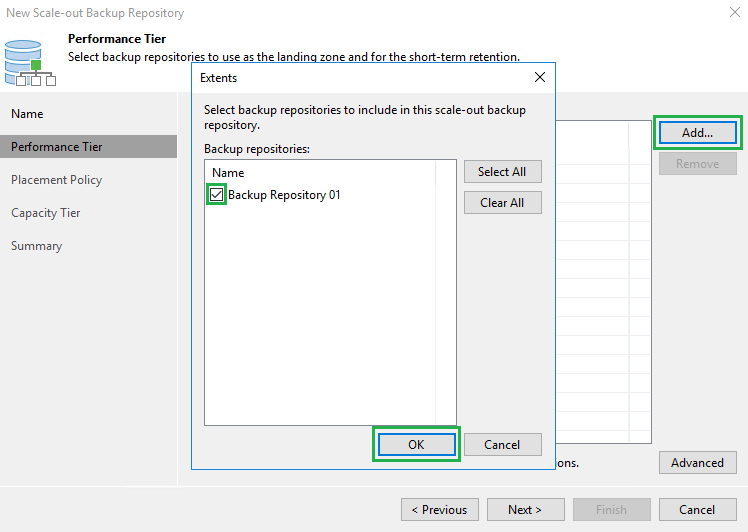
Then click Next
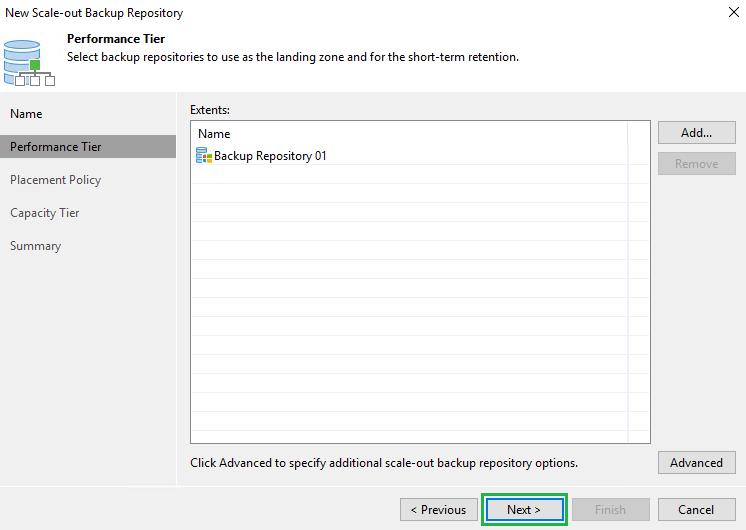
For this example I am just going to select Data Locality as I only have the one backup repository currently connected.
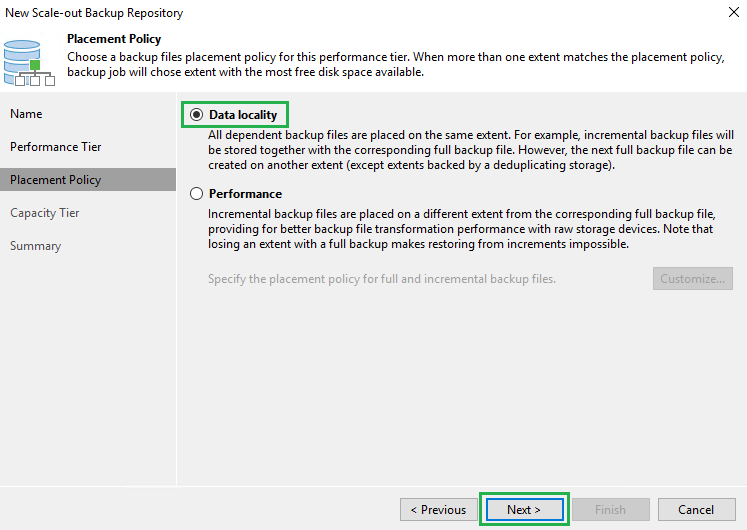
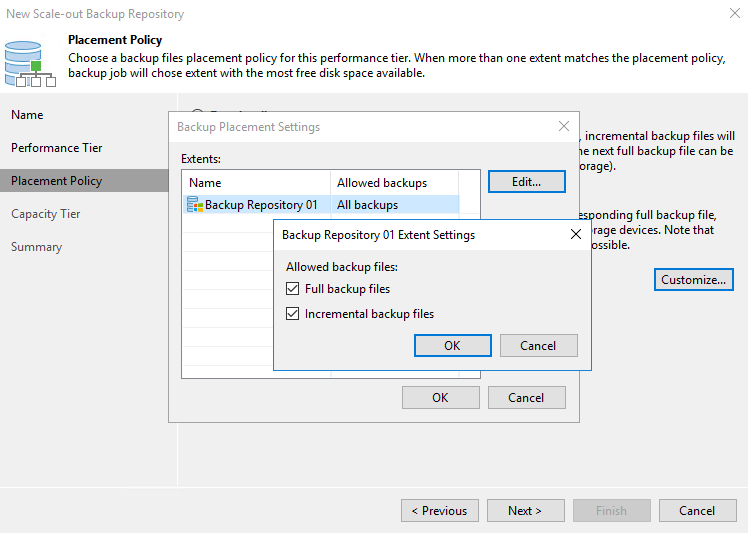
If you were to select Performance you can then click Customize and modify the placement policy for your incremental and full backup files.
The following image shows the options available.
On the Capacity Tier window select the Extend scale-out backup repository capacity with object storage checkbox.
Then from the drop down menu select your Amazon S3 bucket.
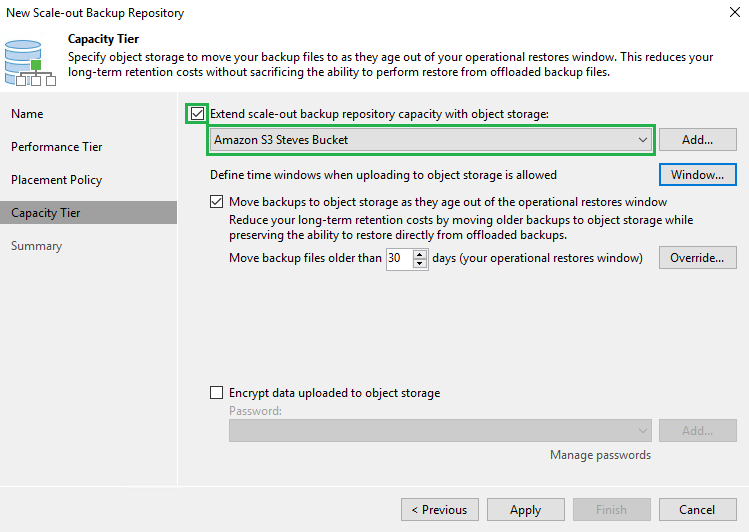
On the same screen click on the Window button, here you can define the time window for uploading data to object storage.
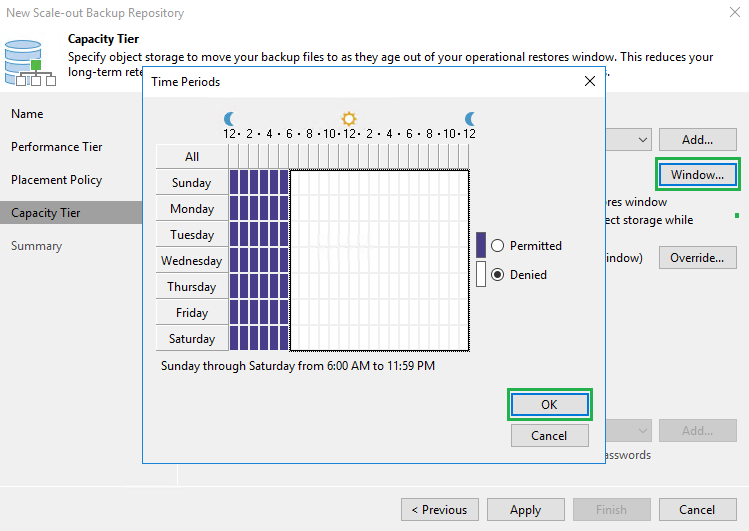
Next we want to specify how many days old our data is before we start to move it out to object storage.
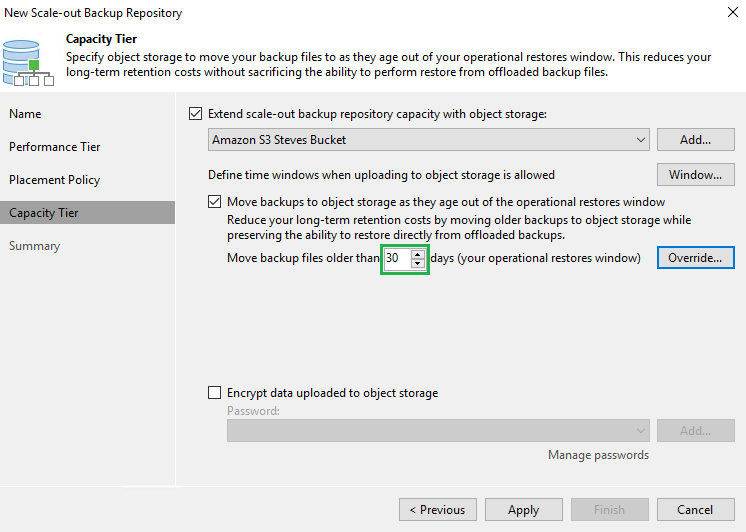
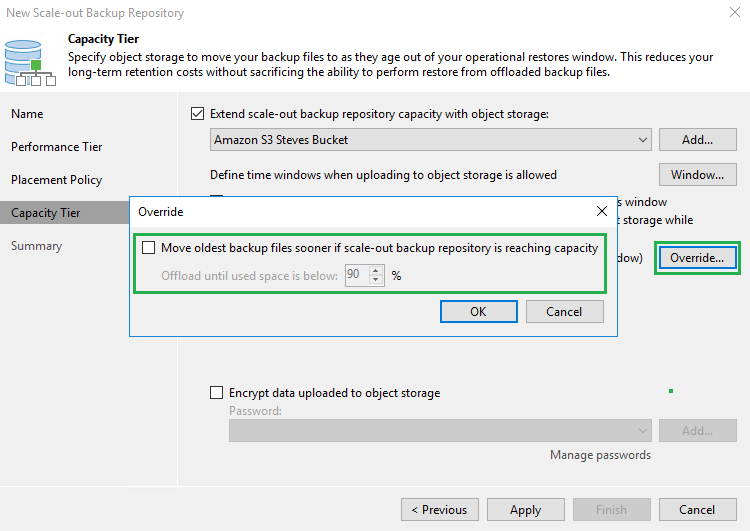
There is also an Override option available to allow you to move the oldest backup files sooner if your scale-out repository is reaching capacity.
Lastly you are also able to encrypt the data that is transferred up to object storage.
Click Apply

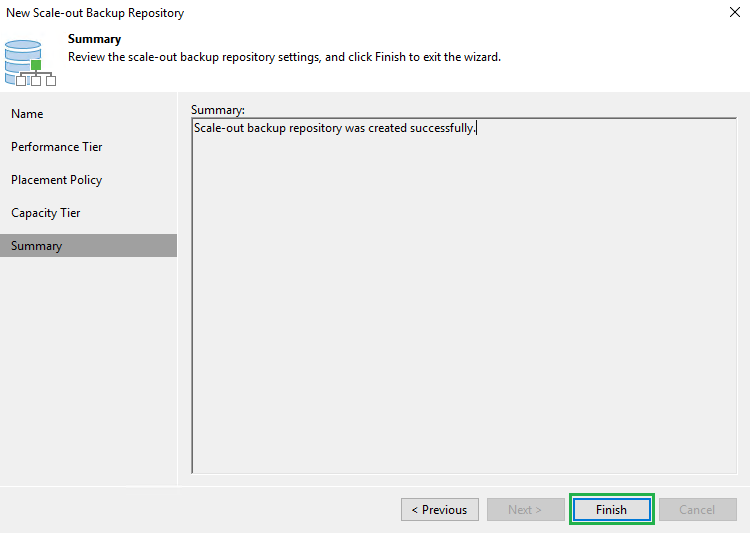
Click Finish to complete the setup
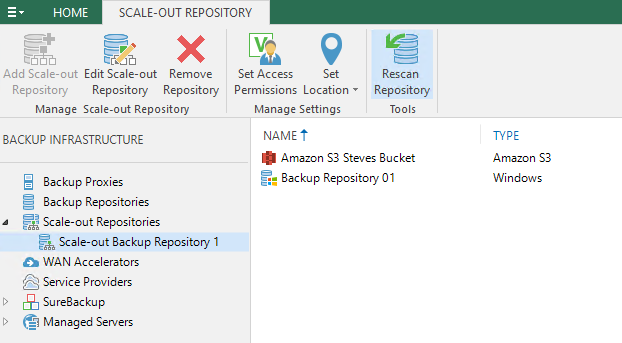
If you select the Scale-Out Repository you will see the both the Local Repository and the Amazon S3 bucket listed.
That’s it your new Backup Repository has been configured to tier data older than 30 days out to Amazon S3
As always use the subscribe box above for new post notifications and follow me on twitter @steveonofaro
-
Cisco HyperFlex ESXi Upgrade option now in HX Connect UI
I have always been a big fan of the Cisco UCS product line so when it came time to dive into the hyper converged world Cisco Hyperflex was the obvious choice! The product just keeps getting better with every new release and the latest version of HX Connect makes upgrading your environment even easier.
Previous versions of the HX Connect UI would guide you through upgrading the UCS Server Firmware and the HX Data Platform but the ESXi host upgrades were initially done via command line. Now from version 3.5(1a) onwards it will also upgrade the ESXi hosts for you.
The ESXi host upgrade process once started is automated so it will take care of migrating the VMs, putting the host into HX Maintenance mode, upgrading and rebooting. Then once upgraded it will take the host out of HX Maintenance mode and bring the storage node back online before continuing with the next host.
Also from 3.5(1a) onwards the manual bootstrap process for upgrading the HX Data Platform is no longer required and the upgrade file can be added in from the HX Connect UI during the upgrade process.
I have covered the overall upgrade in a previous post so I want to focus just on the ESXi upgrade process in the HX Connect UI.
First lets log into the HX Connect UI
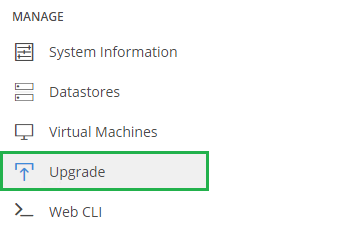
Then once you have logged in click on Upgrade in the left hand menu
You can select all 3 of the options below and run through the entire process but for this example we are just going to upgrade ESXi. I have already completed the UCS Server Firmware and HX Data Platform upgrades so now it’s time for the hosts.
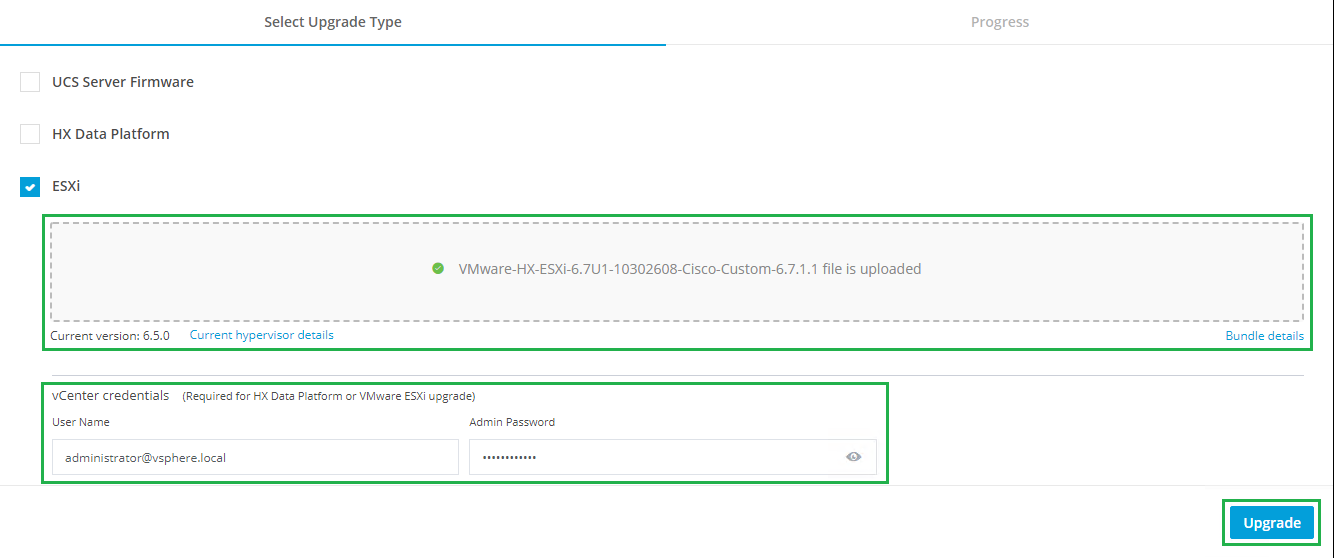
Click on the ESXi checkbox
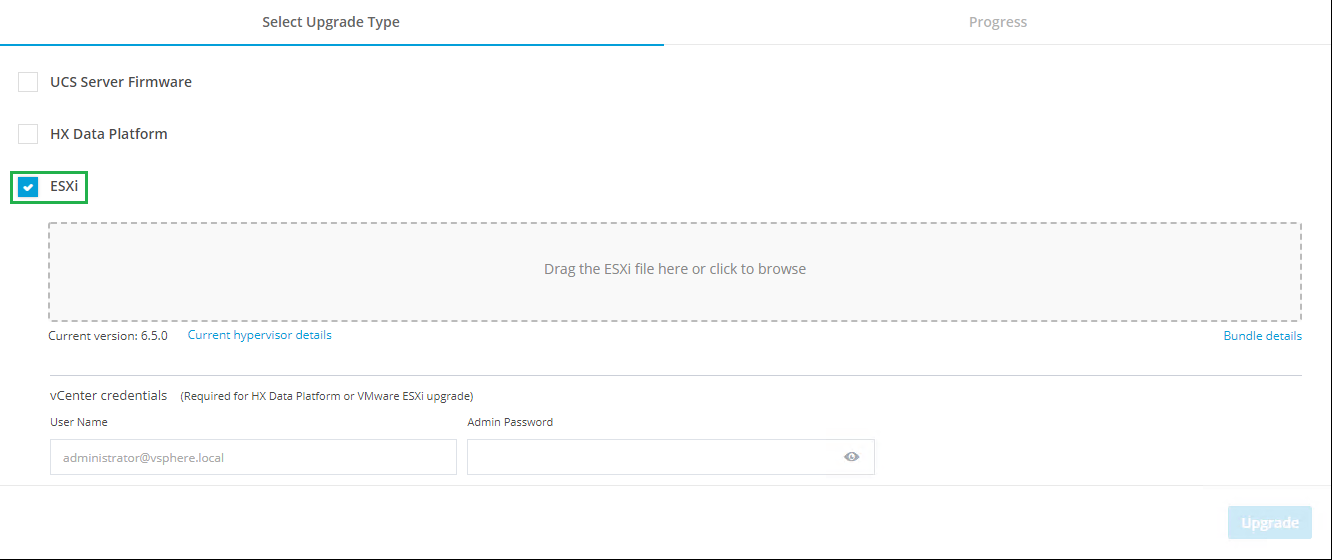
Then click to browse for the ESXi Upgrade Image you would like to upgrade too. You can also just drag and drop the file into the box. In this example I am upgrading from ESXi 6.5 to ESXi 6.7.
One thing to note before you kick this off is if you have any VM rules in place pinning VMs to hosts it would be a good idea to disable them while you perform the upgrade. You want the hosts to be able to enter maintenance mode without any issues.
Once the file has uploaded it’s time to enter your vCenter credentials and click Upgrade
Let’s recap here, all you have had to do is select the upgrade file, enter your vCenter logon details and click Upgrade…
Then the Validation process will start
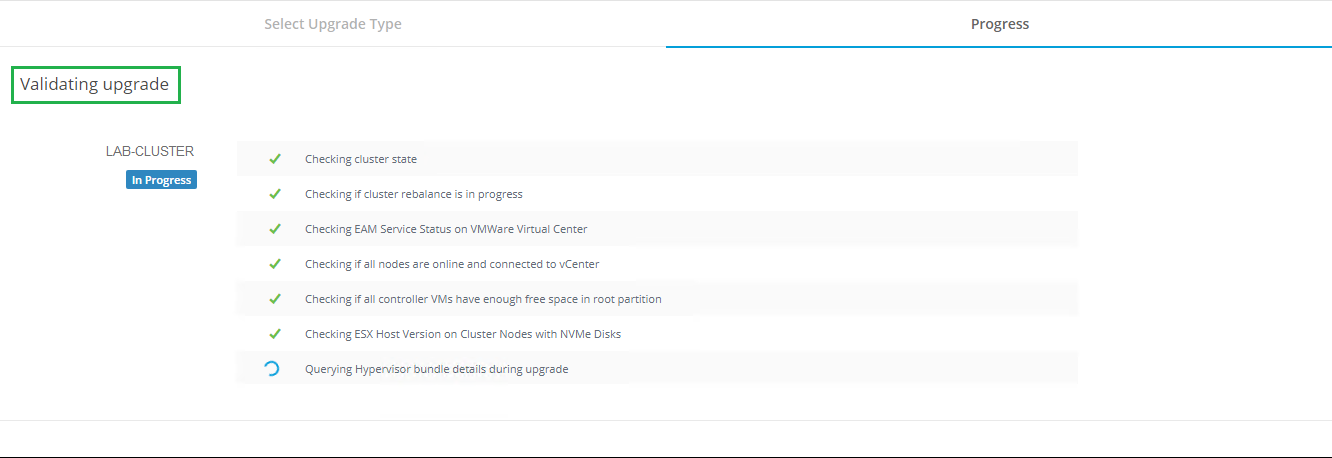
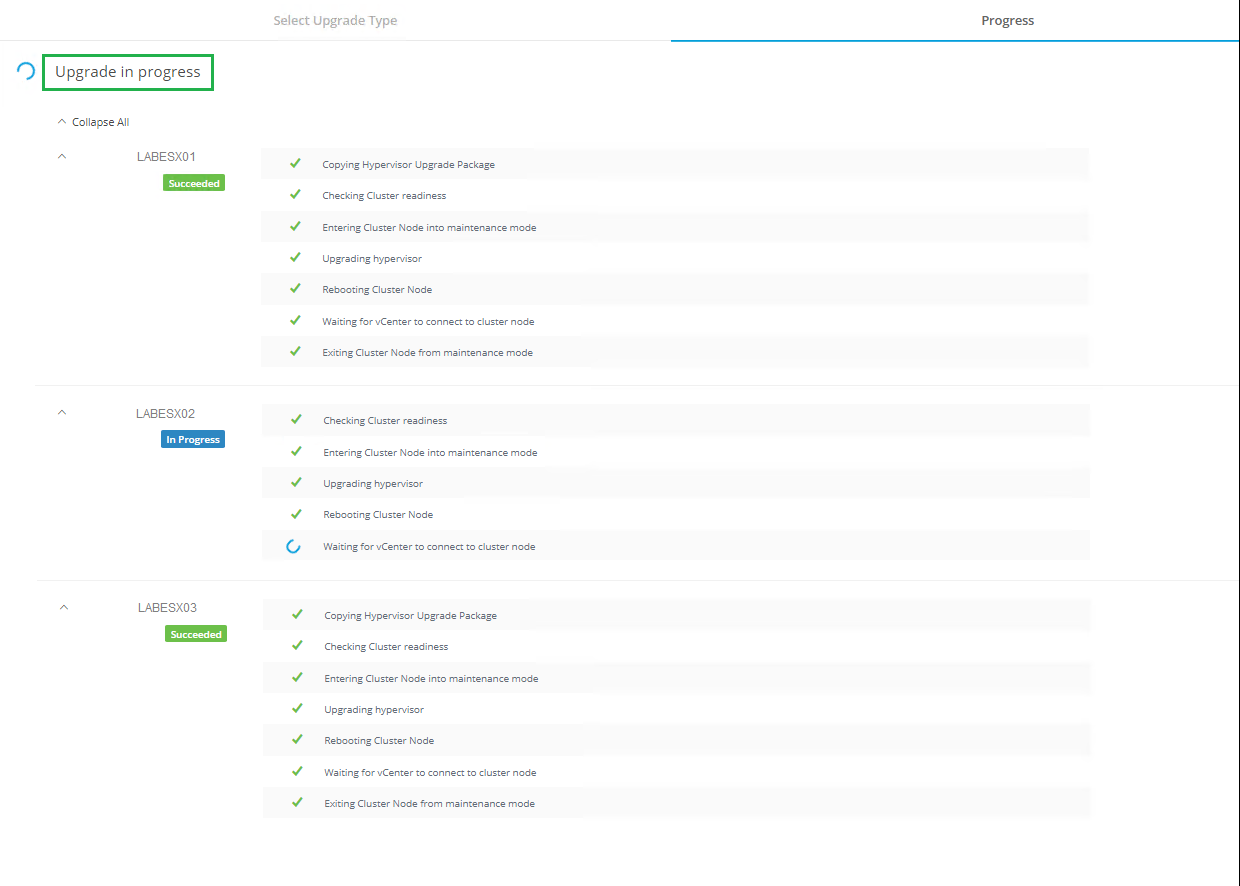
Hyperflex Connect will take care of the upgrade automatically, moving its way through the cluster one host at a time. This is the part when you lean back in your chair and put your feet up, let the software take care of the rest!
When the upgrade is complete you will be prompted in the HX Connect UI
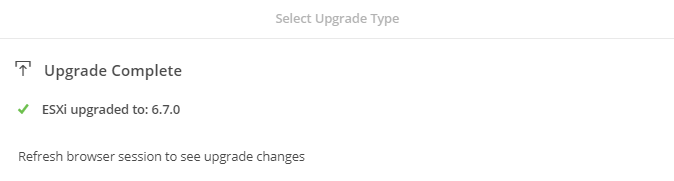
As part of your final checks I would now click back to the HX Connect Dashboard and have a look at the overall cluster status and then log into the vCenter and check each of your hosts.
It’s as simple as that!
As always use the subscribe box above for new post notifications and follow me on twitter @steveonofaro
-
vCloud Director Tenant Backup Portal using Veeam Enterprise Manager 9.5 Update 4
As promised in my previous post Veeam Enterprise Manager Update 4 here is how you can use the product as a multi-tenant backup portal for vCloud Director.
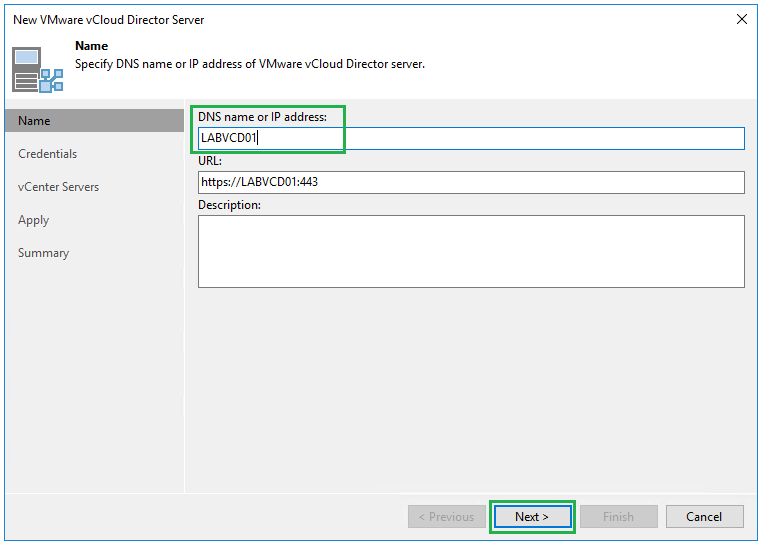
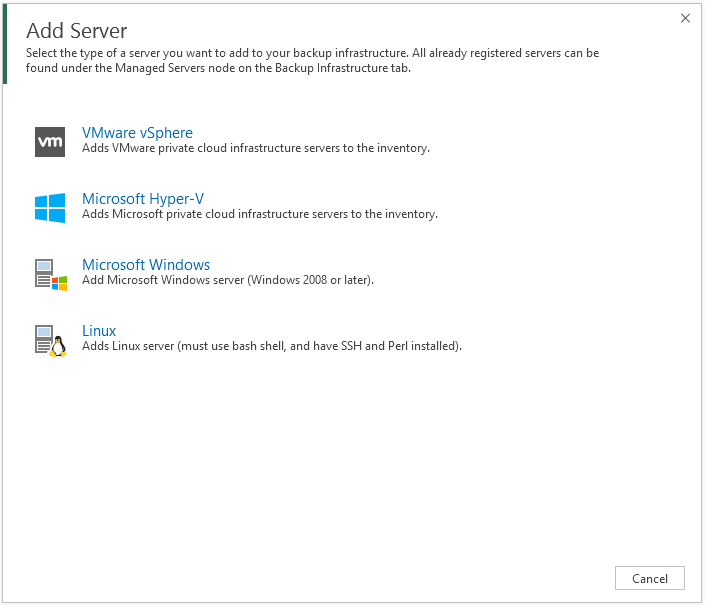
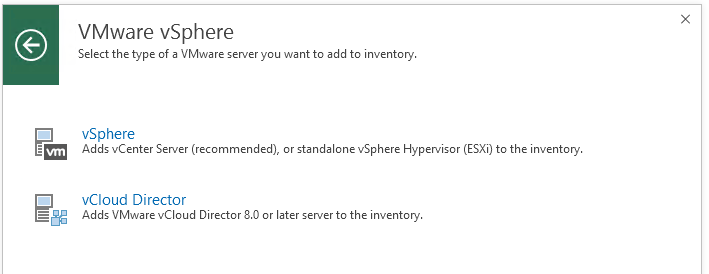
First we need to go to our Veeam Backup & Replication Server and connect to our vCloud Director Instance. You can do this by selecting Backup Infrastructure from the left hand side menu then click on VMware vCloud. Then select Add Server from the top menu

Then enter the vCloud Server name and click Next
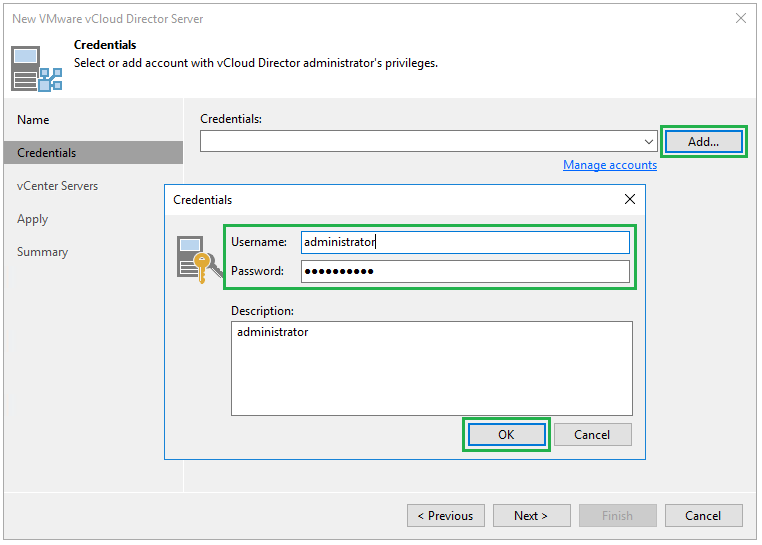
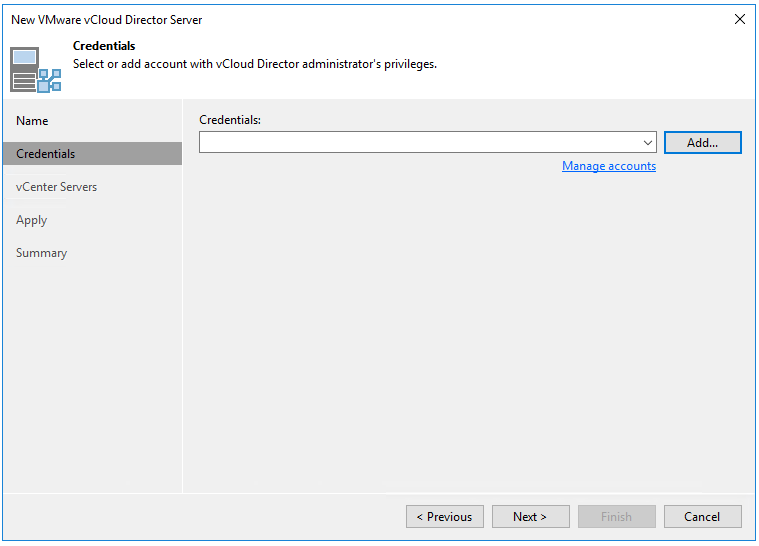
Then click Add to enter the credentials you would like to use to connect to vCloud Director then click Ok. Then click Next
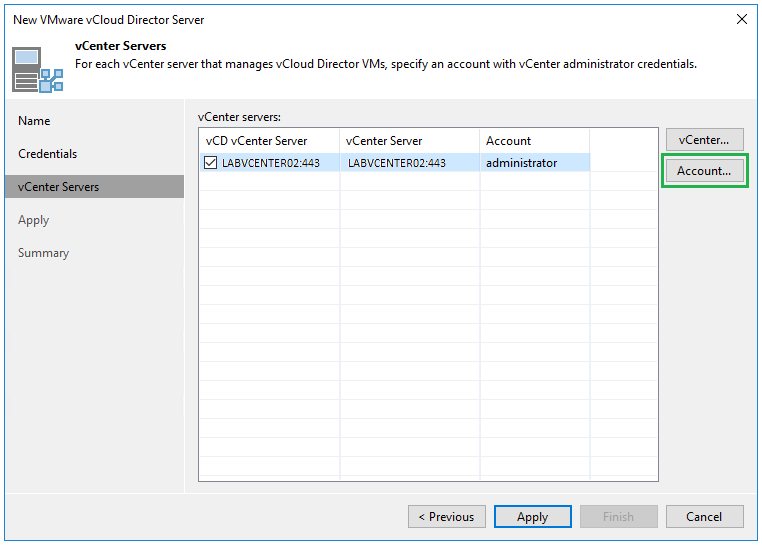
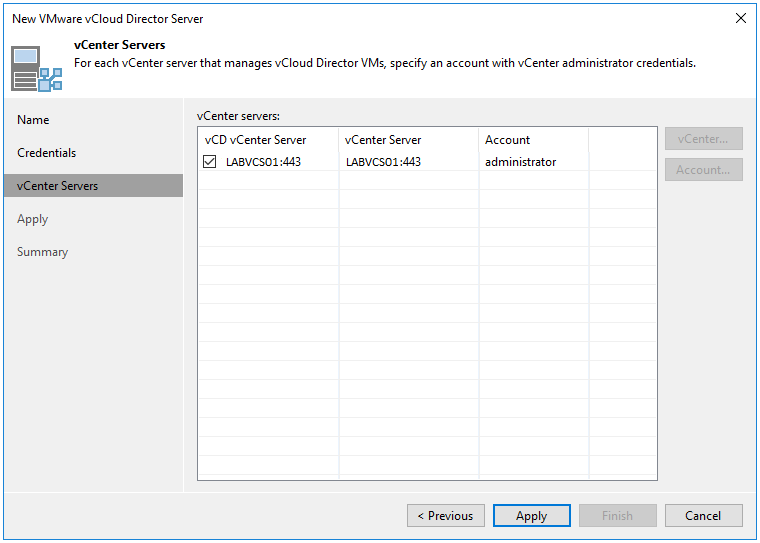
It will then scan vCloud Director for the vCenter Server that is connected and it will be added to the list below. Select the vCenter Server and click Account
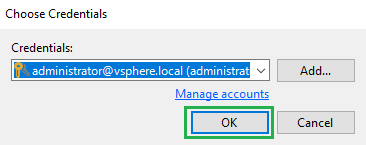
Then select the account required to connect to vCenter, for our example it will be the administrator@vsphere.local account. Then click Ok
Once the account has been set click Apply

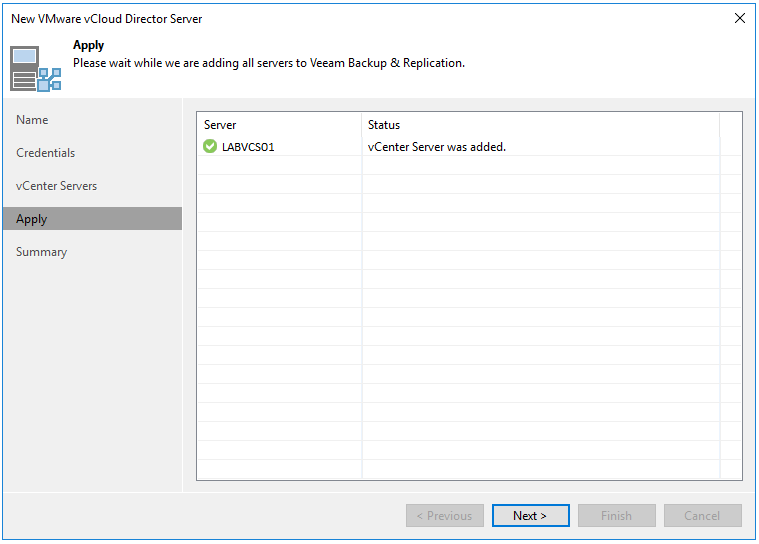
Accept the certificate and once the server has been added click Next
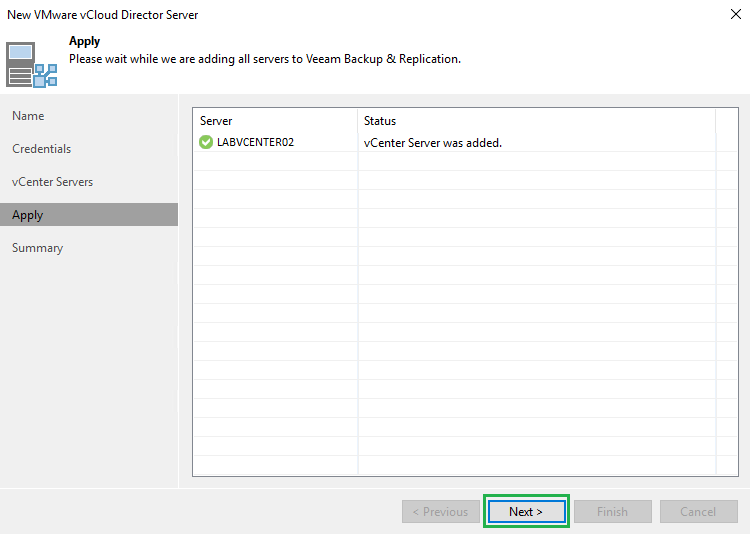
Then click Finish
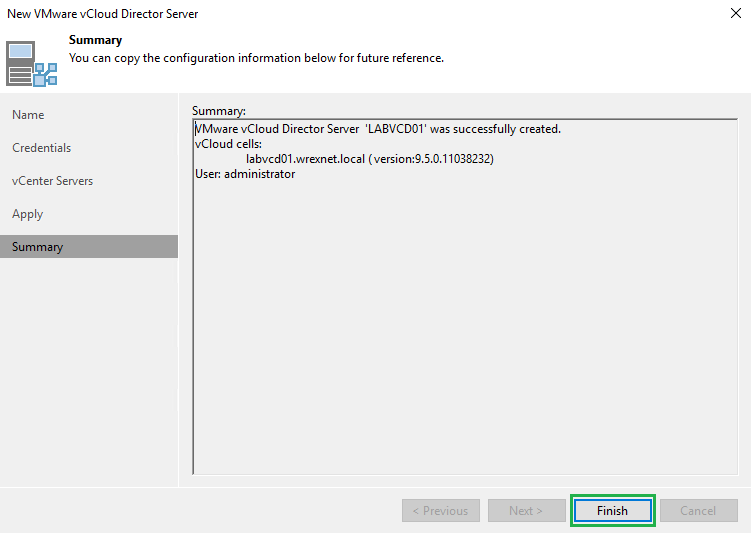
Your vCloud Director instance should now be connected

Ok so now I am assuming you have been using vCloud Director for a while and you already have tenants setup ready to go. If you don’t then now is the time to go and setup at least one Org VDC, vApp and user logon credentials so that you can complete the remaining steps
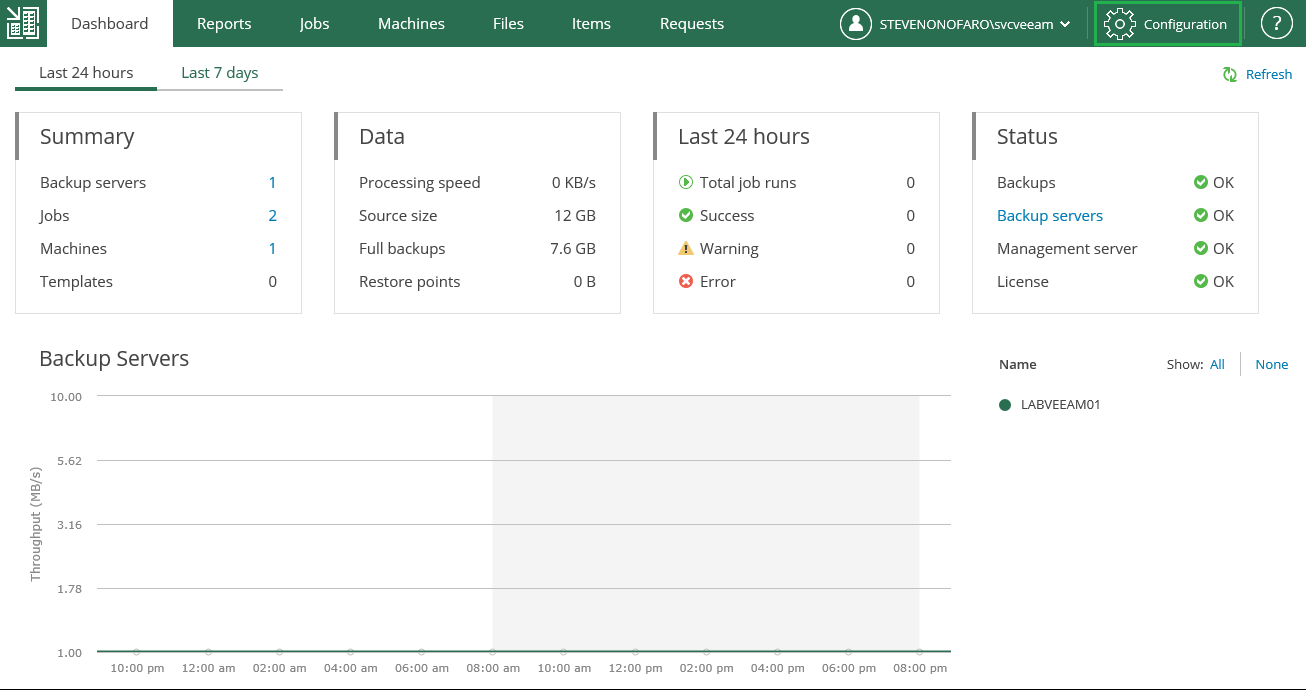
Let’s switch back over to Veeam Enterprise Manager now. Click on Configuration from the top right menu
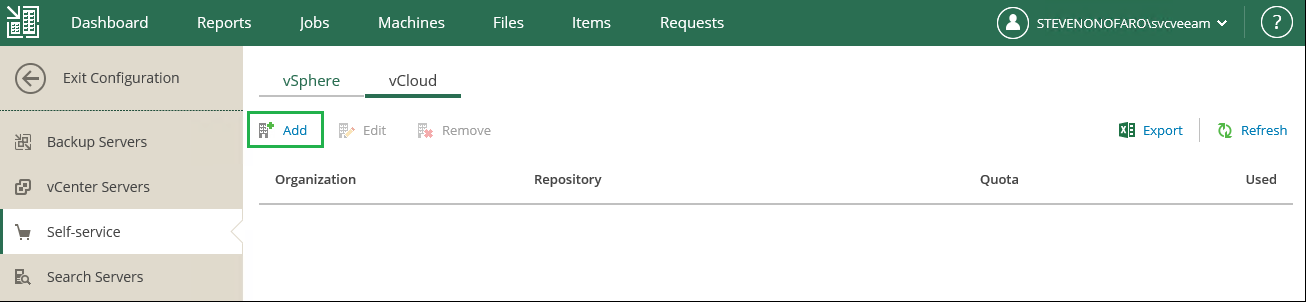
Then click on Self-Service and then select vCloud
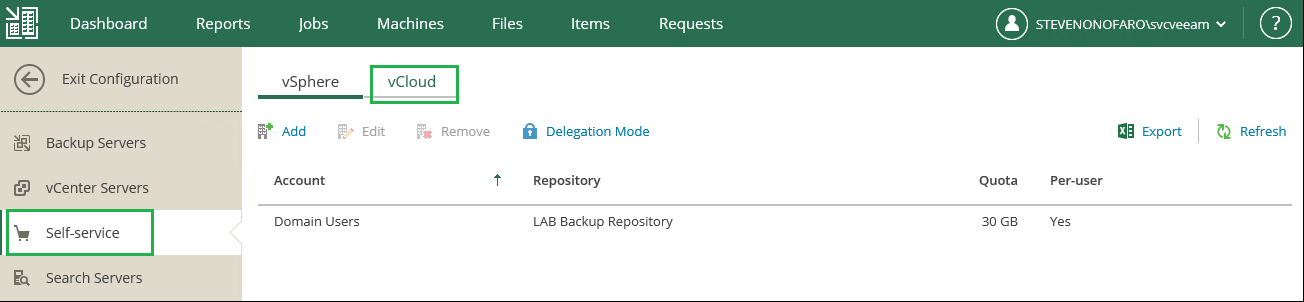
Then under vCloud click on Add
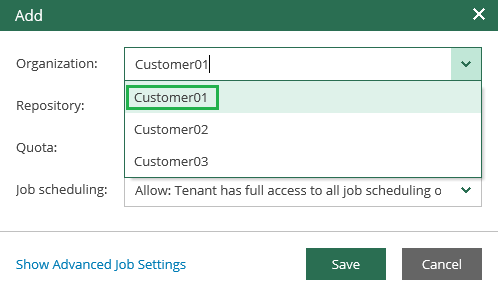
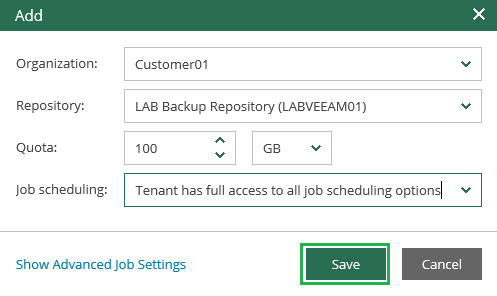
From the drop down menu under Organization you can view each of the customers you have setup in vCloud Director. Select the one that you will be setting up access to the backup portal
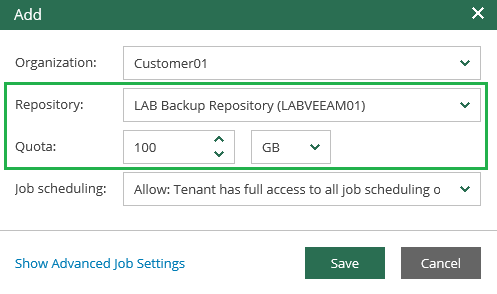
Next select the Repository and Quota for the Tenant
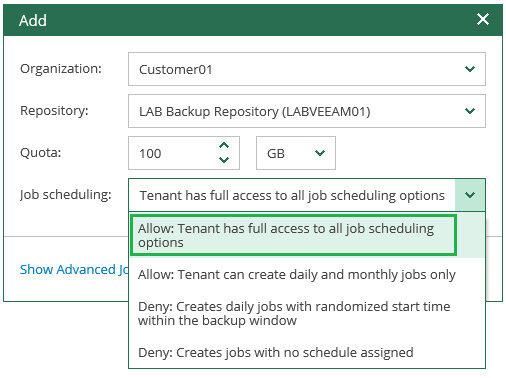
Then under Job Scheduling you have the following options to choose from. For this example we are going to go with Allow: Tenant has full access to all job scheduling options
Then click on Save
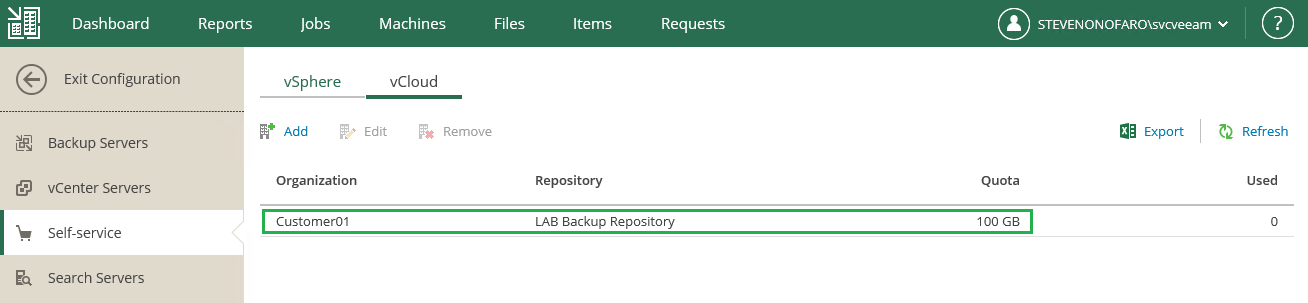
The tenant Customer01 has now been setup to access the backup portal for their VMs in vCloud Director
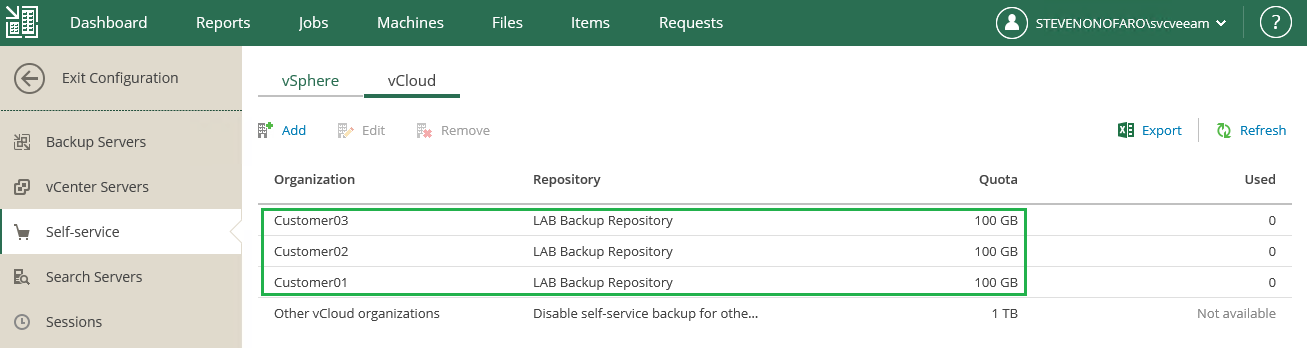
You can also go ahead and add in the other customers you have setup
You will need to also install an SSL certificate on the Enterprise Manager Server and edit the site binding in IIS to apply the certificate
Now let’s connect as the Tenant, in this example I have updated my dns to reference the external connectivity. Tenants will use the following url to access their backups,
https://backup.stevenonofaro.com:9443/vCloud/Customer01
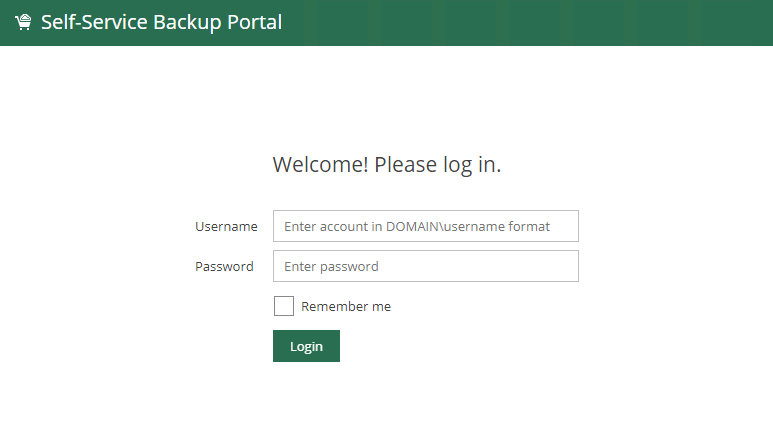
The customer will use their vCloud Director logon credentials to log into the Backup Portal so there is no need to manage any other accounts
The following is the Tenant View
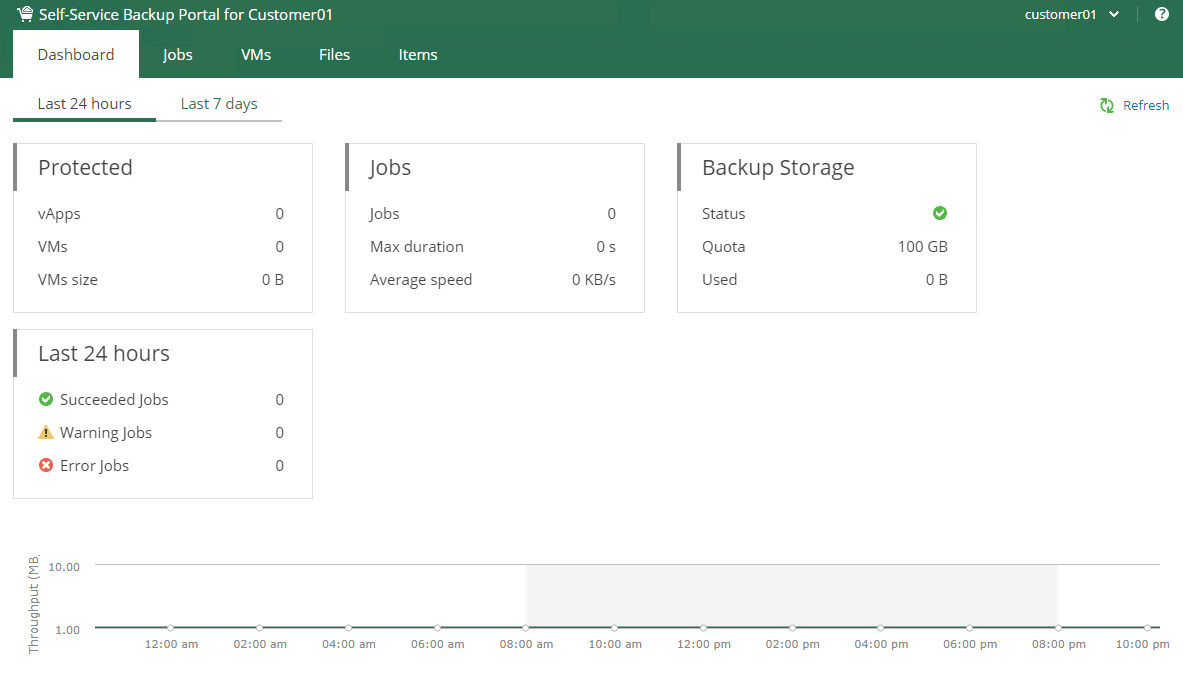
The customer can then go and create their own backup jobs for their VMs currently located in vCloud Director on the Service Provider side
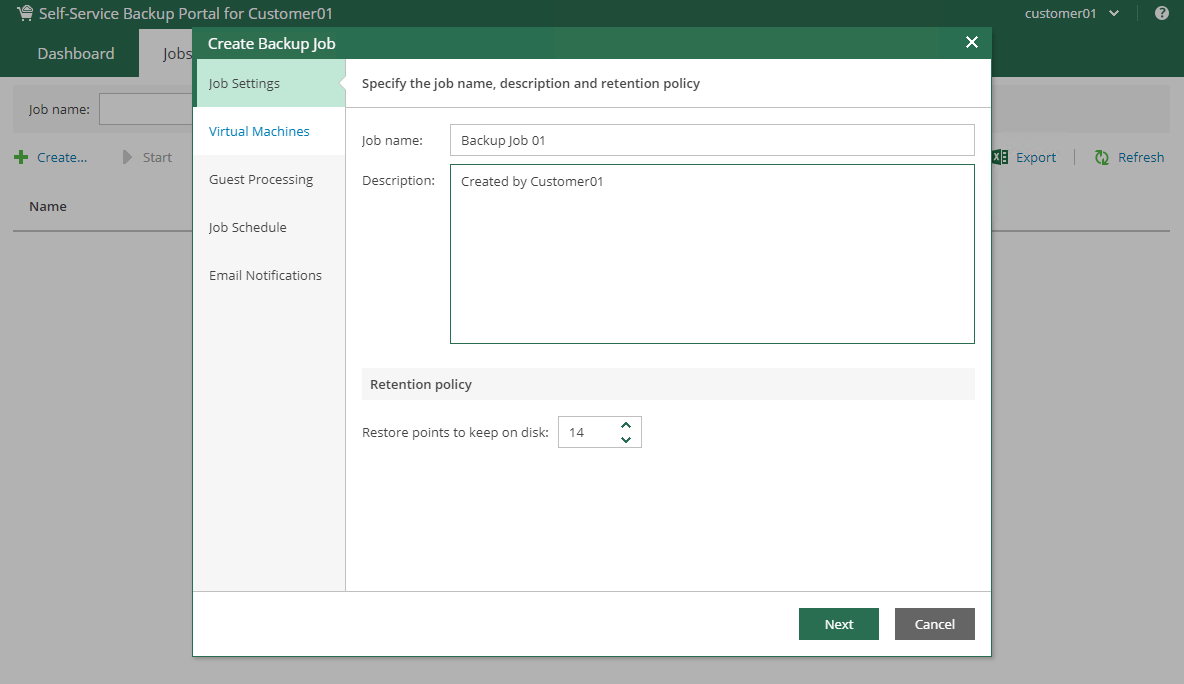
When the customer goes to add the VMs into the job they will only see their Org in vCloud Director. They can then select the VMs to backup and continue on to the guest processing settings.

Restore points, Guest Processing, Job Scheduling and Email notifications can all be setup and managed by the customer
The Service Provider can also provide a custom set of predefined backup policies for the customer to select and add their VMs too
Since no agents have been installed on the VMs the restore operations are performed using the VMware vSphere Guest Interaction API if you are using vSphere 6.5 onwards. If you are still at vSphere 6 it will still work via the Vmware VIX API
From the Machines menu the customer can perform full VM restores, Delete backups and Perform Quick Backups
The Files menu will allow the customer to mount backup jobs and perform file level restores. They can pick the date and restore point and mount the job. Locate the file they need to restore and click Restore. They will be able to restore or keep the file and even download it straight to the server they have launched the portal from which could be a management server within their allocation
The Portal itself can be completely customized and I have written a how to guide for the previous two versions of Veeam Enterprise Manager which you can find links to below
How to modify the default theme of Veeam Enterprise Manager 9.5 Update 3a
How to modify the default theme of Veeam Enterprise Manager 9.5 Update 4
Updated Tenant Portal Example

As always use the subscribe box above for new post notifications and follow me on twitter @steveonofaro
-
Veeam Enterprise Manager 9.5 Update 4
Enterprise Manager is a great product to help manage multiple Veeam Backup and Replication Deployments from one location. I want to walk through deploying and setting up the latest version of Veeam Enterprise Manager 9.5 Update 4 which will give you a good overview of the interface.
Some of the great features of Enterprise Manager,
Multiple VBR Server Management
Centralized Reporting
Password loss protection for encrypted backup or backup copy jobs
1-Click File-level Restore
1-Click Application Item-level Restore
Microsoft Exchange Mailbox Items Restore
Microsoft SQL Server Database Restore
Oracle Database Restore
Self-Service File Restore
Self-Service Backup Portal for vCloud Director
RESTful API Service
I will also be putting together another post showing you how to configure Veeam Enterprise Manager as a multi-tenant backup portal for vCloud Director so subscribe for updates!
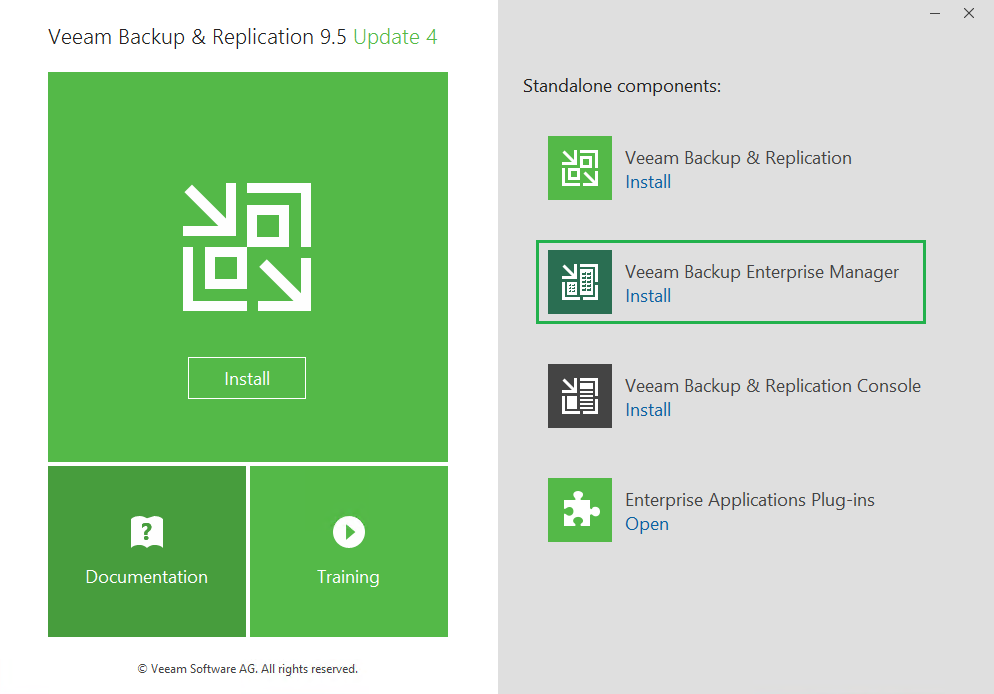
Ok let’s get it installed
Launch the Setup and click on Veeam Backup Enterprise Manager
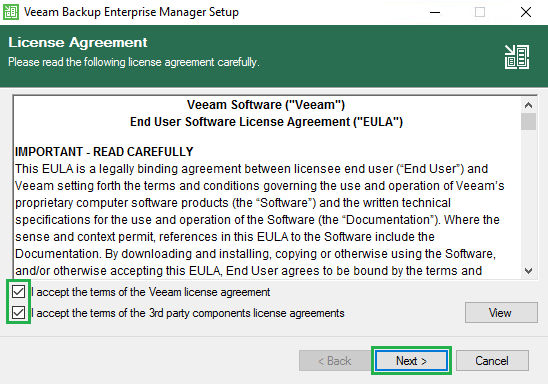
Accept the license agreement by ticking both boxes and click Next
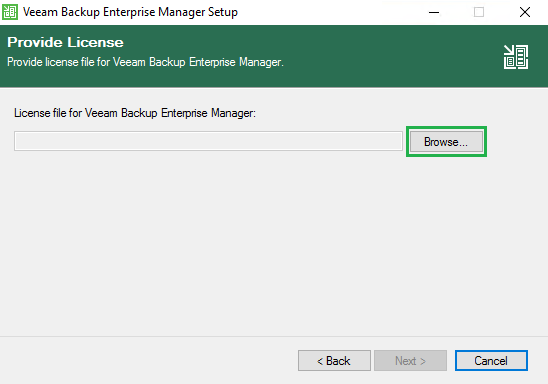
Click Browse and locate your license file and click Next
We want to install the default options here so click Next
I will cover the Cloud Connect Portal for Service Providers in a later post.

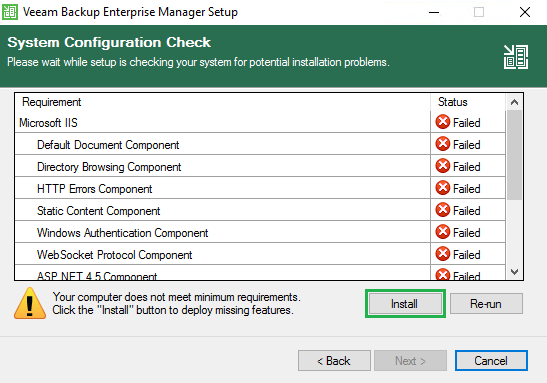
The next step checks the system for the installation pre-requisites. As you can see if it finds anything missing it will list them out here. Click Install to deploy the missing features
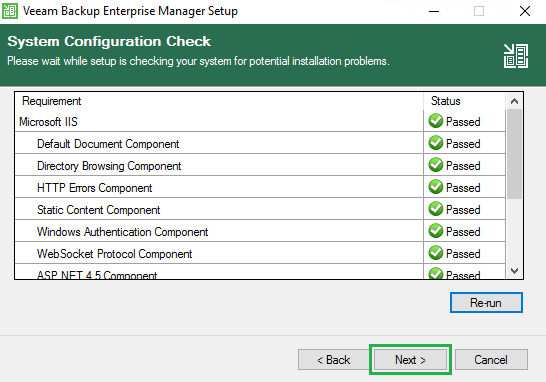
Once the missing features are installed click Next to continue
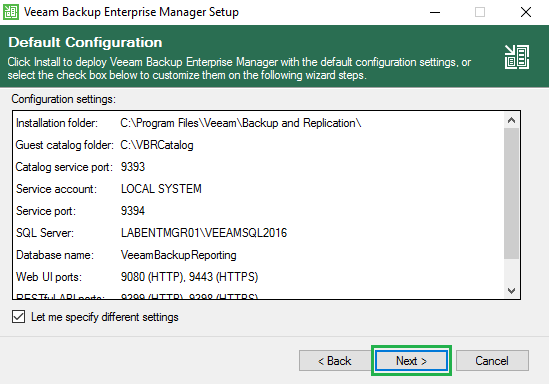
I have a separate SQL server instance so in order to use that instead of a local instance click on Let me specify different settings and click Next. If you want to run with the local install just leave the box un-ticked and hit Next
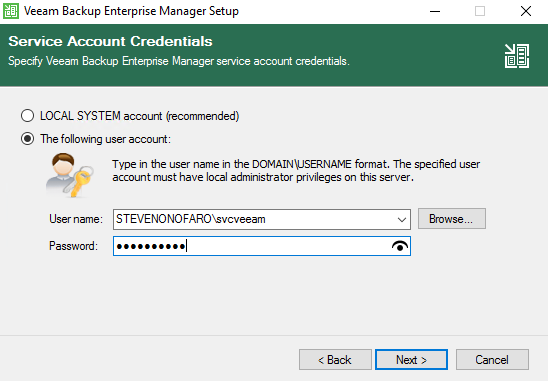
Here we specify the service account we are going to use. Make sure this account is a local administrator on the Veeam Enterprise Manager Server. Then click Next
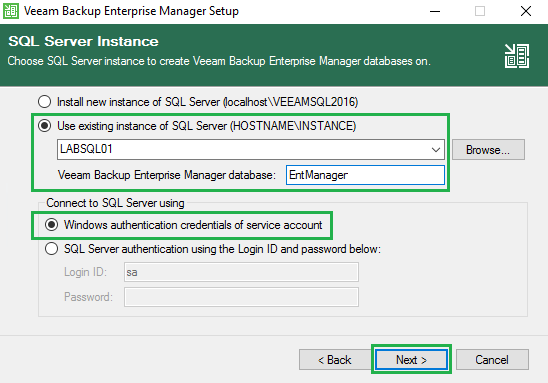
On my SQL Server I created a new database called EntManager and set my svcveeam user account as the db owner.
Below we specify the path to the SQL Server and the name of the Enterprise Manager Database. Then we need to specify the account we are using to connect to SQL. I have logged into this server with my svcveeam service account which I granted access to the EntManager database.
Select Windows authentication and then click Next
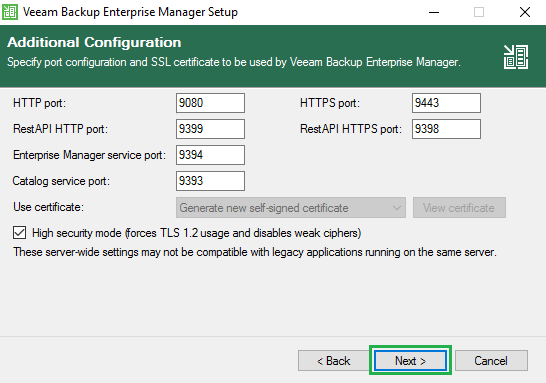
Take note of the ports that will be used and click Next
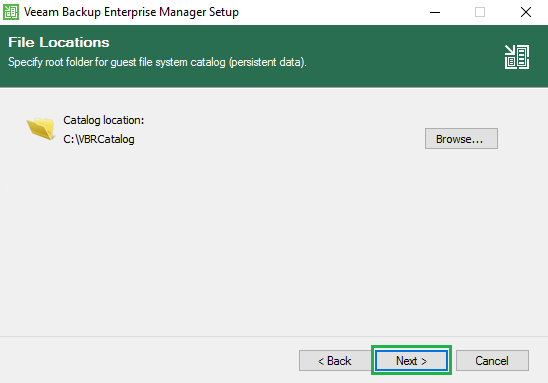
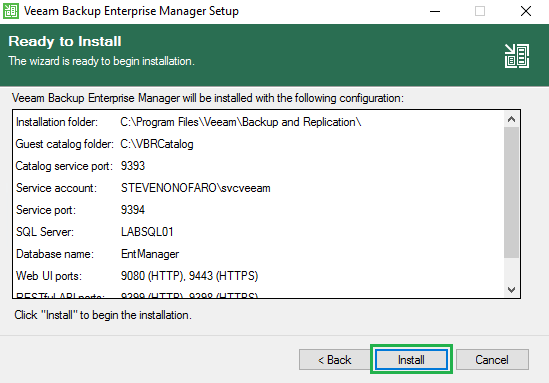
For this example we will go with the default values. Click Next
Review the settings and click Install
Once the installation completes click Finish
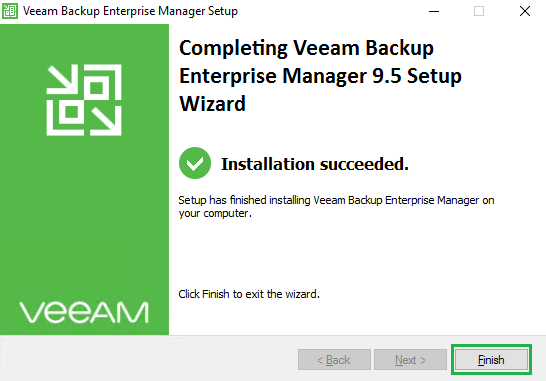
Launch Enterprise Manager from the icon on the desktop

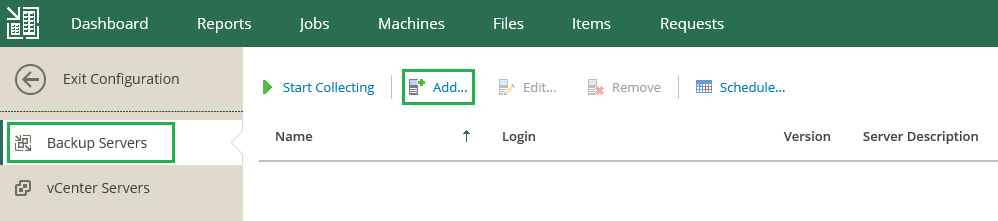
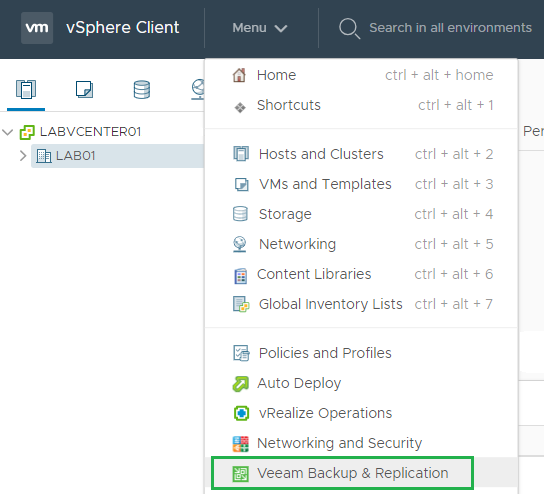
The new look Enterprise Manager interface will now open. It now time to connect Enterprise Manager to our Veeam Backup Server. Click on Configuration located at the top right hand corner of the menu

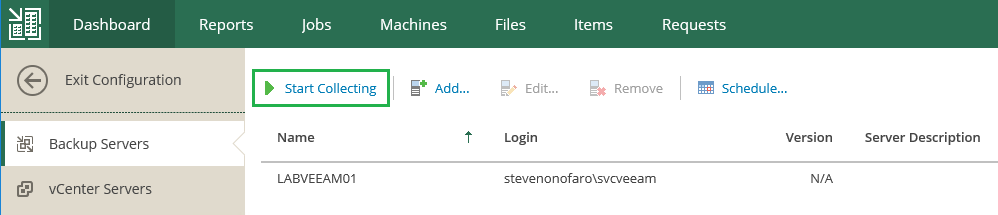
Click on Backup Servers on the left hand menu and then click Add
Then enter the DNS name or IP of your Veeam Backup & Replication Server and the logon credentials below. Then click Ok
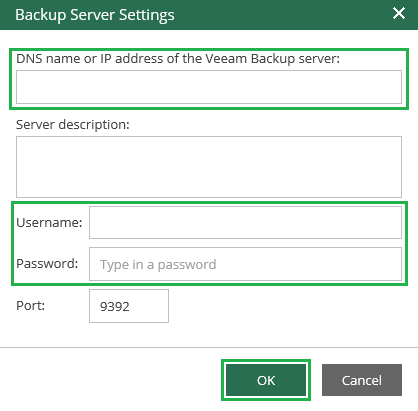
The Veeam Backup Server has now been added to Enterprise Manager. Click Start Collecting to kick off the data collection process
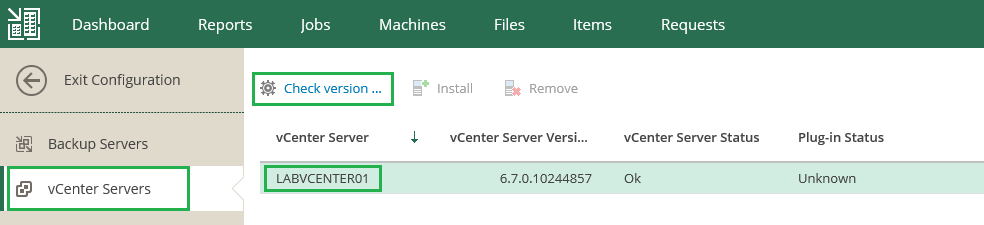
Next we are going to install the plugin on vCenter. Click on vCenter Servers in the left hand menu, then click on your vCenter Server to highlight it and then click Check Version
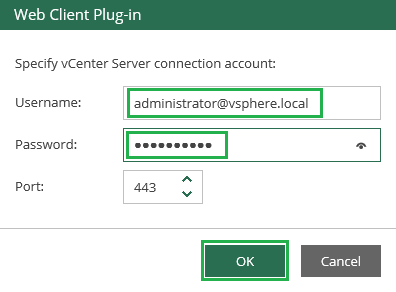
Then when prompted enter your vCenter credentials and click Ok
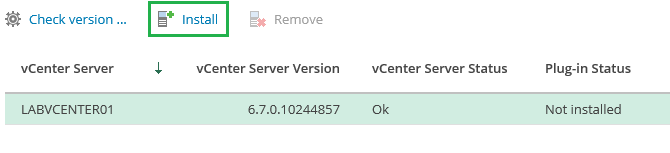
Now with our vCenter highlighted we can click Install. This will install the plugin into the web client
Once complete you will see the following screen

Then if you open up vCenter you will notice a new menu item
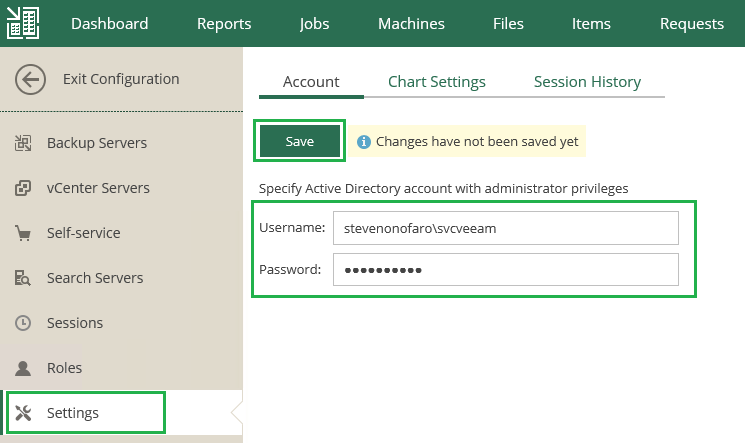
When you launch the plugin make sure the account that you have logged into vCenter with has access to connect to the Enterprise Manager Server otherwise it will not connect
Now specify an AD account here which has administrative privileges. Then click Save
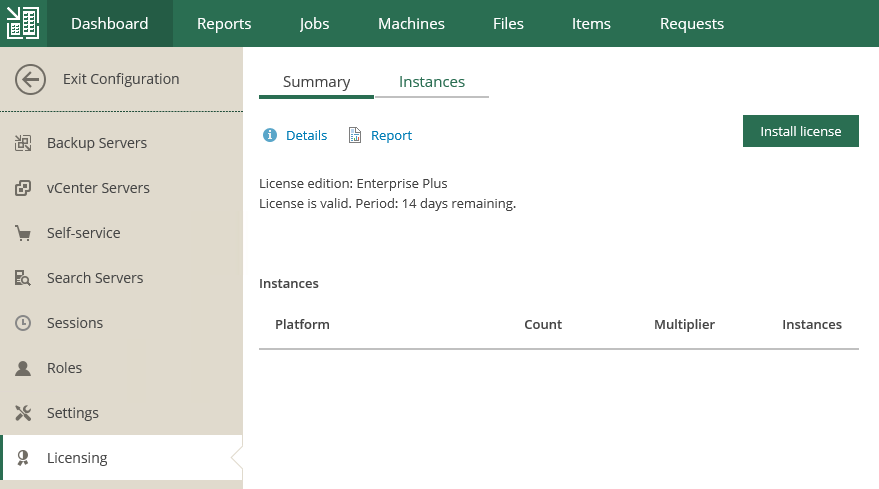
Licensing can be added or updated from the Settings section on the left hand menu. To do this click on Install License then select the license file and click Open. Then when prompted click Yes
Roles can be assigned to users or groups from the Roles section on the left hand menu. Click on Add then select either group or user, then enter the username or group name and select a role. By default you can choose from Portal Administrator, Portal User and Restore Operator

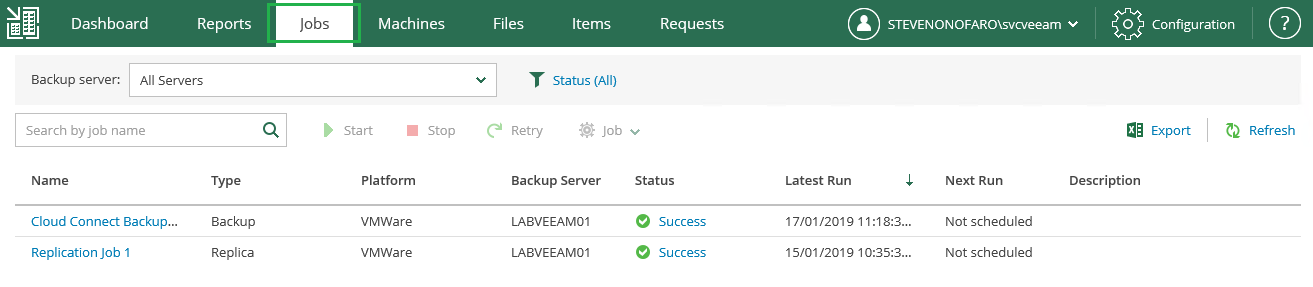
Most importantly users can manage backup and replication tasks by click on the Jobs button on the main menu at the top of the page
From the Machines menu you can kick off VM restores, manage Failover Plans, Delete backups and Perform Quick Backups

The Files menu will allow you to mount backup jobs and perform file level restores, just pick the date and restore point and mount the job. Locate the file you need to restore and click Restore. You can restore or keep the file and even download it straight to the server you have launched the portal from
I hope this post has helped you guys get started with Enterprise Manager 9.5 Update 4!
Stay tuned for my next post when I will walk you through integrating Enterprise Manager 9.5 Update 4 with vCloud Director 9.5 to create a multi-tenant custom backup portal
Subscribe for post updates and follow me on twitter @steveonofaro
-
Veeam Backup & Replication 9.5 Update 4 – Whats New and Cloud Connect Setup Guide
Veeam Backup and Replication 9.5 Update 4 RTM has finally been released and like most of you I have been hanging out to give the new feature set a trial run. One item in particular has really caught my attention and that is the ability to allow tenants to DR workloads directly into vCloud Director.
Some of the new features that have come out with Veeam Backup & Replication 9.5 Update 4 are as follows,
- Veeam DR directly into vCloud Director on the Service Provider Side
- Capacity Tier to age out data to S3 endpoints
- The ability to create Gateway Pools which are groupings of Veeam Cloud Gateways
- Cloud Connect tenant backups can now be written to tape
- Tenants can now reset their own passwords
-
The ability to run a virus scan on the VM prior to performing the restore with Secure Restore
- Support for vCloud Director 9.5 and Vmware 6.7 Update 1
So I thought I better get this setup and checkout some of these new features in my lab. Below are the servers I will be using for this basic deployment.
- Existing Domain Controller
- Existing SQL 2016 Server
- Existing vCloud Director
- Win2016 Server for Veeam Backup & Replication
- Win2016 Server for Veeam Backup Proxy
- Win2016 Server for Veeam Cloud Gateway
To take this to a proper production deployment you would need to add in additional proxy and cloud gateway servers. Also deploying one or two wan accelerators would be a good idea. These are all on windows 2016 servers and the process is straight forward once you have the main Veeam Backup Server deployed. Check out the Veeam sizing guides online to ensure you deploy each component to the correct scale.
Enabling CPU and Memory hot add on each VM is always a good idea so you can scale the deployment as it grows.
First lets look at deploying the database on our SQL server. If you just want to deploy the DB locally on your Veeam Server then you can skip the first few steps. Just remember to migrate it off as your environment starts to grow.
Open SQL Management Studio and create a New Database for Veeam Backup and Replication.
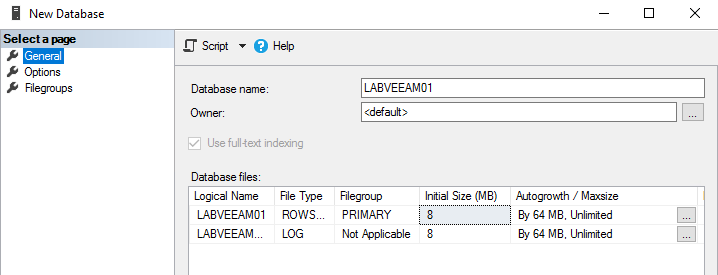
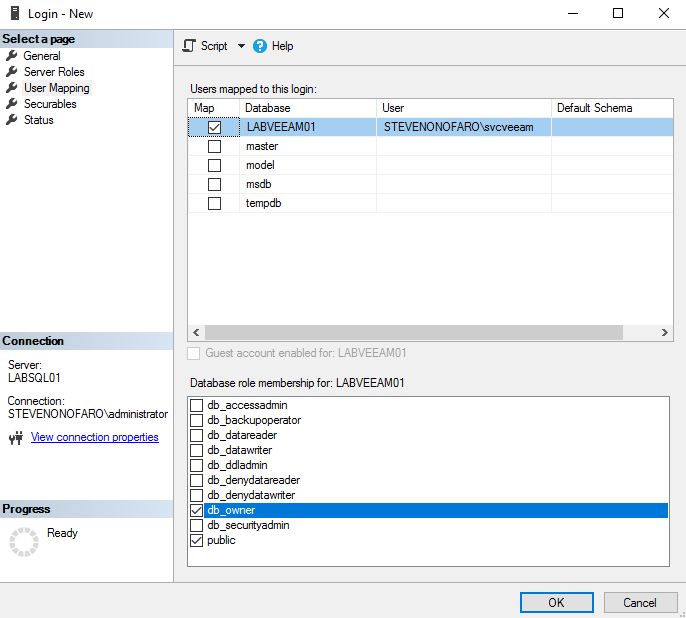
Then under Security add in the service account that you will use during the veeam deployment. I just created a svcveeam service account for this install. Then grant your service account access rights to the database by ticking db_owner as the database role membership
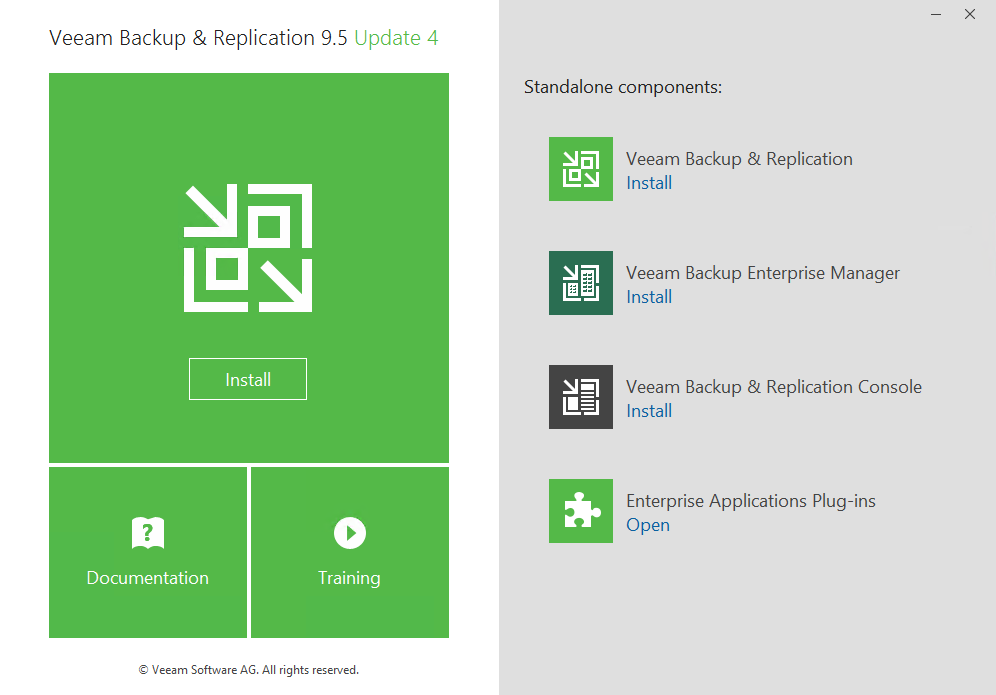
Next open the installer and click on Veeam Backup & Replication to start the installation
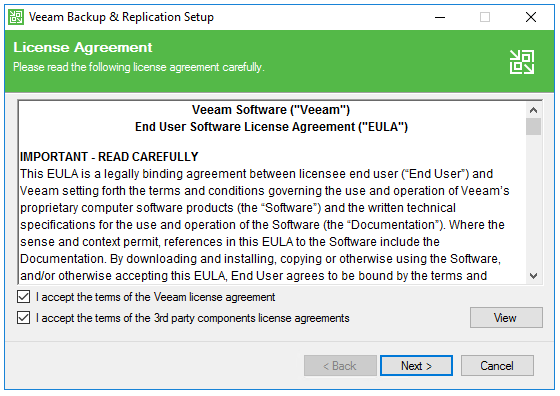
Agree to the terms and conditions by ticking both boxes and click Next
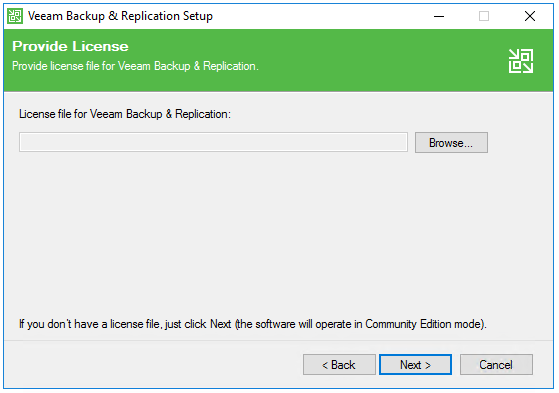
Select your license file and click Next
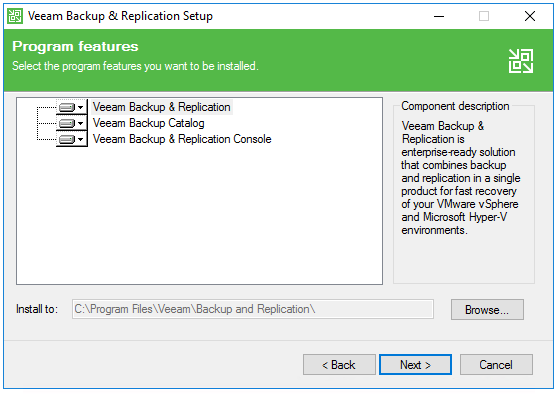
Review the components you will be installing and click Next
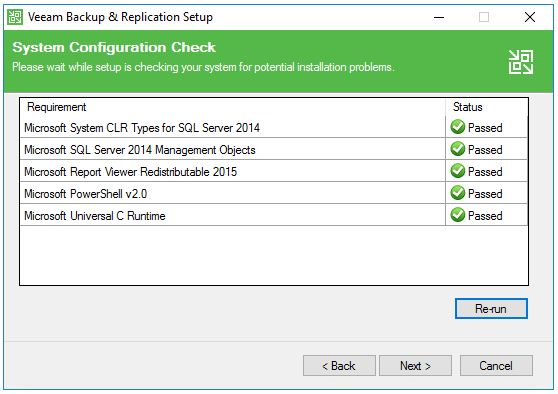
The setup will detect if you have all of the pre-requisites installed. Click the Install button to add in the missing items
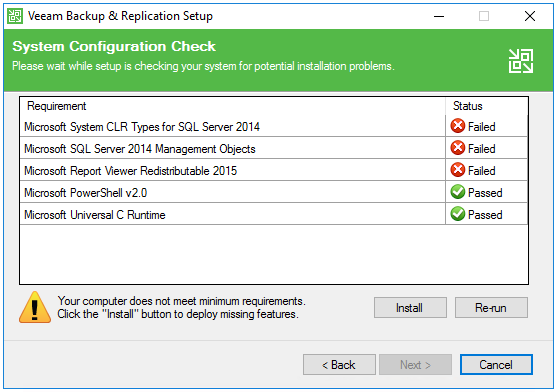
The missing features will then be added in for you
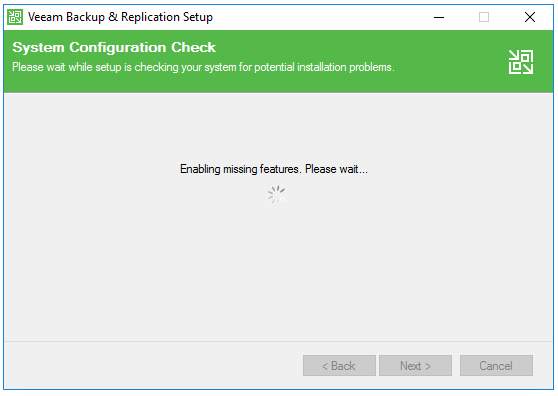
Once complete click on Next to continue
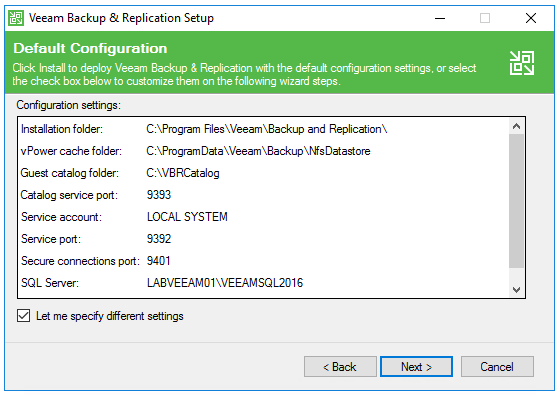
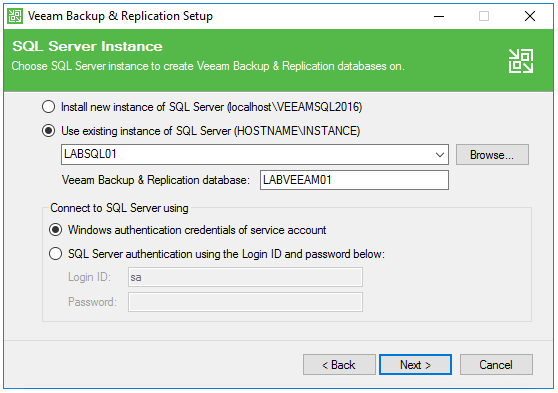
I have a separate SQL server instance so in order to use that instead of a local instance click on Let me specify different settings and click Next. If you want to run with the local install just leave the box un-ticked and hit Next
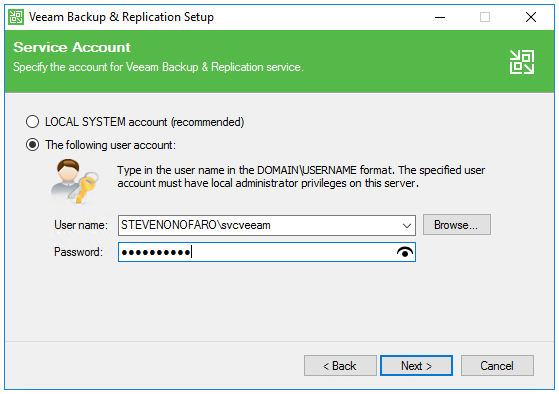
Here we specify the service account we are going to use. Make sure this account is a local administrator on the Veeam Backup Server
Below we specify the path to the SQL Server and the name of the Veeam Database. Then we need to specify the account we are using to connect to SQL. I have logged into this server with my svcveeam service account which I granted access to the LABVEEAM01 database.
Select Windows authentication and then click Next
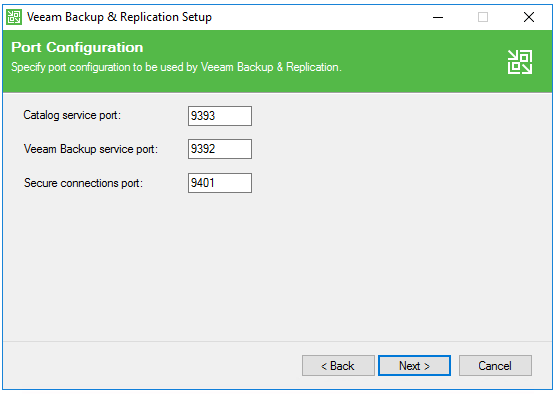
Review the port configuration and click Next
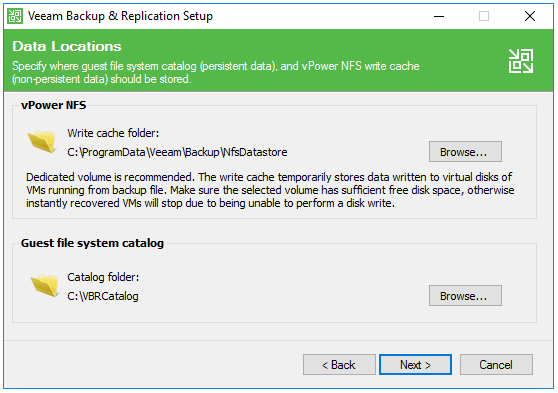
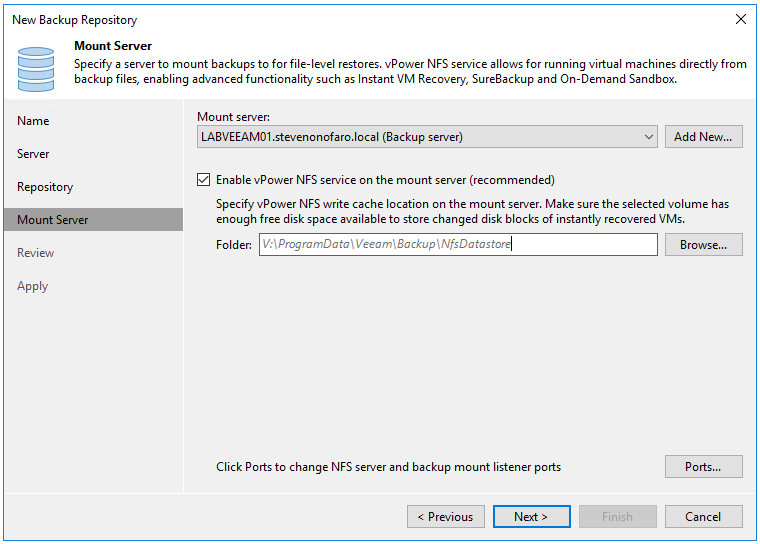
Select the location for your vPower NFS write cache and System Catalog and click Next. For this example I am going to use the default values as I am running this up in my lab. If this is production it would be a good idea to specify a separate location for the vPower NFS write cache
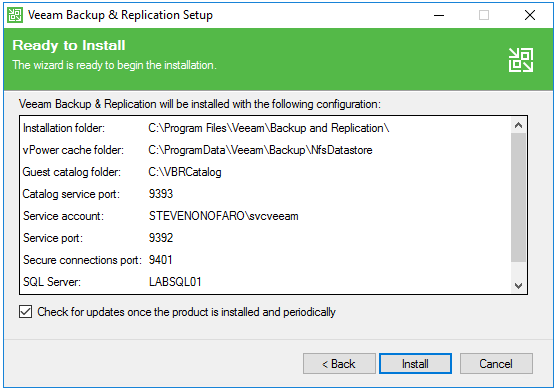
Review your settings and click Install
Click Finish to complete the installation
Launch Veeam Backup and Replication and click Connect
Notice the new updated look on the startup page
The Veeam Backup and Replication Console will now load
Next lets add in our new Veeam Proxy Server, click on Backup Proxies and then click Add Proxy then select Vmware vSphere
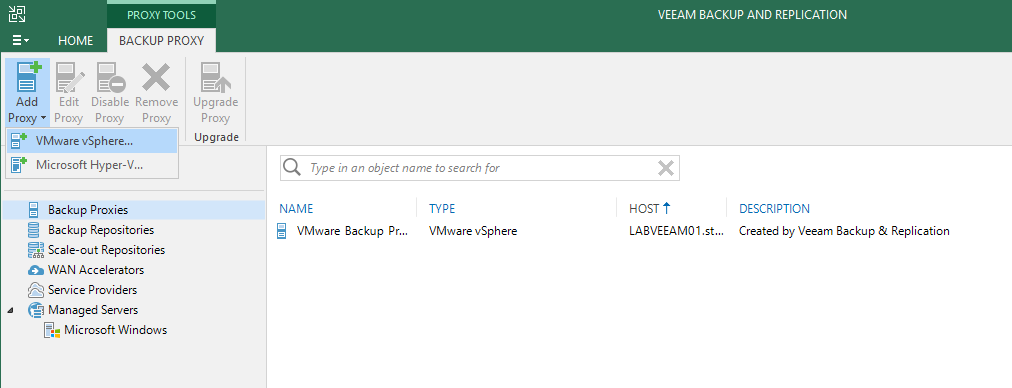
Then the New Veeam Proxy setup box should appear
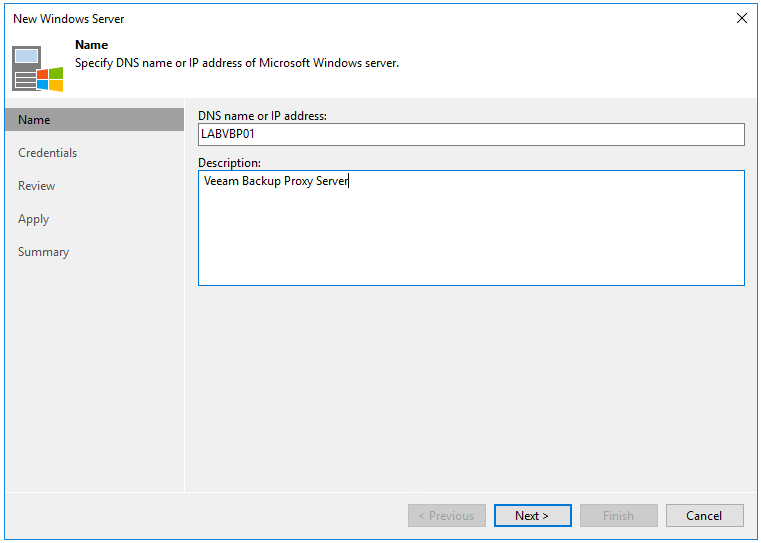
Click the Add New button, then enter the Name of the Win 2016 Server you would like to setup as a Veeam Proxy. Then Click Next
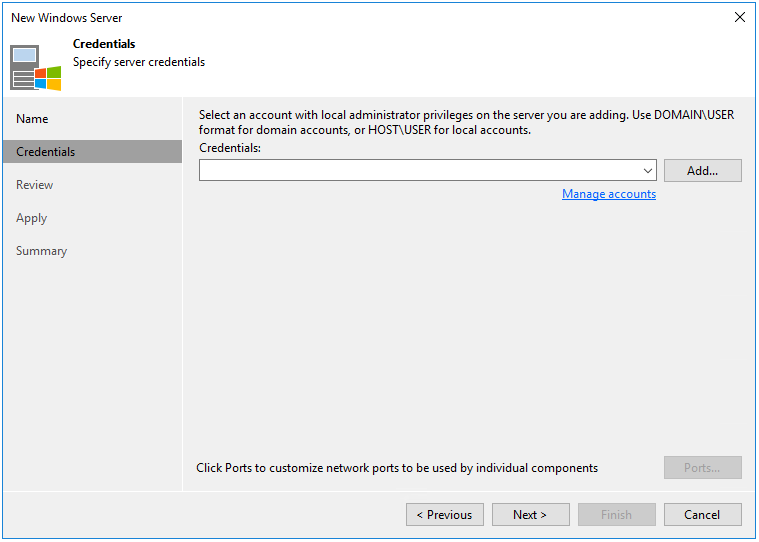
Next add in the svcveeam service account we used earlier. Ensure that this account is also a local administrator on the Win2016 server you are setting up as the Veeam Proxy
The installer will now detect any previously installed components. The Review screen shows that the transport role will now be installed. Click Apply

Wait for the role to be installed. Once complete click Next
Then Finish

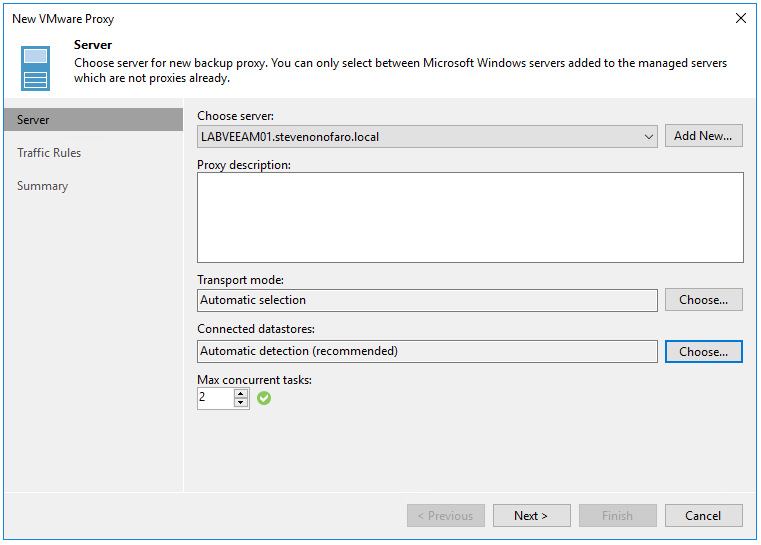
Next we need to setup the new Veeam Proxy Server. Depending on how you size the VM will determine how many concurrent tasks you can run. As this is only in my lab I have not given the VM many resources.
The Veeam Proxy Server requires 1 vCPU per task (per vmdk attached to a VM it is backing up), 2GB of ram per task and a minimum of 500GB disk space per task.
I will be using the default values for Transport mode and Connected Datastores. Then click Next

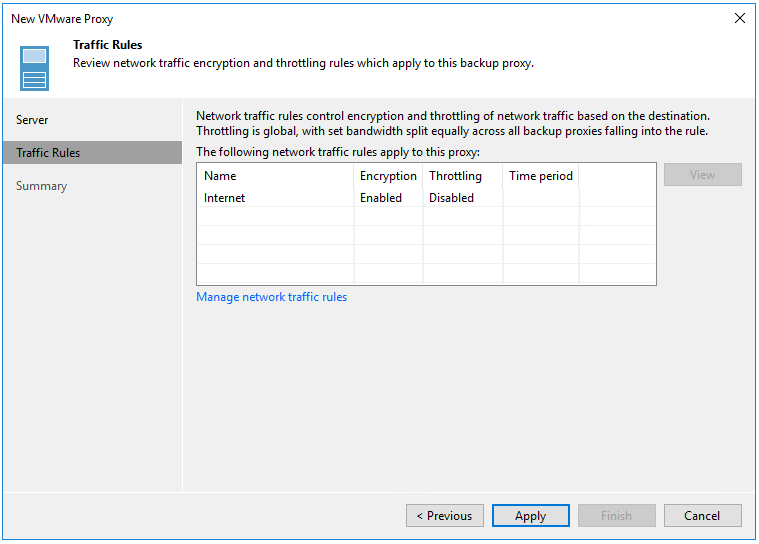
The next section allows you to configure traffic rules to control encryption and throttling. I will be using the default values again. Click Apply
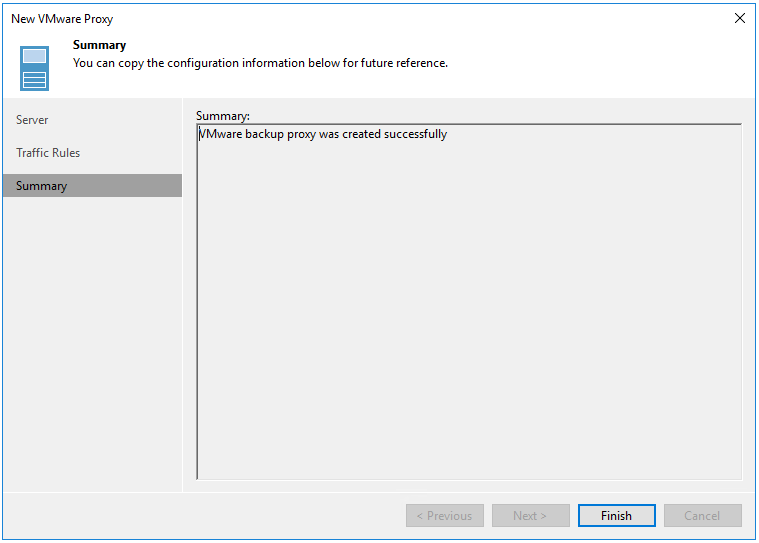
Then click Finish
Next select Backup Repositories and click Add Repository

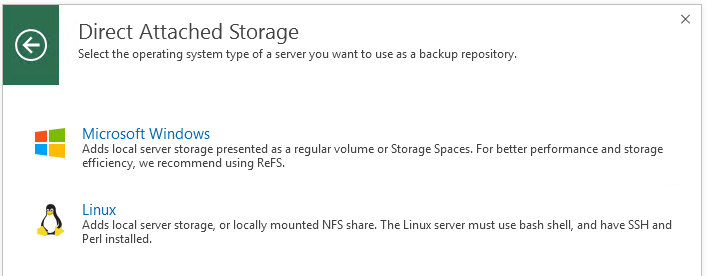
Select the type of Backup Repository you would like to add and follow to prompts to complete. For this deployment I am just going to use some Direct attached storage.
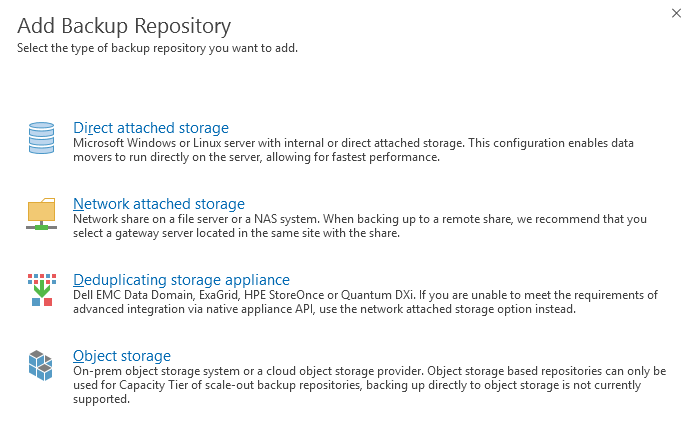
Select Microsoft Windows
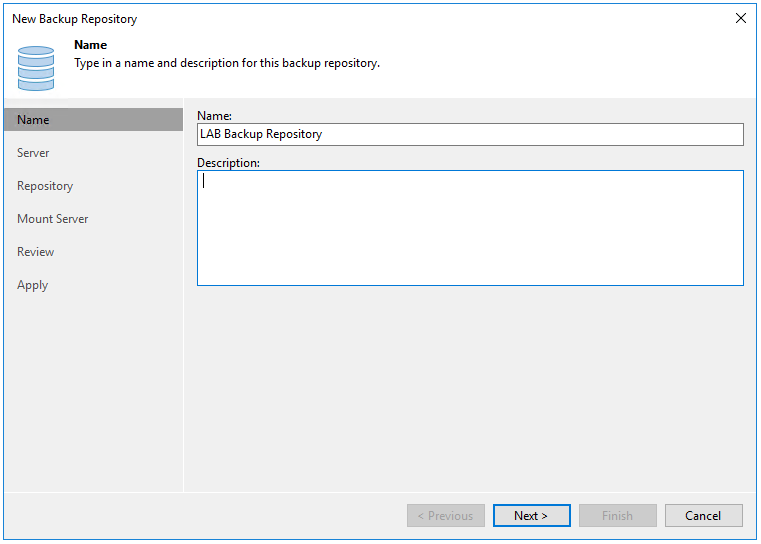
Give the backup repository a Name and click Next
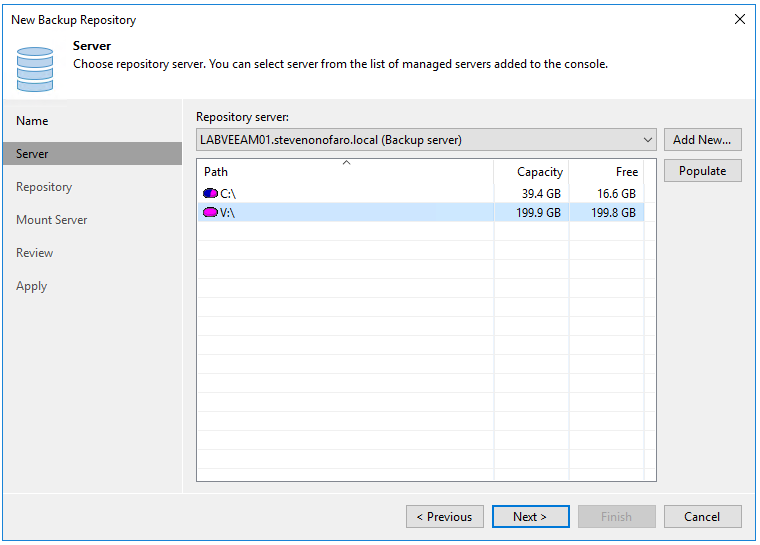
Add in a different server or click Populate if you have mapped the drive to this Veeam Server. Select the drive letter and click Next
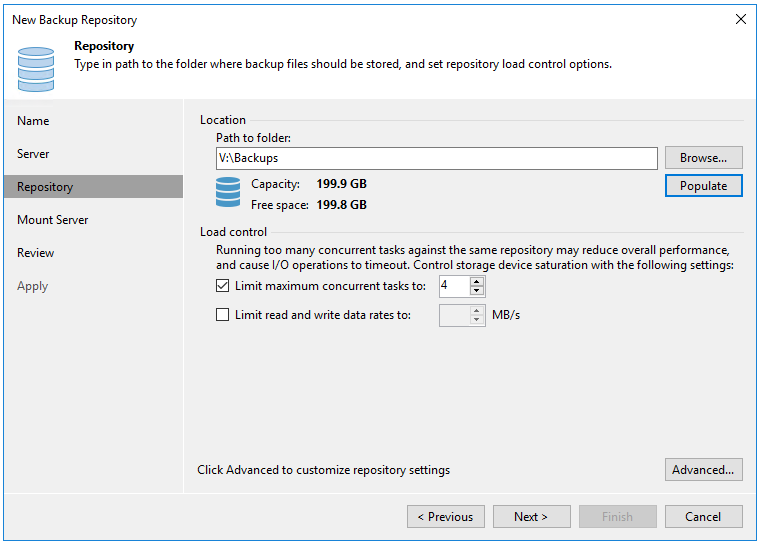
Set the folder path and maximum concurrent tasks then click Populate so check the volume size, then click Next
For this deployment I am accepting the default values for vPower NFS write cache but you can choose an alternate location. Click Next
Review your settings and click Apply
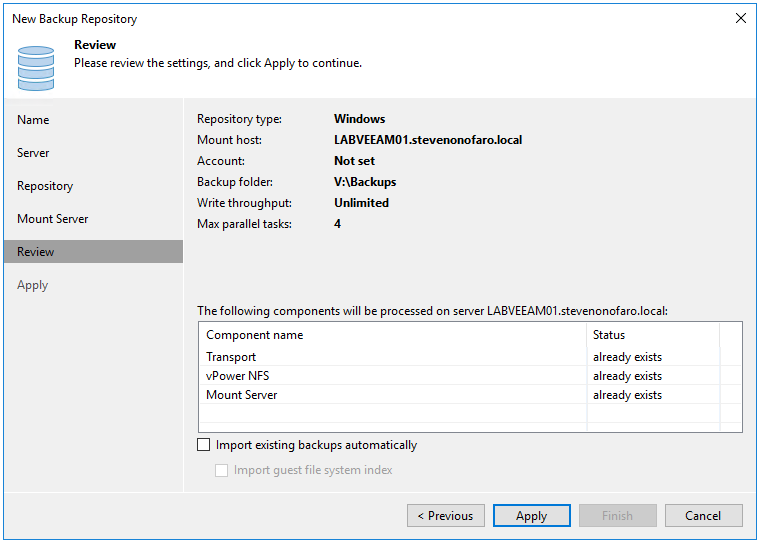
Then click Finish once complete

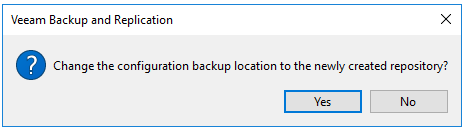
Then click Yes to change the configuration backup location
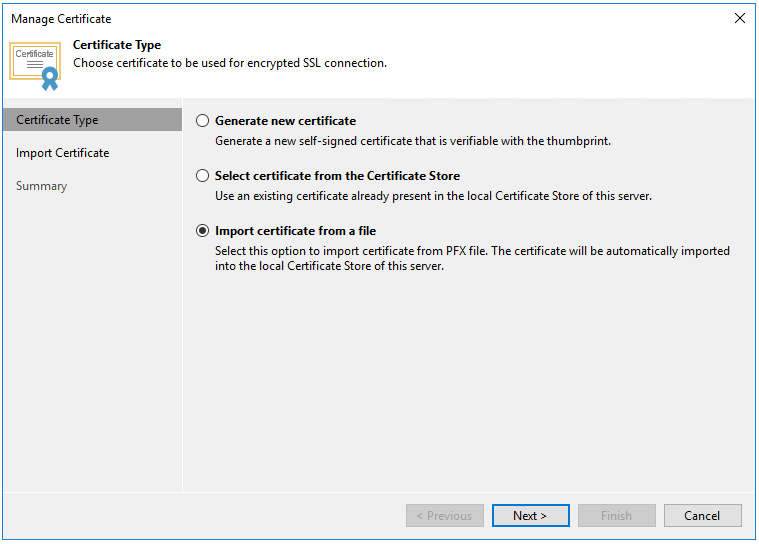
Next its time to install our Public Certificate on the Veeam Backup Server. To do this click on the Cloud Connect Menu. Then highlight Cloud Connect and click on Manage Certificates

Then follow the wizard to import your certificate from file. If you have the certificate saved as a PFX file then select Import Certificate from a file and follow the prompts.
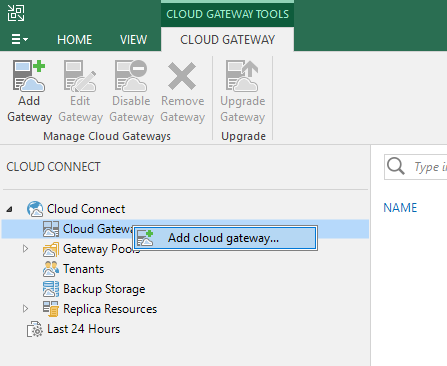
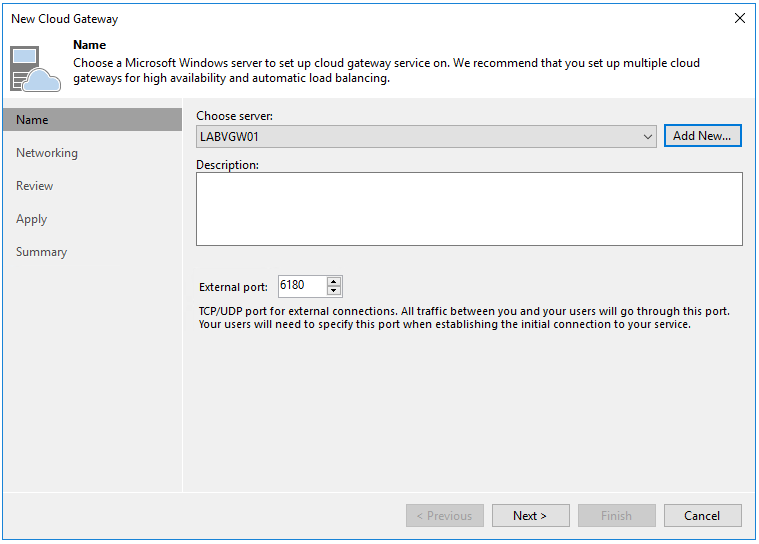
Now it’s time to setup the Gateway Server, this is the server that the clients will connect to from their on premise Veeam Instance. It’s a good idea to setup at least two gateways as a minimum. I am currently settings this up in my lab with limited resources but just repeat the process to install additional gateways.
In Update 4 Veeam has introduced Gateway Pools, with this feature you can group multiple gateways and present them to separate tenants.
Ok to get started right click on Cloud Gateways then click Add cloud gateway
Then click Add New to add the new windows server we will be using as the gateway
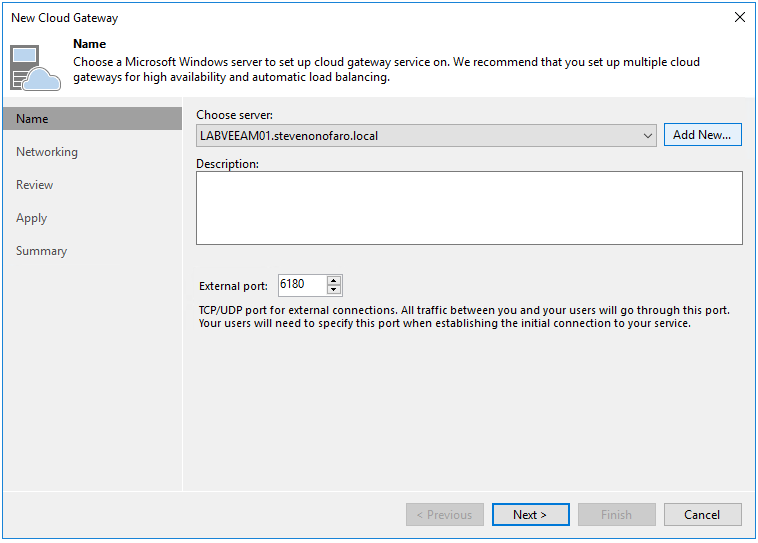
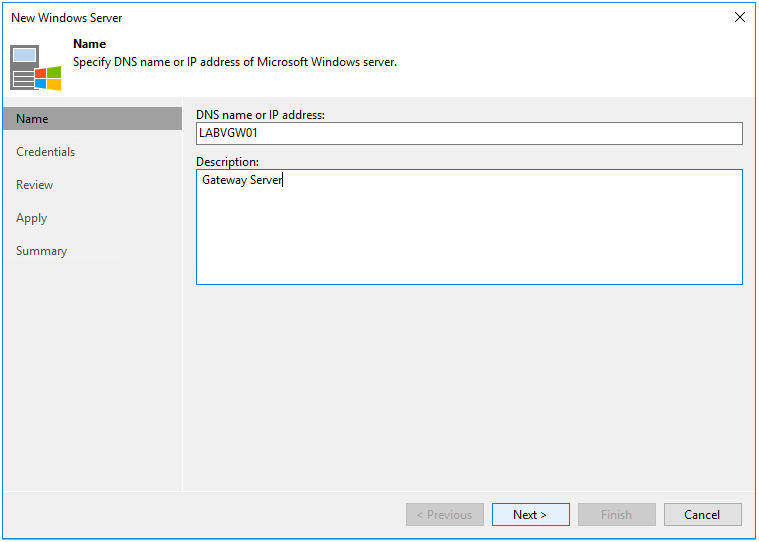
Enter the Server Name or IP and click Next
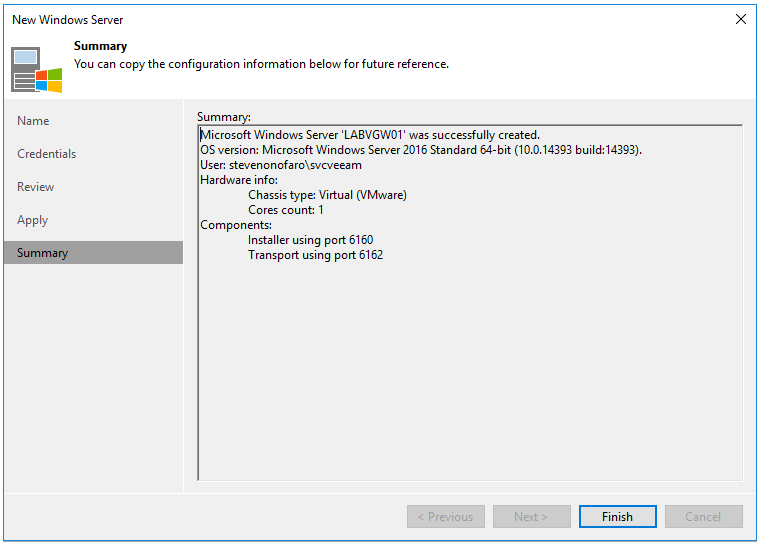
Select the server credentials to use from the drop down menu or add a new account by clicking Add. Then click Next

The Transport component will now be installed on the server. Click Apply to continue

Once the install is complete click Next

Then click Finish
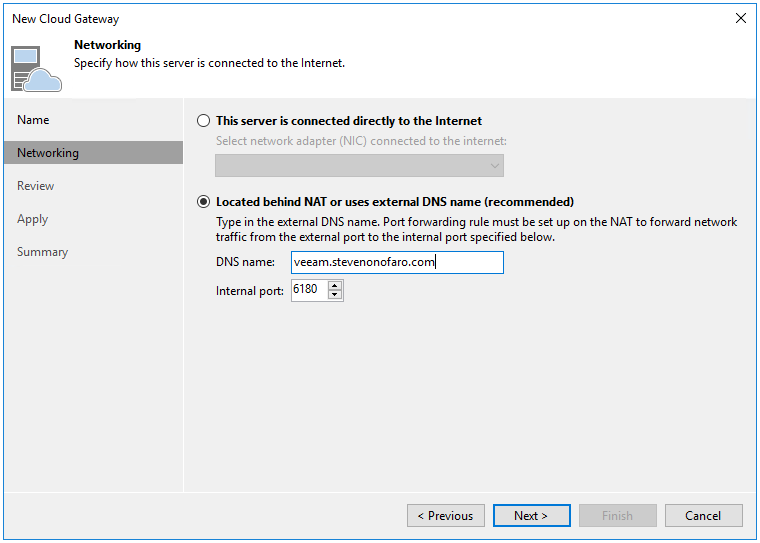
Now it’s time to setup the new Gateway Server, click Next
Select located behind a NAT and enter the external DNS name you will be using for the deployment. Keep in mind you will also need to setup the external DNS then say nice things to your network admin and ask him to configure the NAT for you.
Then click Next
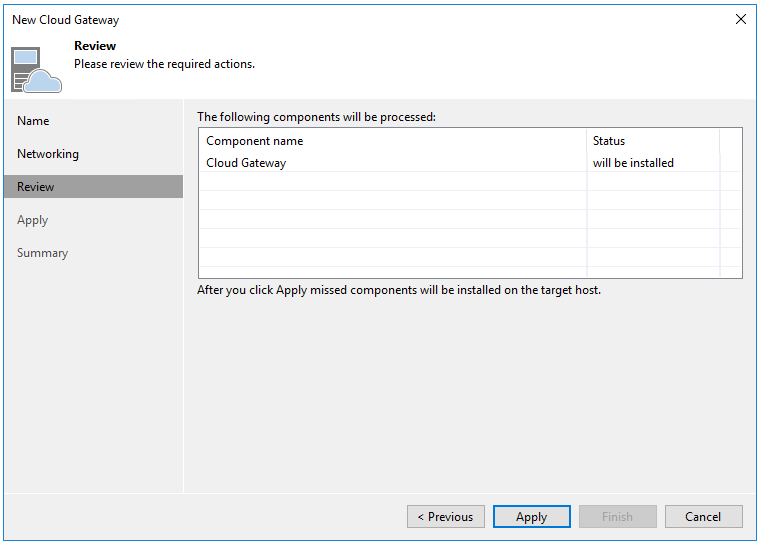
The Cloud Gateway Component will now be installed, click Apply
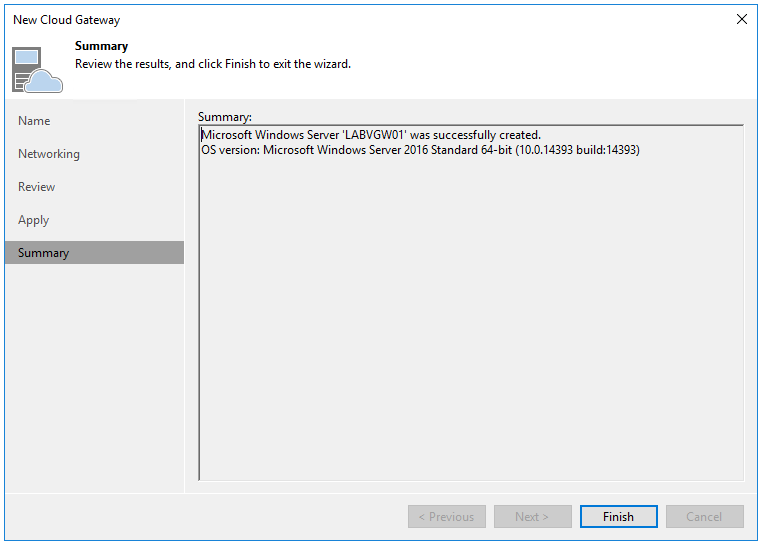
Once the install is complete click Next

Then click Finish
Next lets add in our vCloud Director Server. Under Backup Infrastructure click on Managed Servers, then Add Server. Then click on Vmware vSphere
Then select vCloud Director
Enter the vCloud Director Server Name or IP Address and click Next

Next add in your vCloud Director credentials then click Next
Select the vCenter and click Apply
Accept the certificate and on the Apply screen click Next
Then on the Summary Screen click Finish

Tenant Side Setup
Now lets walk through how a tenant will connect to our Veeam instance from their on premise Veeam Server
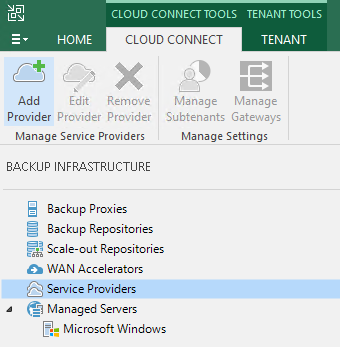
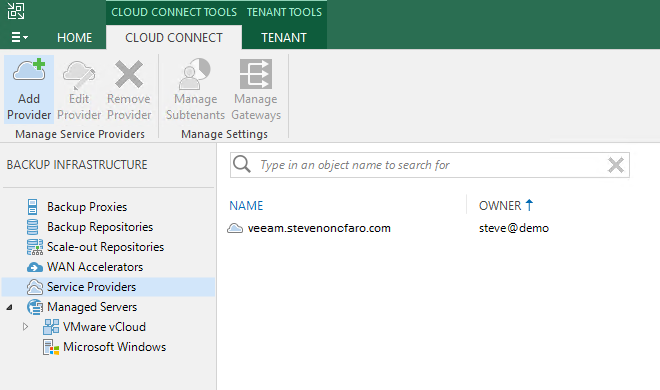
Click on Backup Infrastructure then select Service Providers, then click Add Provider
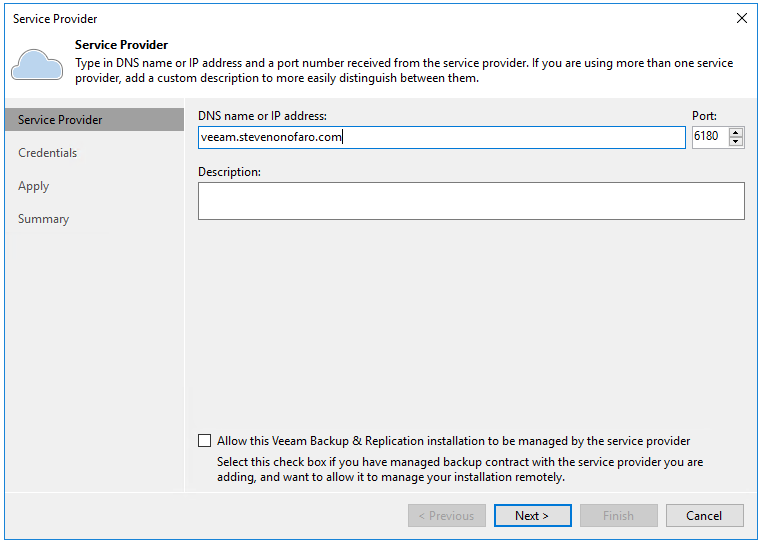
Then enter the DNS Address provided by your Service Provider and click Next
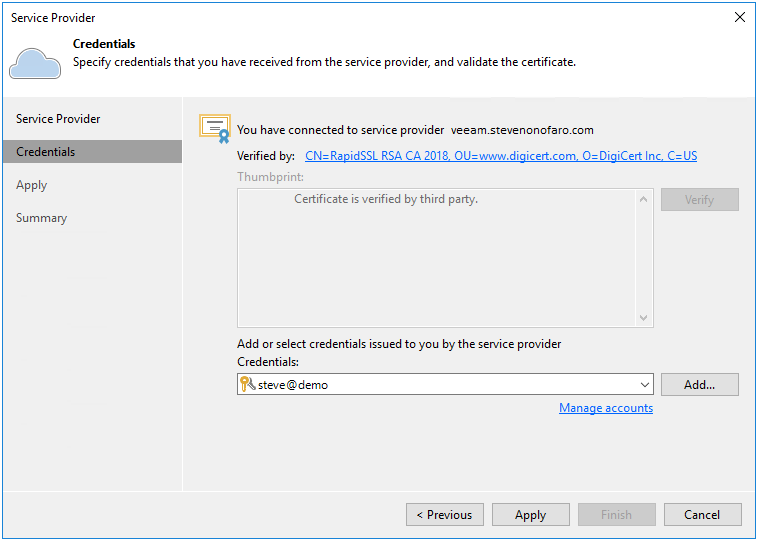
The Service Providers certificate will be validated. Then click Add and enter the credentials you were supplied.
The account used will be the vCloud Director user credentials that are configured on the Org you will be connecting too. Make sure you enter the username in the following format username@Org-name
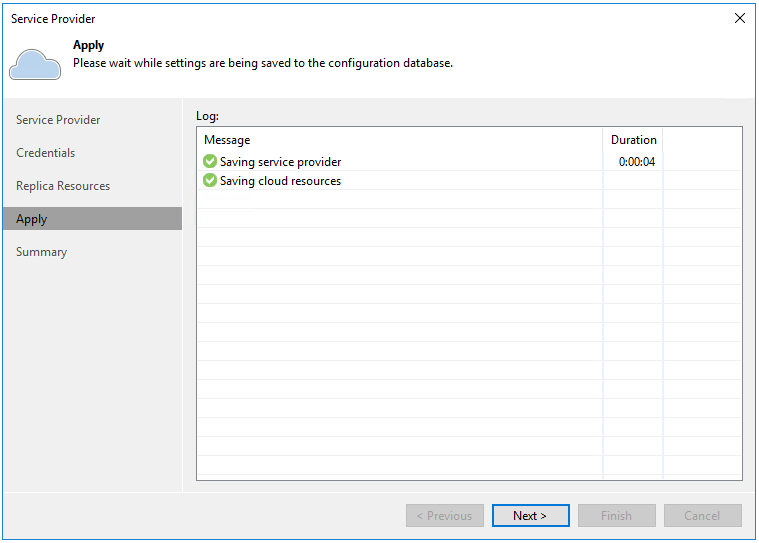
Then click Apply
Then click Apply
Then click Next
Then on the Summary screen click Finish
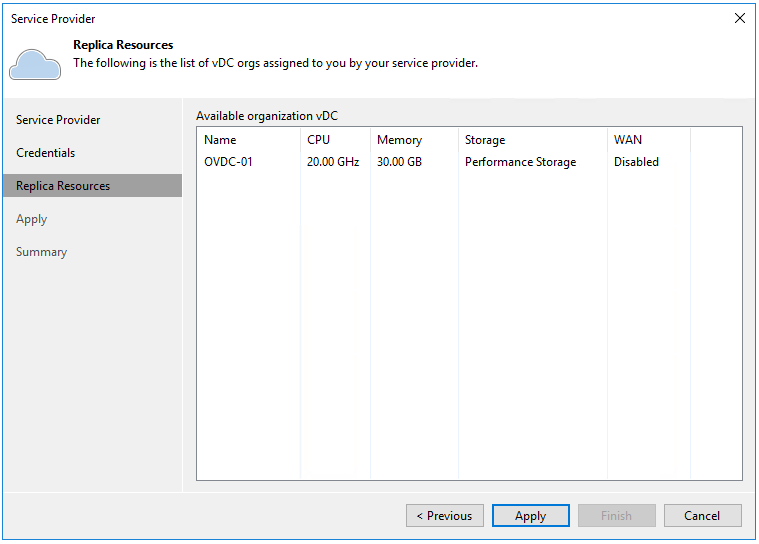
You are now all setup and ready to configure replication Jobs to your vCloud Director Org hosted by your Service Provider using Veeam Cloud Connect
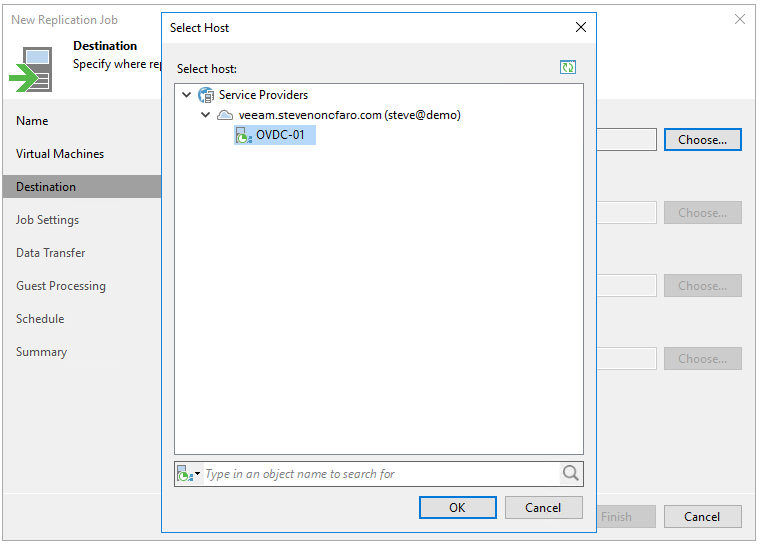
When you create the Replication job you need to select Cloud host on the Destination section
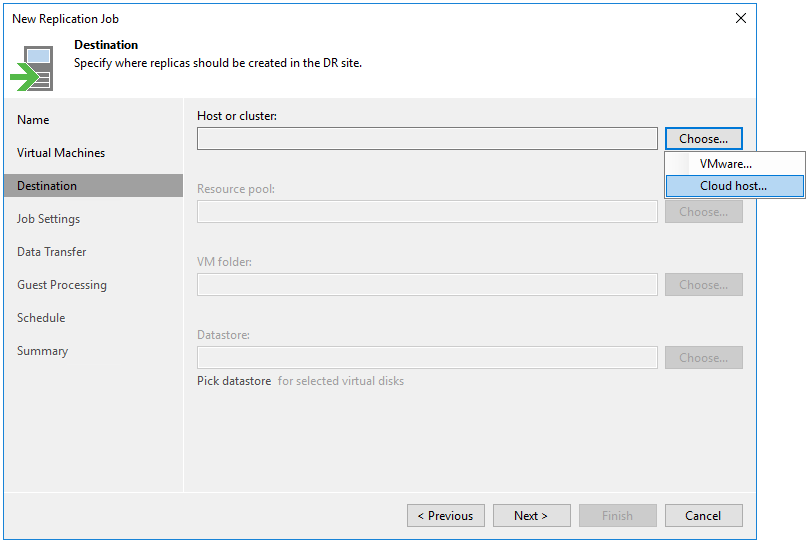
Then select your Service Provider connection and Org VDC and click Ok. Then continue to configure the replication job
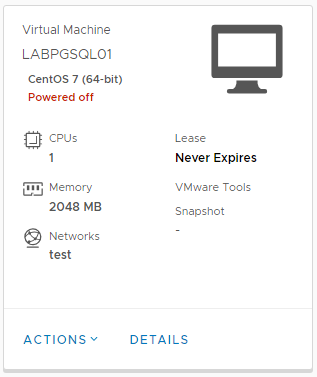
Configure the job settings you prefer and start the replication

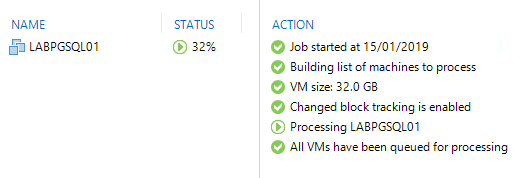
Then log into the vCloud Director portal on the Service Provider side and you should see the VM that you are currently replicating. The VM will remain in a powered off state until you are ready to failover
I hope this has helped you with your Veeam Cloud Connect Setup and has given you a good look at the new DR to vCloud Director feature! This addition is definitely going to take off so get on-board and take it for a test drive!
Subscribe above for new post notifications!
-
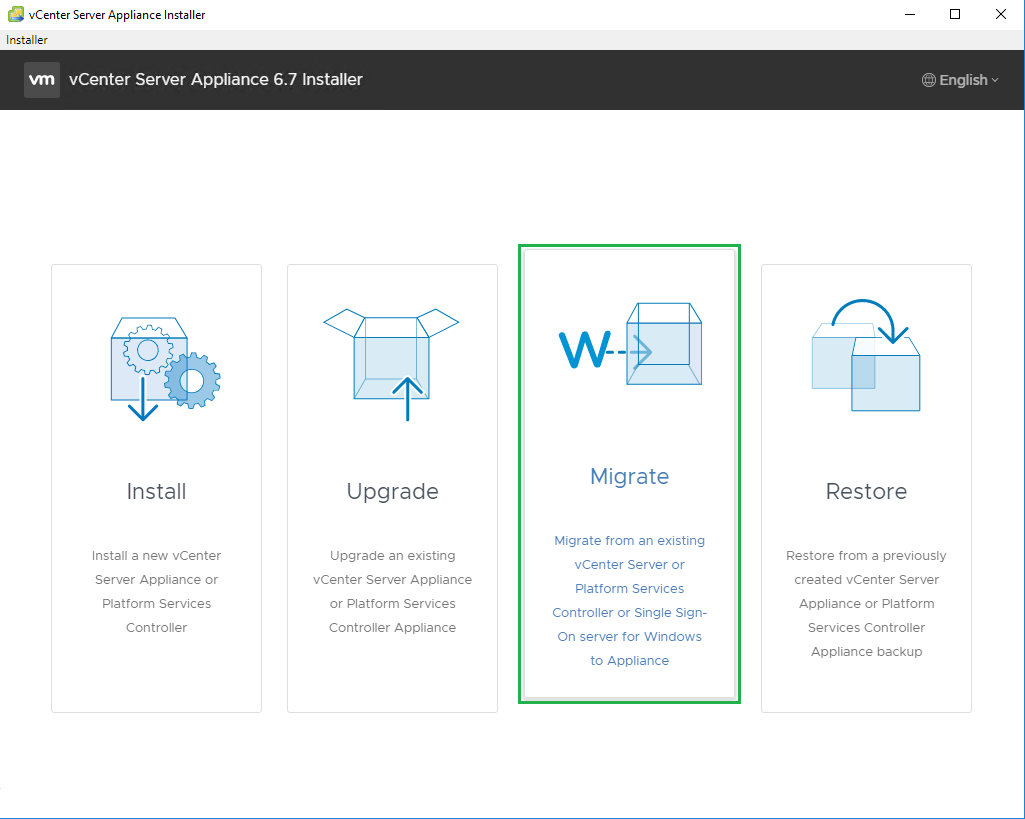
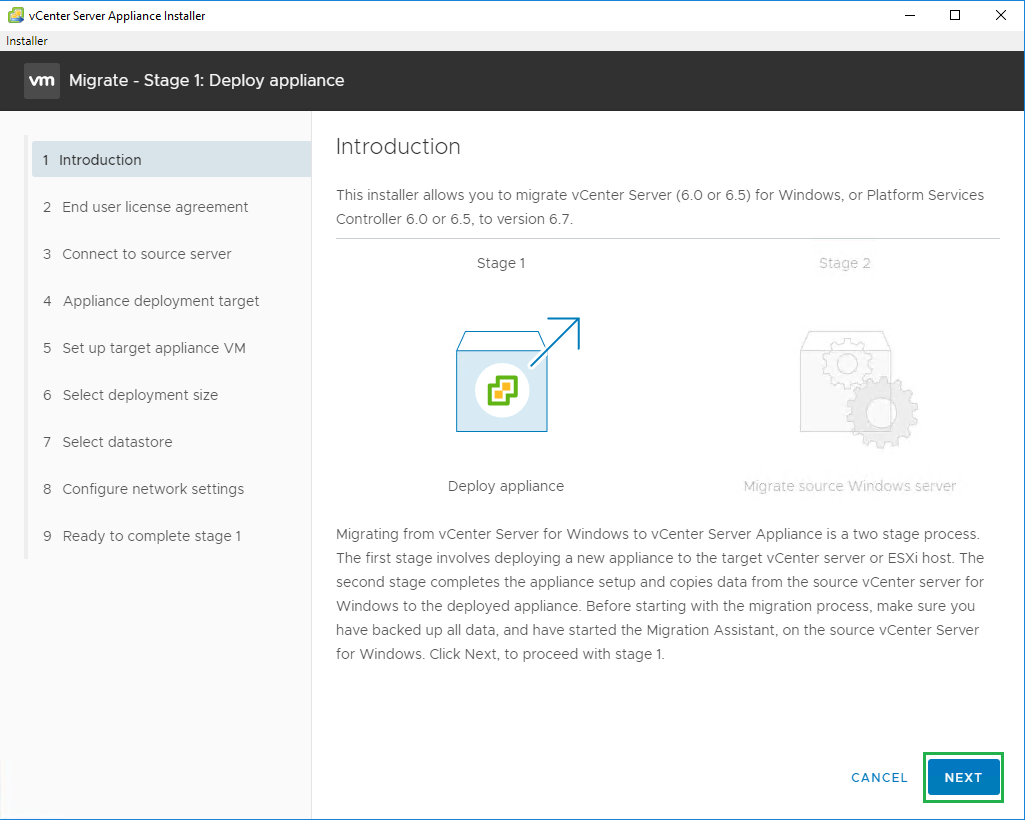
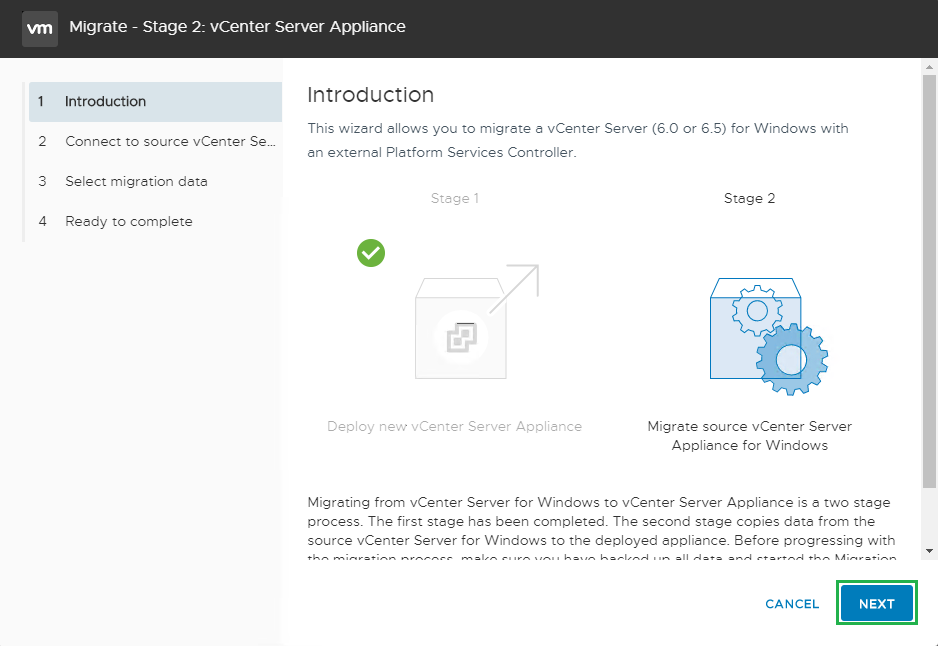
vCenter 6.5 Windows Server to vCenter 6.7 Appliance Migration Guide
For those of you out there running a windows based vCenter 6.5 Server I thought I would put together a guide to help you with your migration to the vCenter 6.7 Appliance.
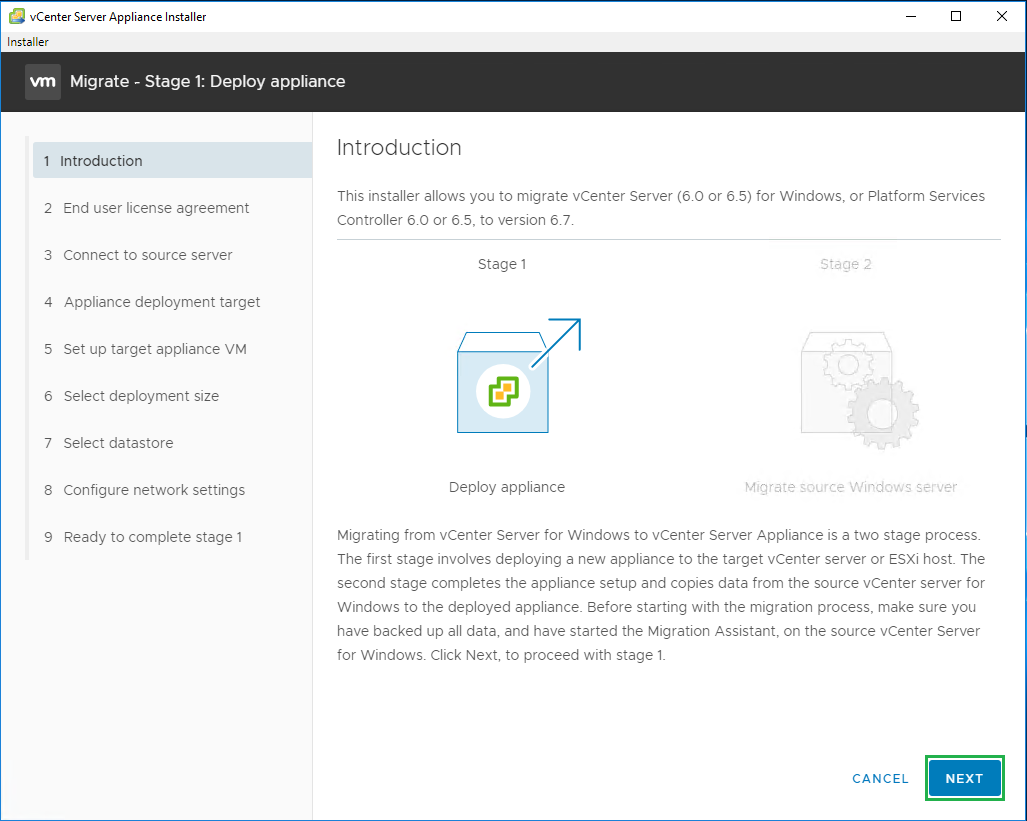
The following post will walk you through migrating your Windows based Platform Services Controller and vCenter Server to two separate 6.7 Appliances. Update Manager is built into the vCenter Appliance so we won’t be migrating our old windows one but I will mention the steps when required.
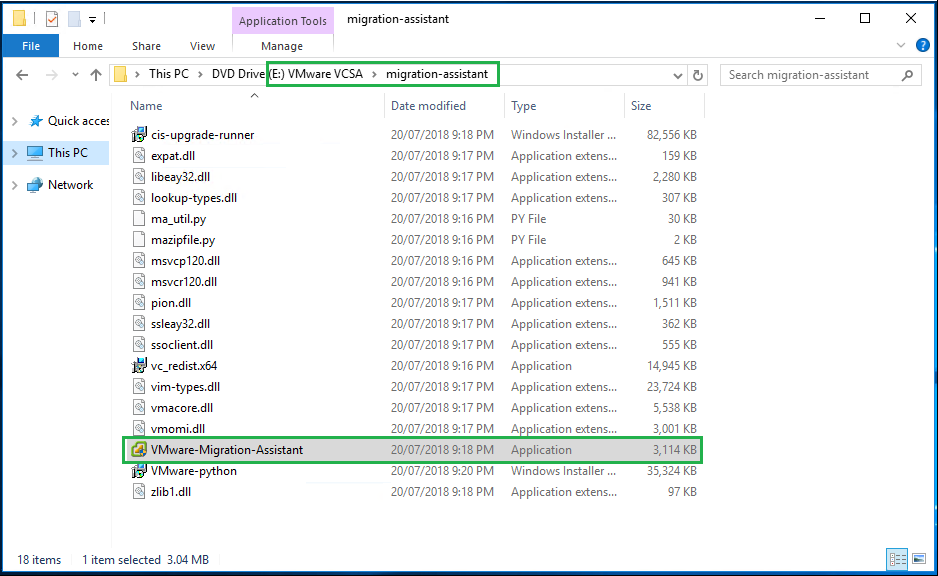
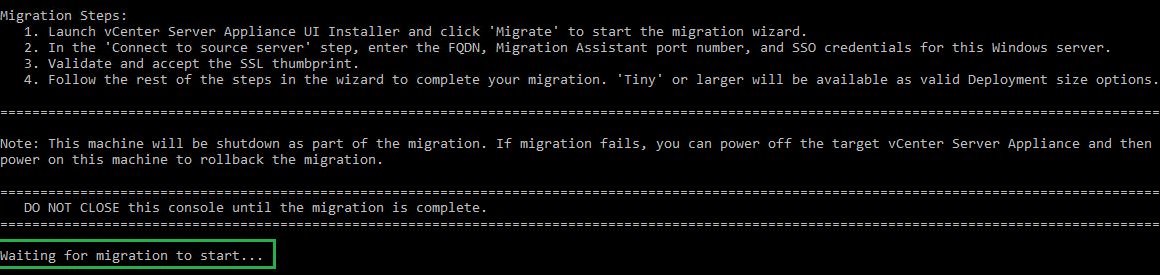
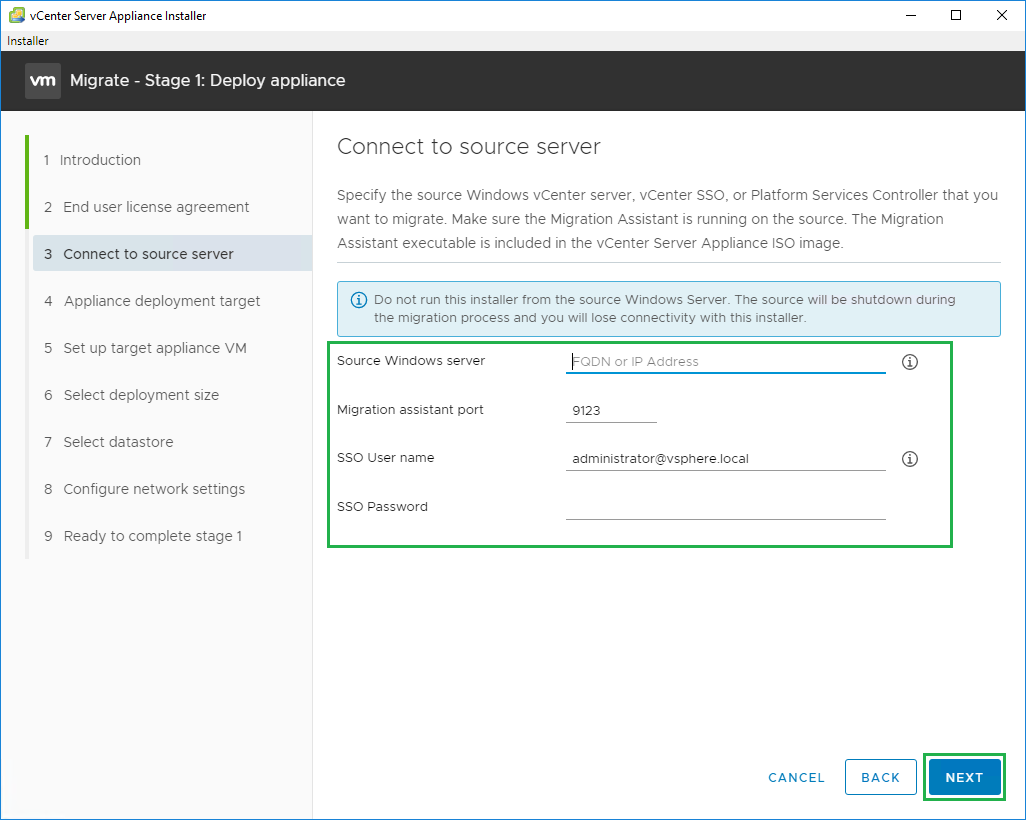
First off connect to your Platform Services Controller and mount the vCenter 6.7 Appliance ISO.
Then launch the VMware-Migration-Assistant located at E:\Vmware VCSA\migration-assistant
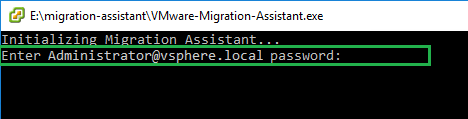
Login with your Administrator@vsphere.local credentials
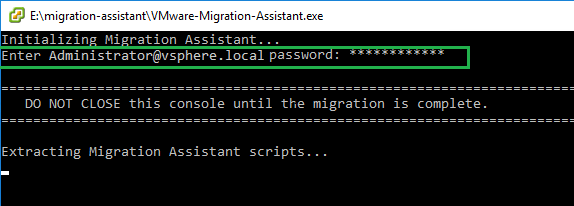
The Migration Assistant scripts will now start extracting
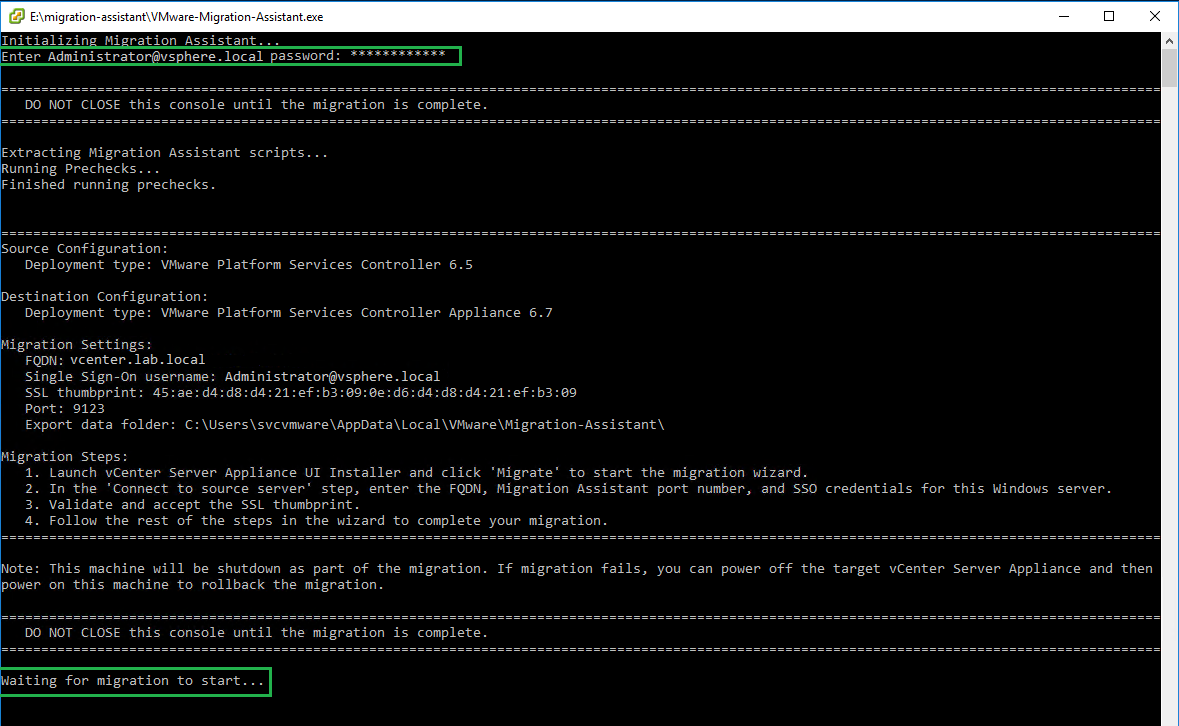
You should see the following screen when the Migration Assistant is ready
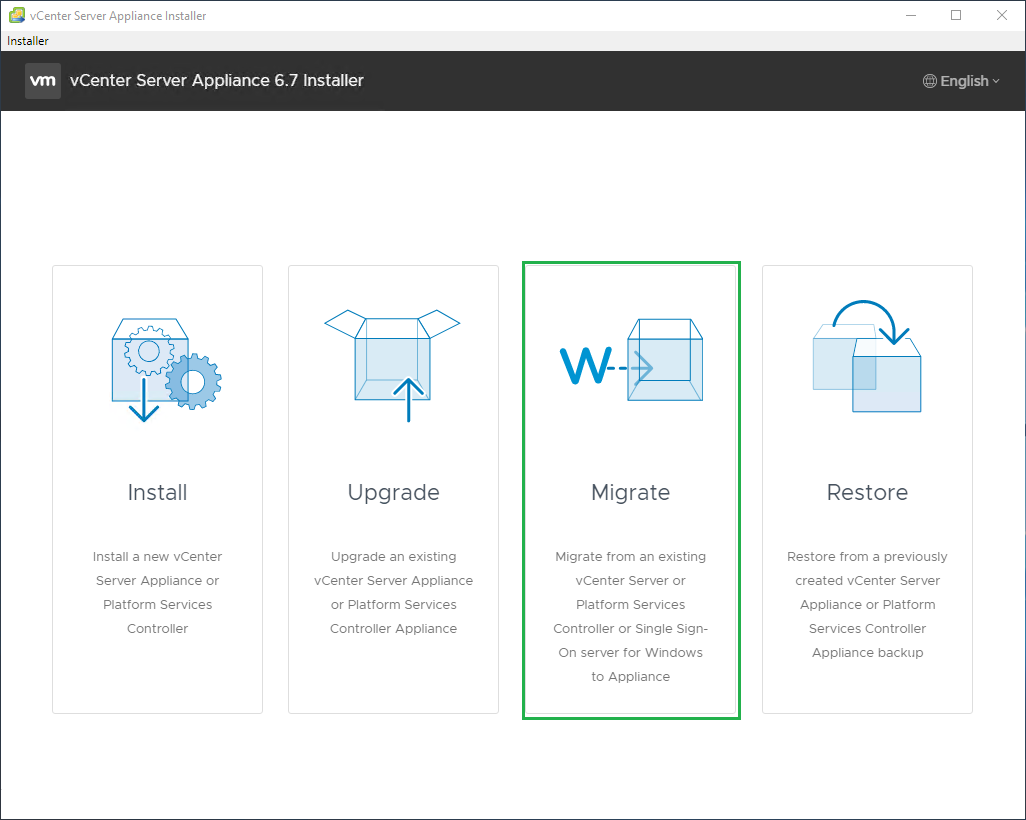
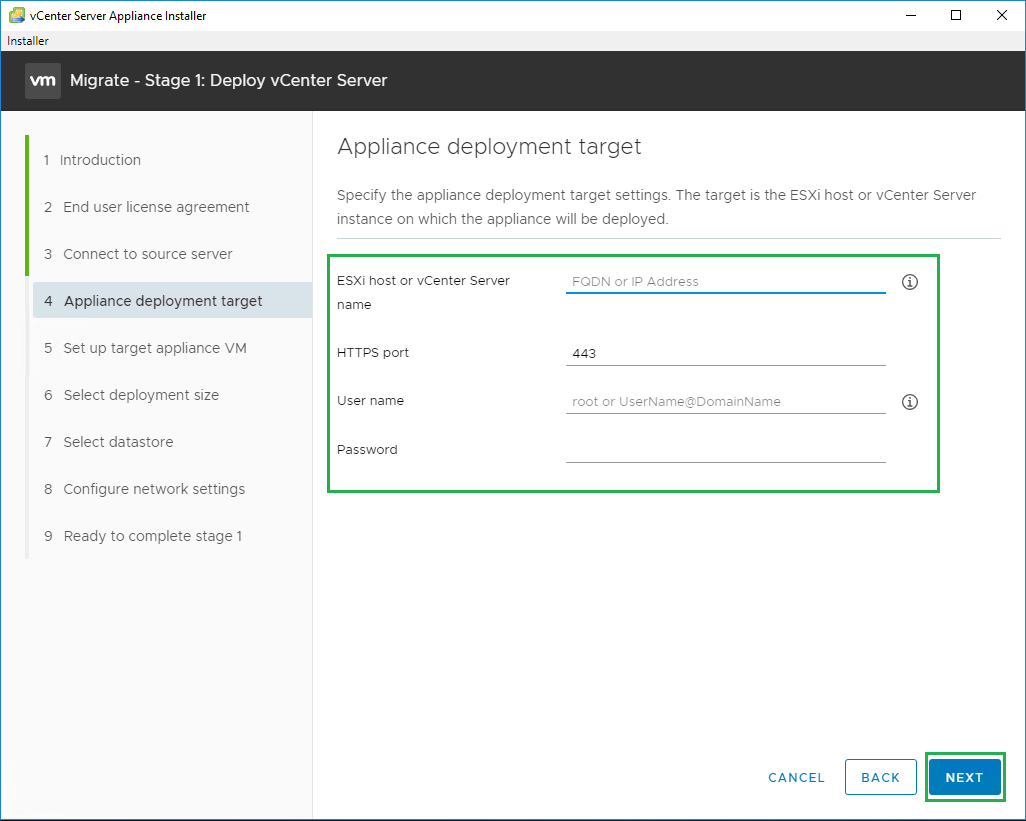
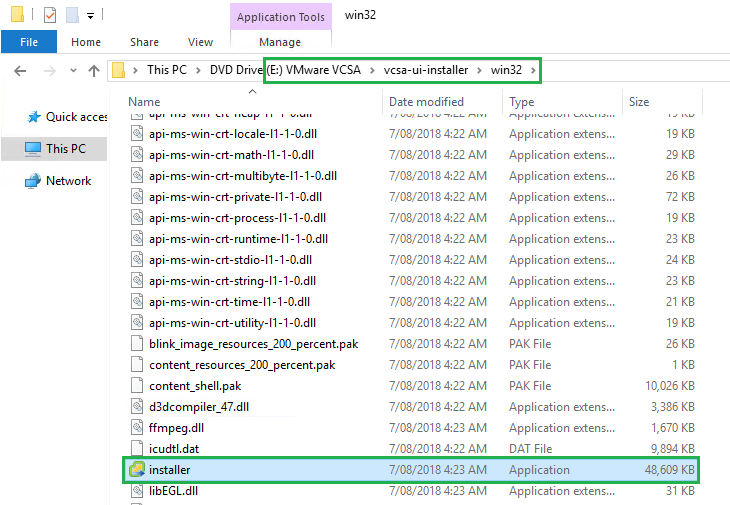
Then launch the installer located at E:\Vmware VCSA\vcsa-ui-installer\win32\installer

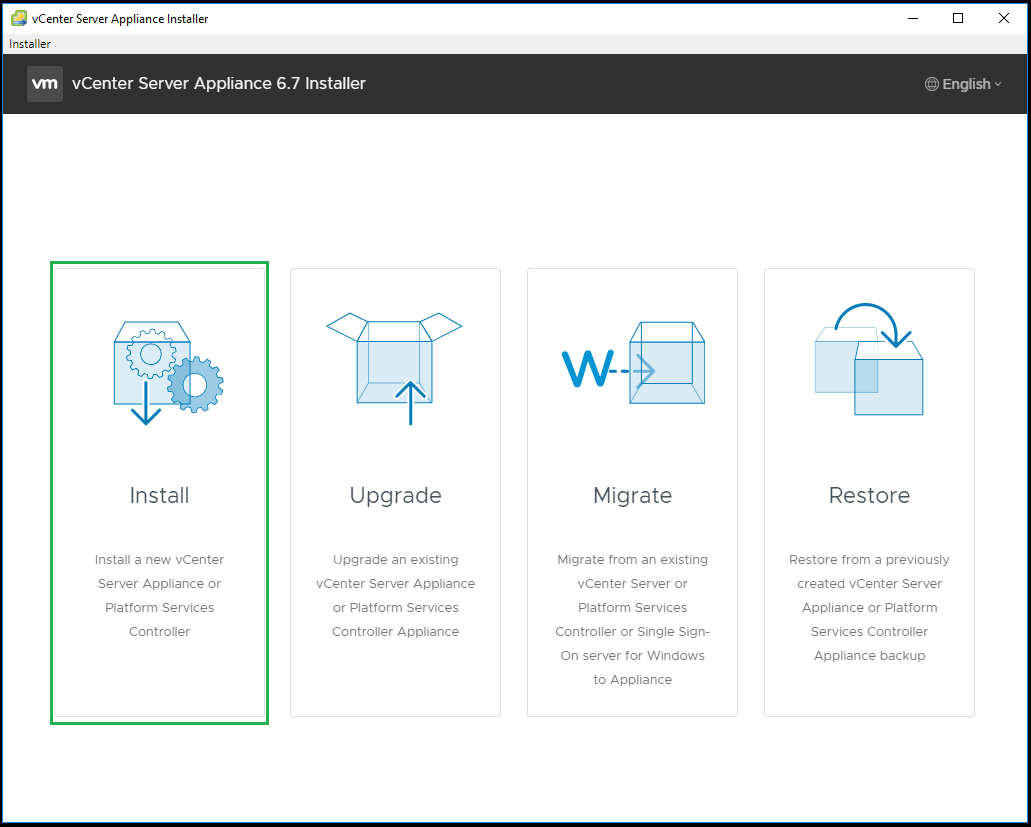
Click on Migrate
Click Next to start the Migration Wizard
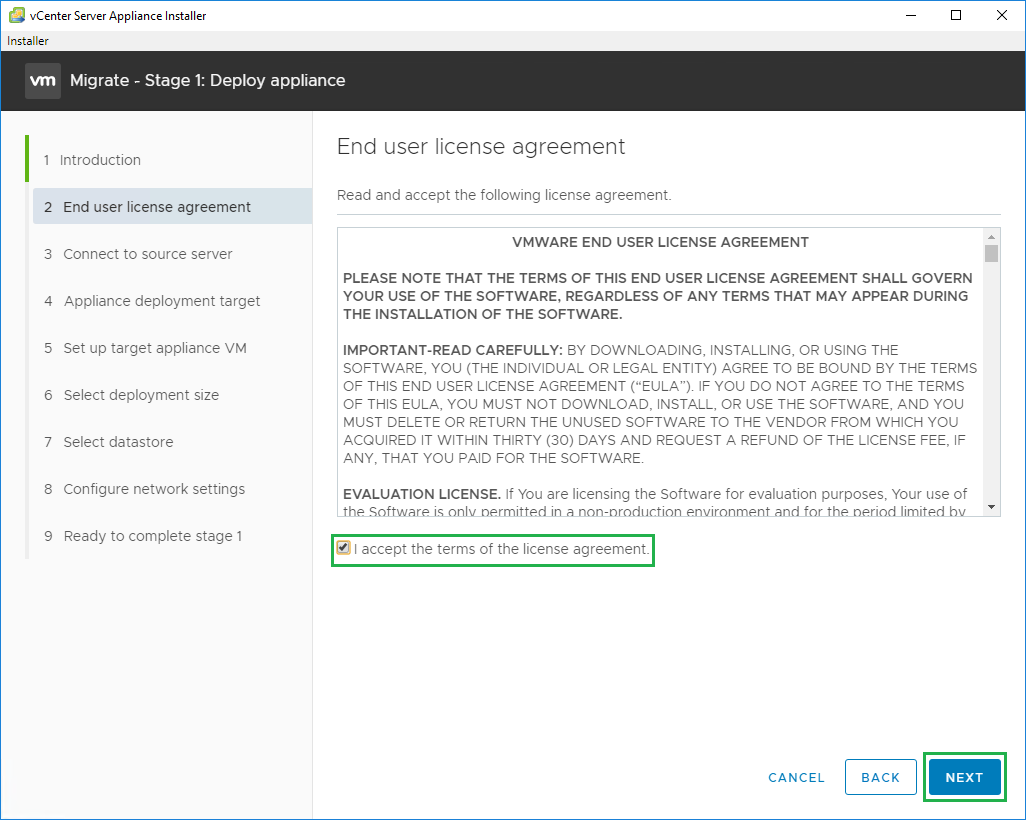
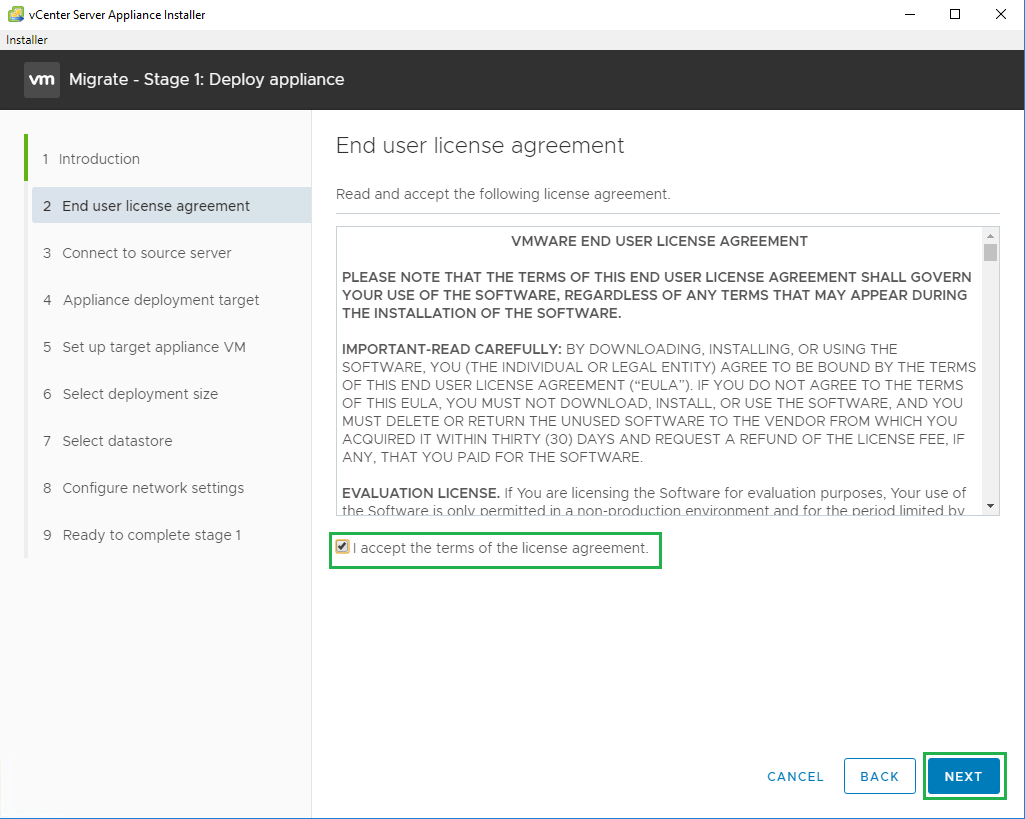
Accept the agreement and click Next
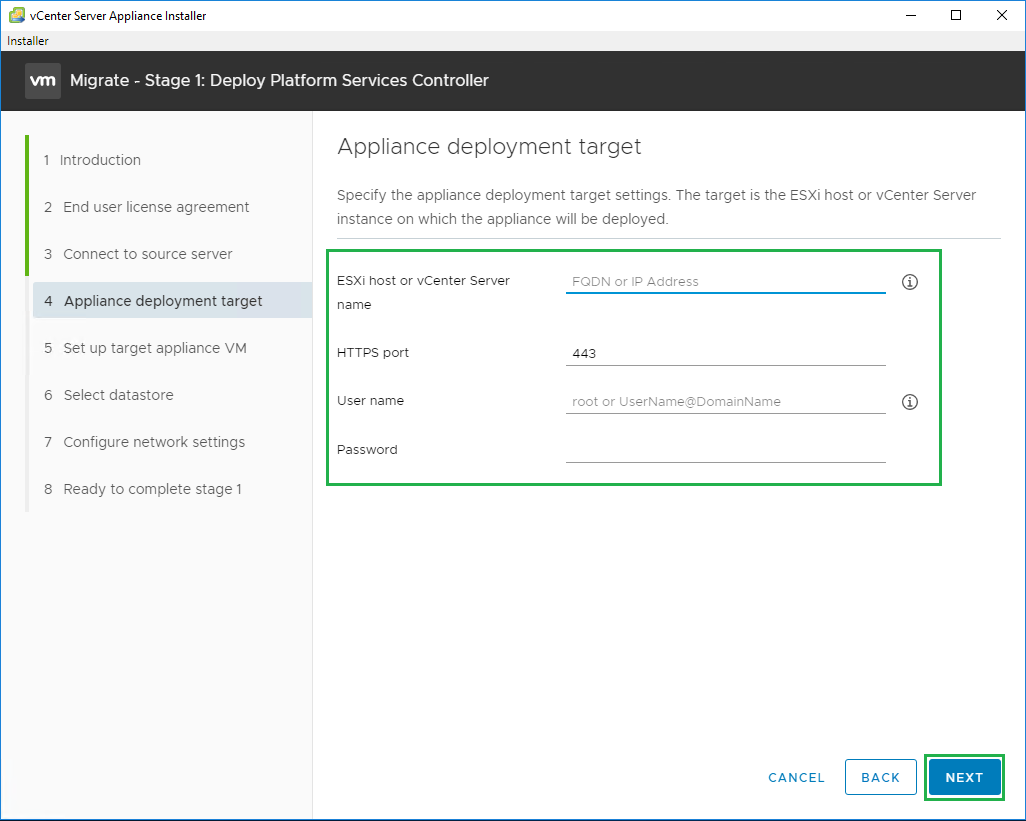
Enter the Source Platform Services Controller IP Address and SSO account details, then click Next

Click Yes on the Certificate prompt. Then enter the vCenter or ESXi host connection details and click Next
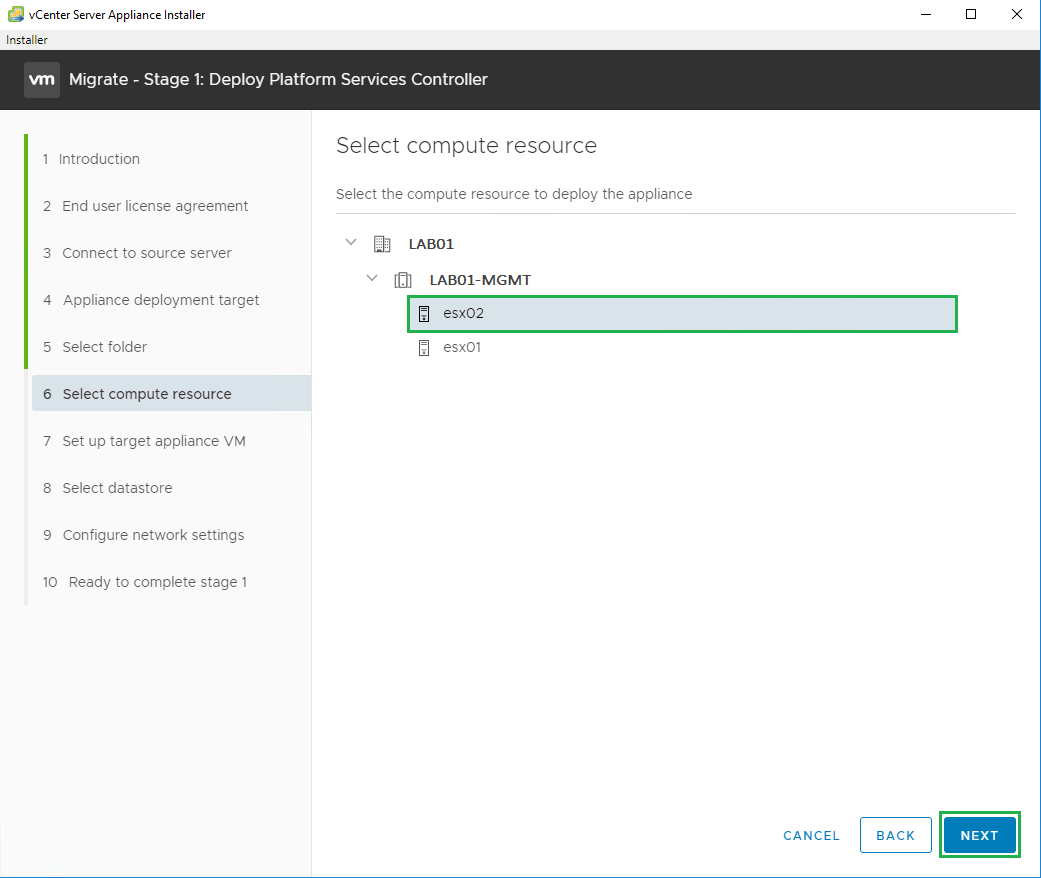
Select the Datacenter where this VM will be deployed and click Next
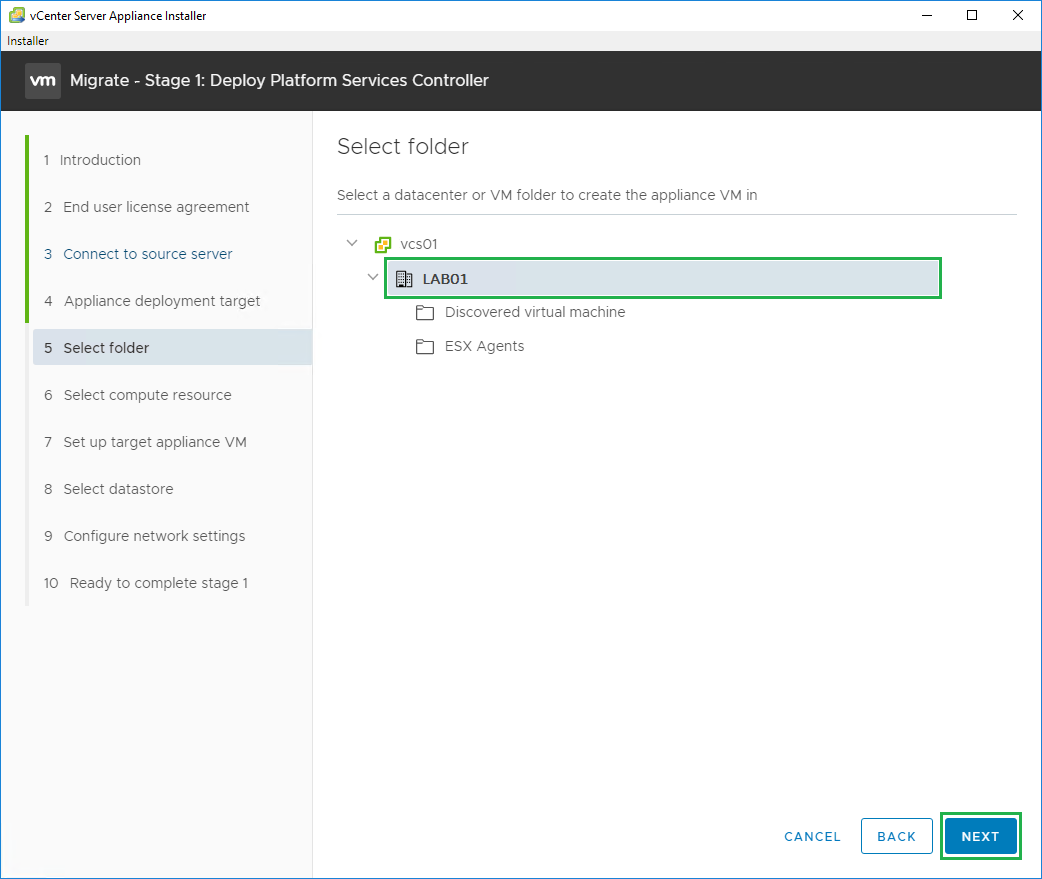
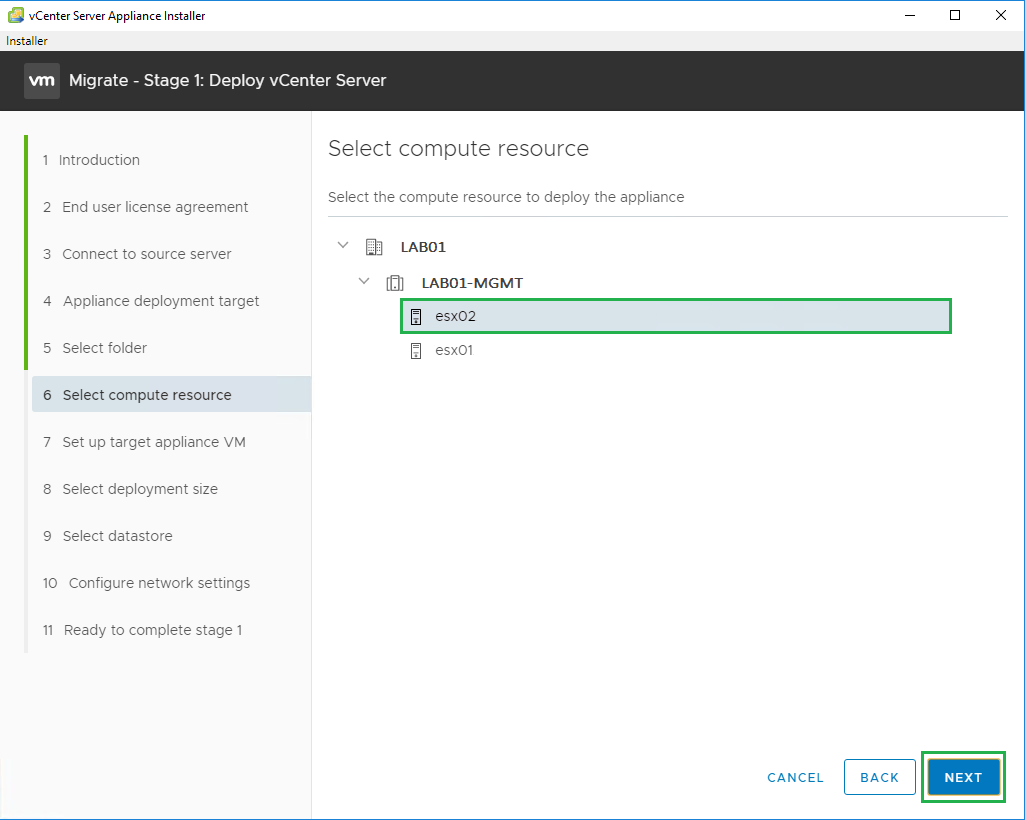
Select the host to deploy the VM on and click Next
Click Yes on the Certificate prompt. Enter the VM name and set the root password. Then click Next

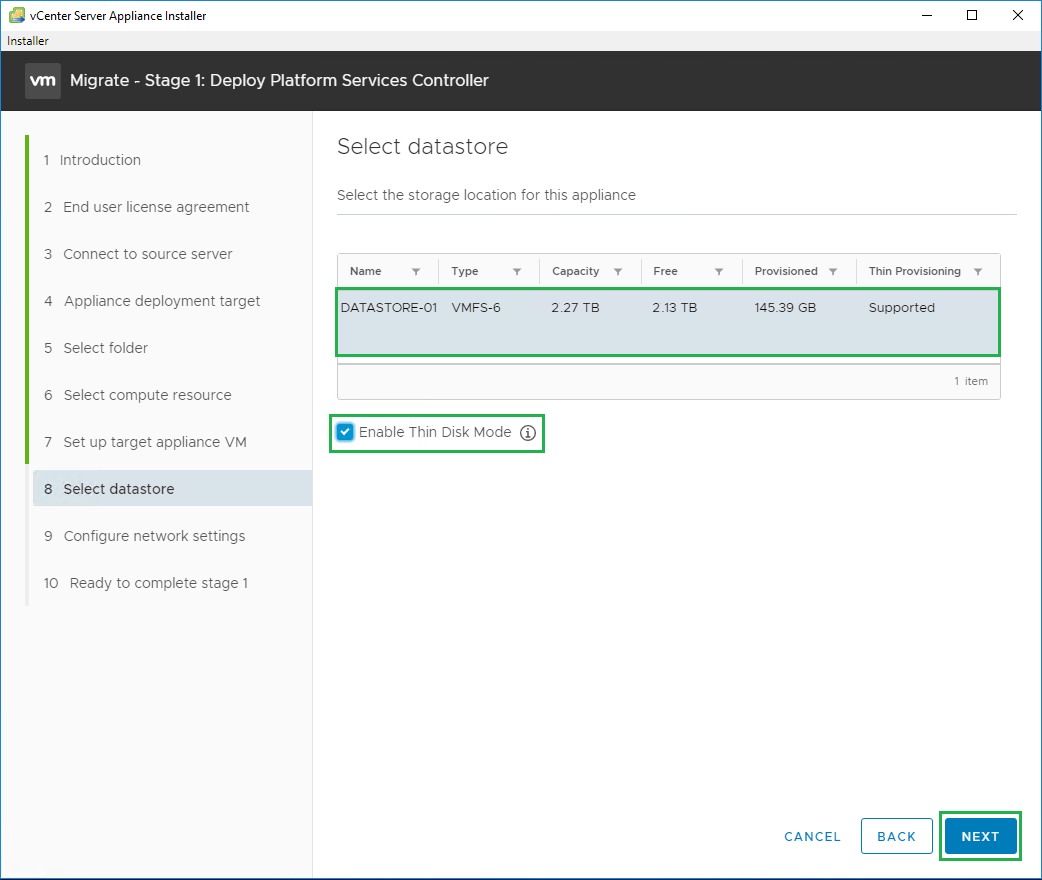
Select the datastore you would like to use and enable Thin Disk Mode if you prefer, then click Next
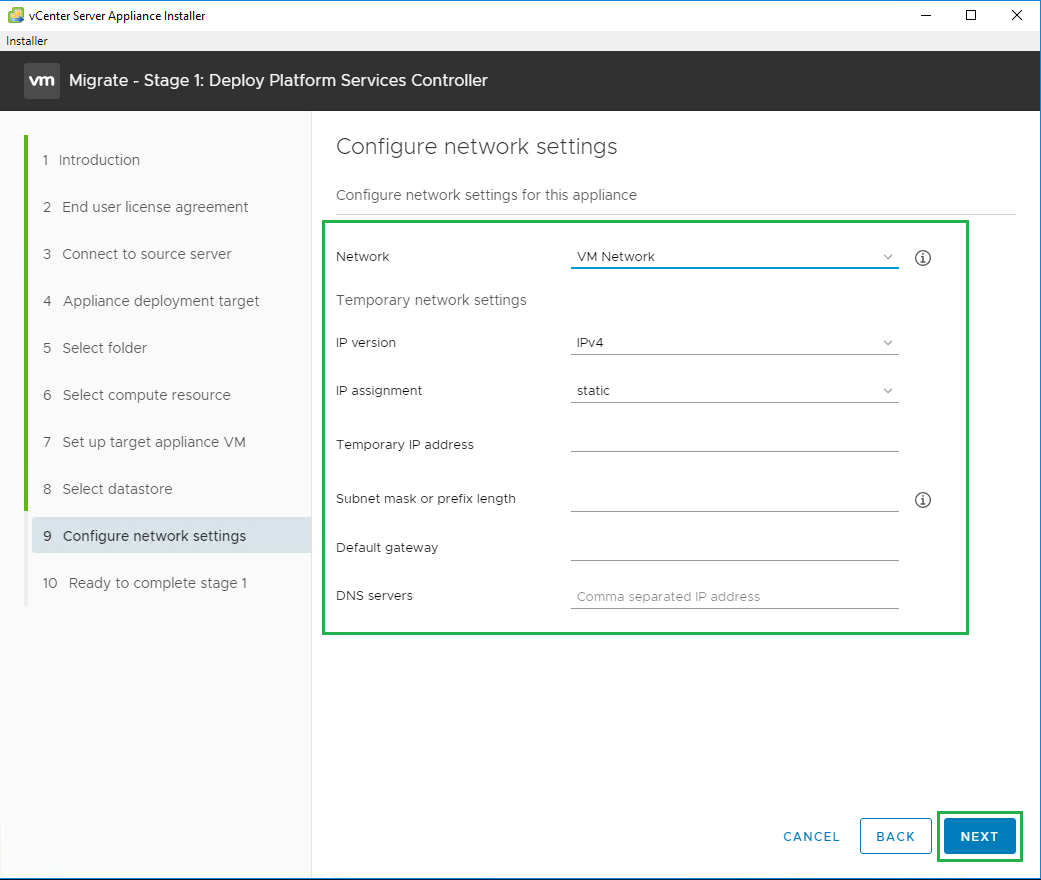
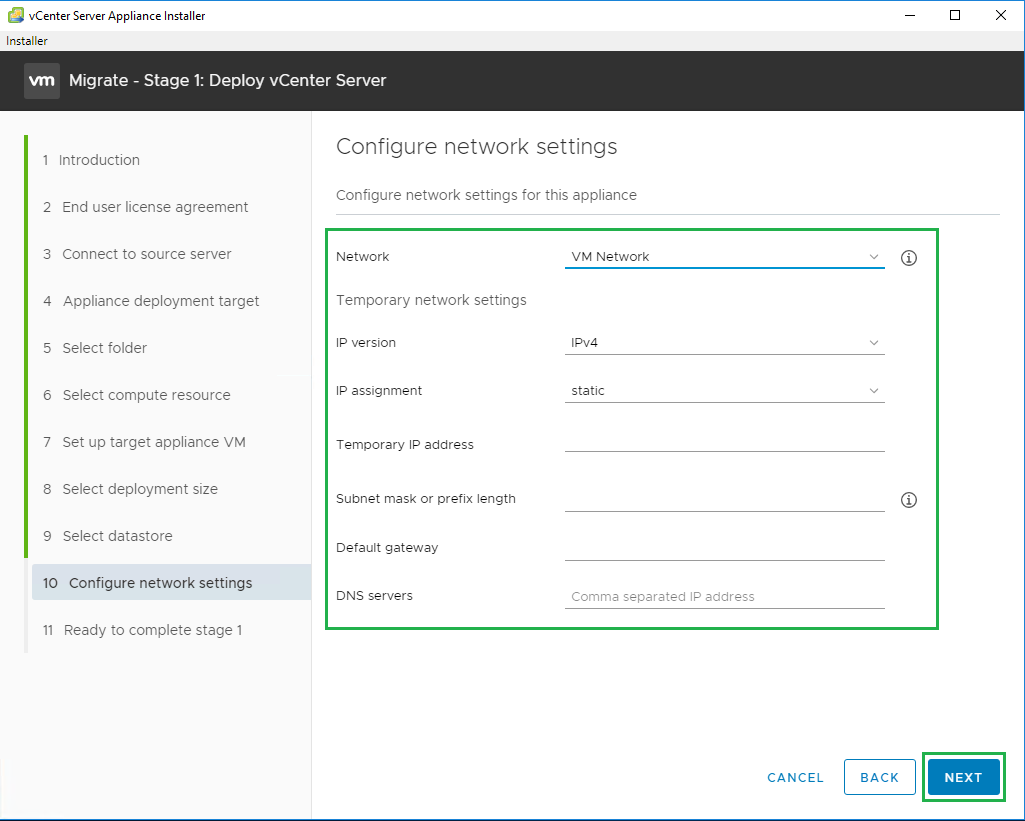
Configure the network settings for the VM, this will be a temporary address for the initial deployment. The correct address will come across when the migration starts.
Then click Next
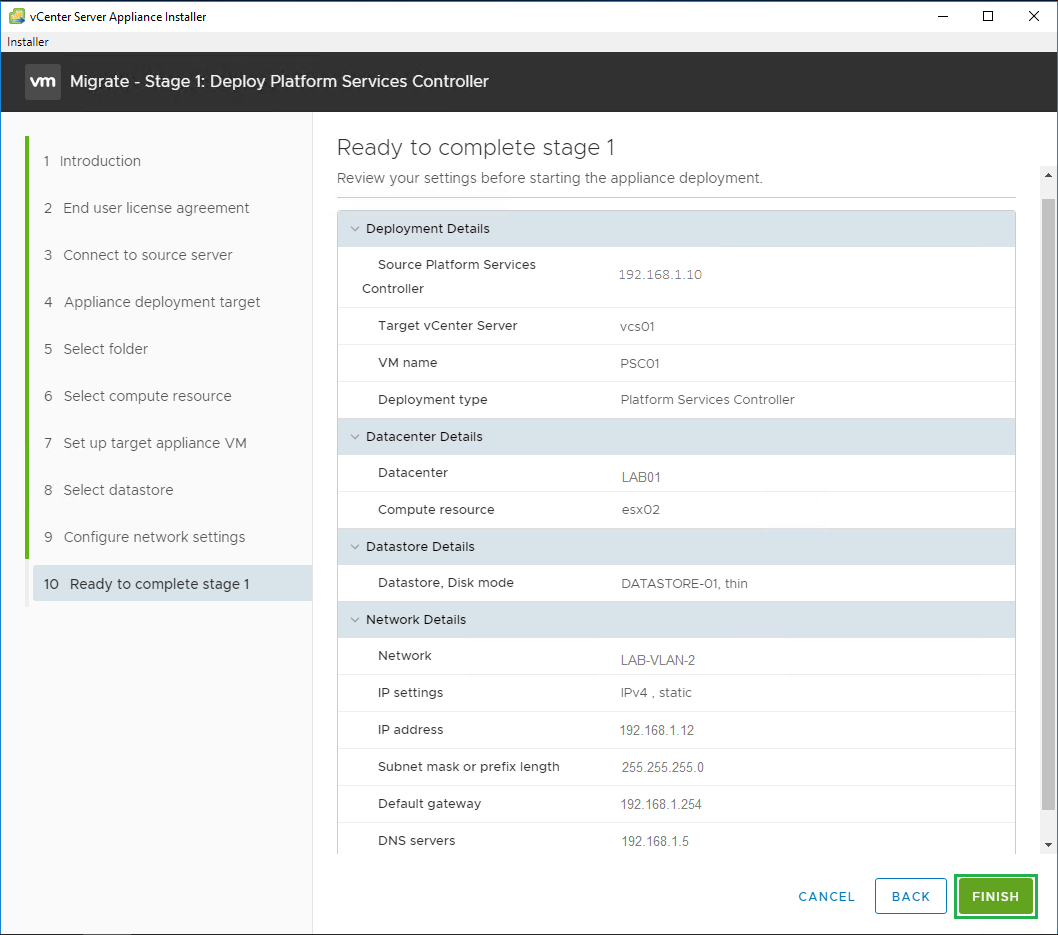
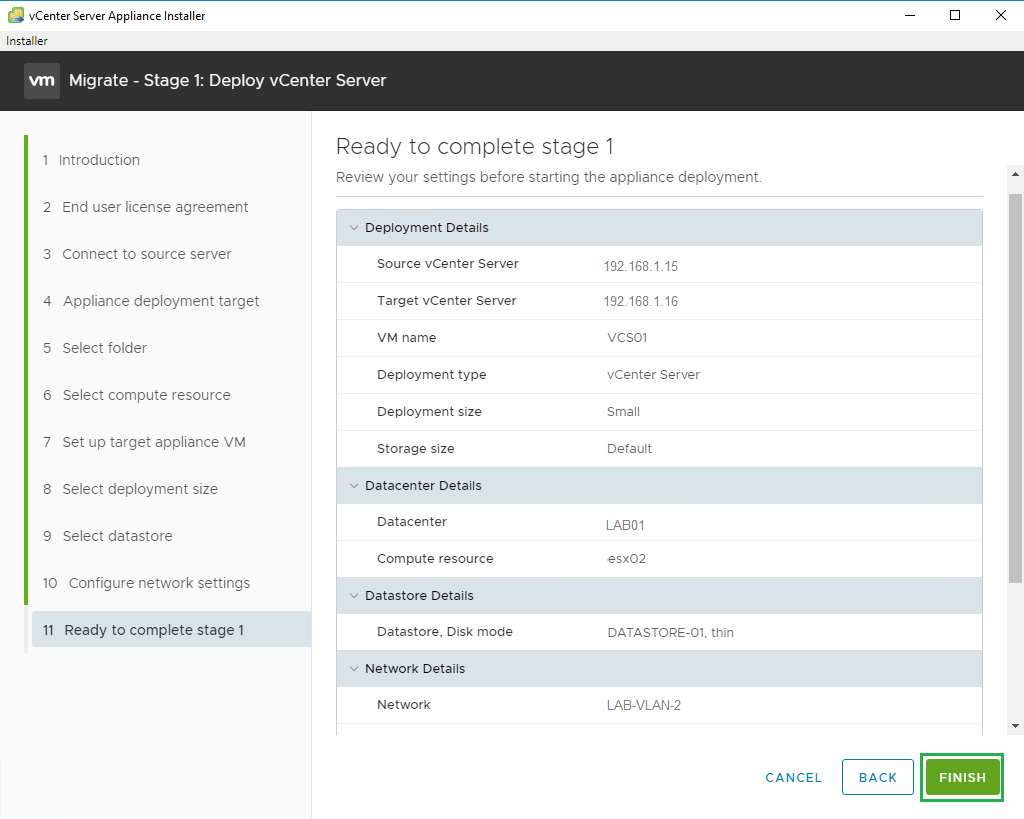
Review your settings and click Finish
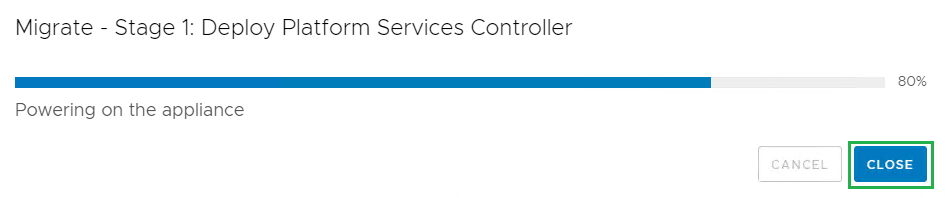
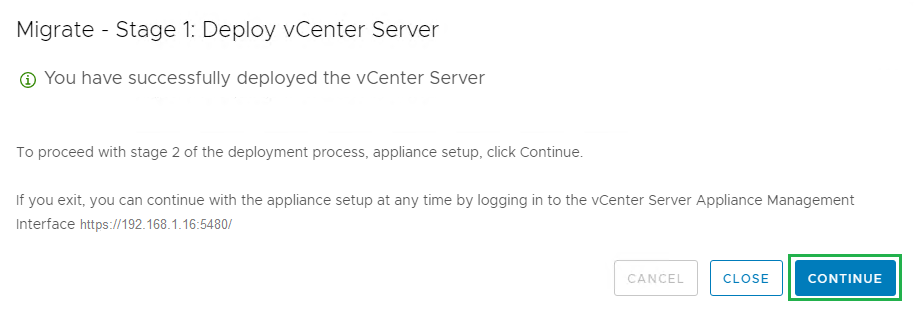
Stage 1 will now start with deploying the new Platform Services Controller Appliance
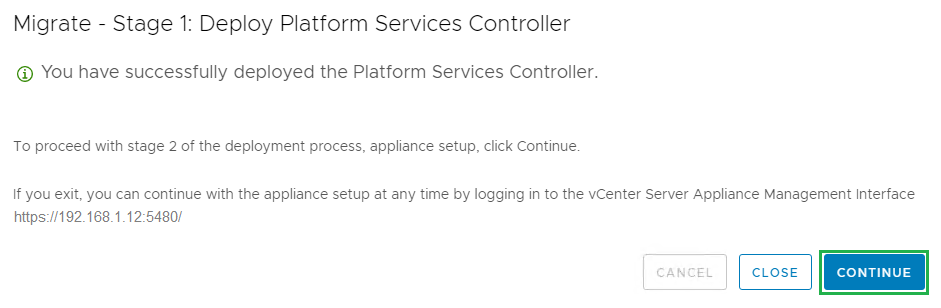
Stage 1 completed successfully. Click Continue to move onto Step 2
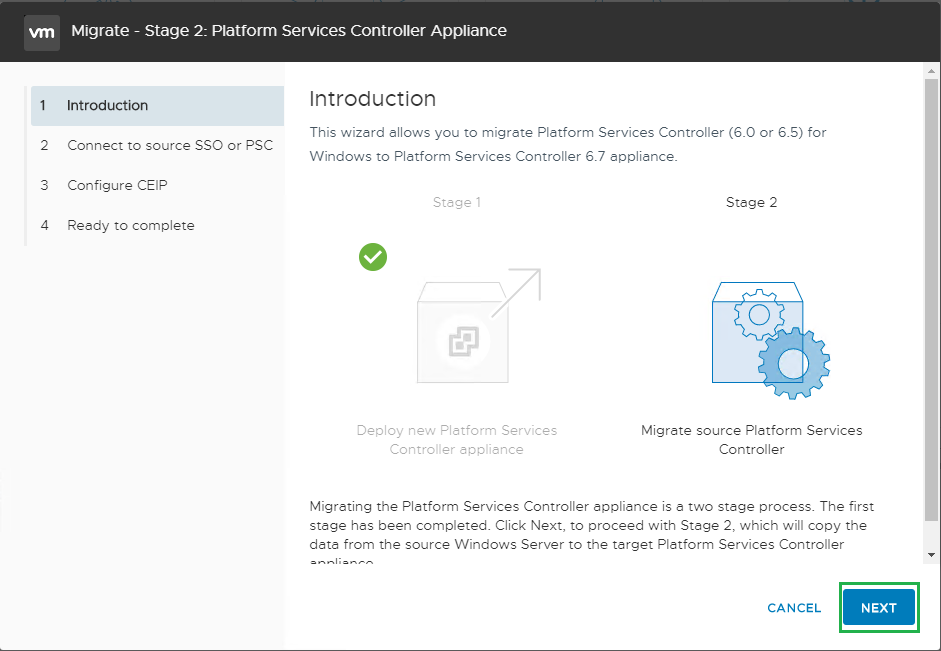
Click Next to start Stage 2
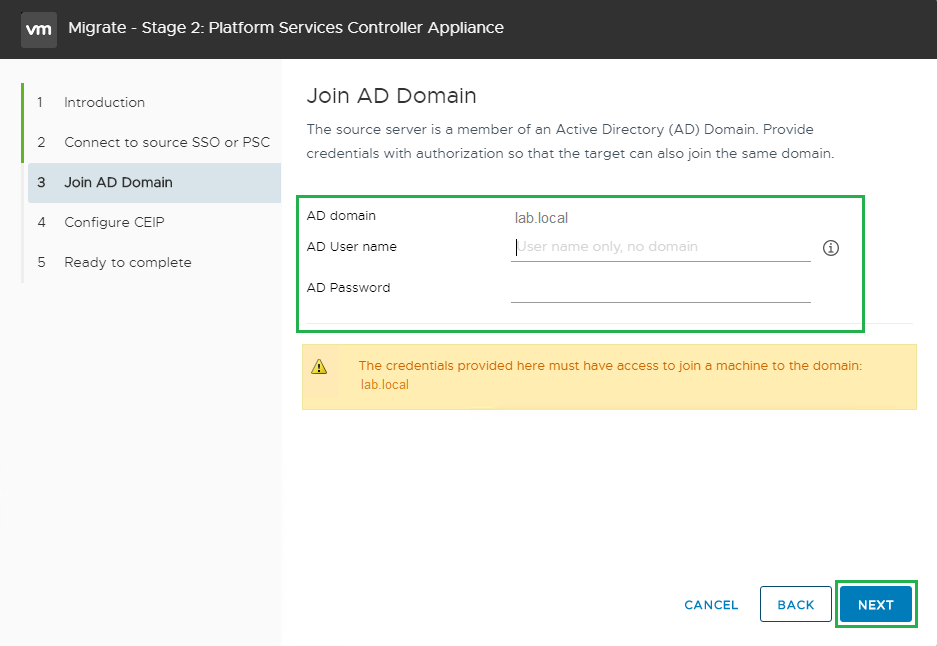
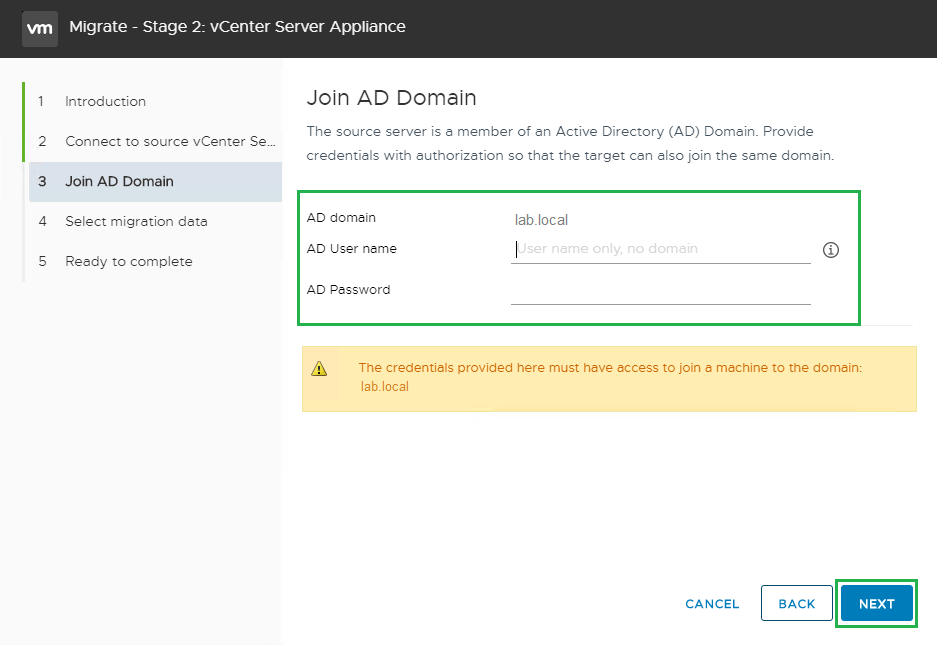
Pre-migration checks will now run on the PSC. Then enter the credentials to join the server to the domain. Then click Next
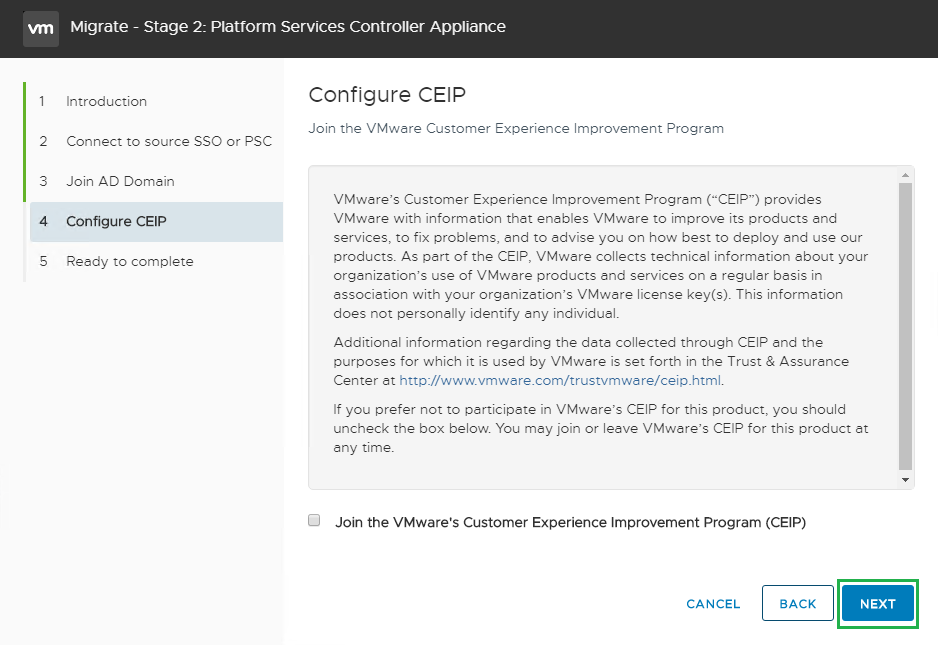
Join the Vmware CEIP if you like then click Next
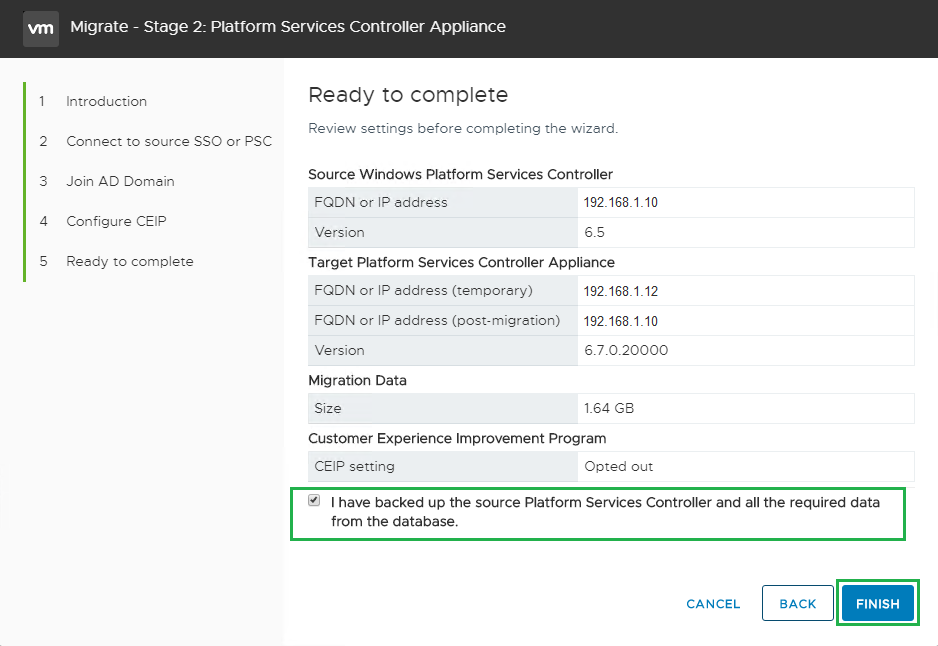
Review the settings and click Finish
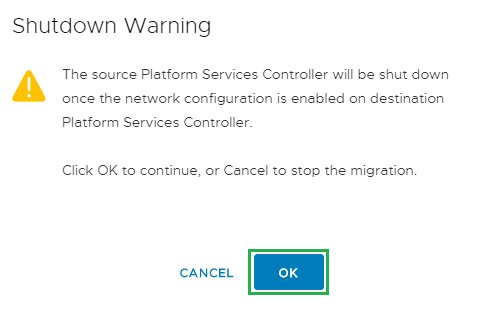
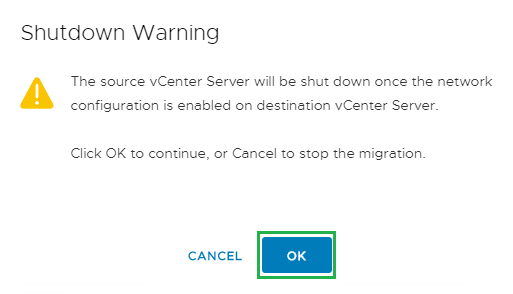
Click OK to continue
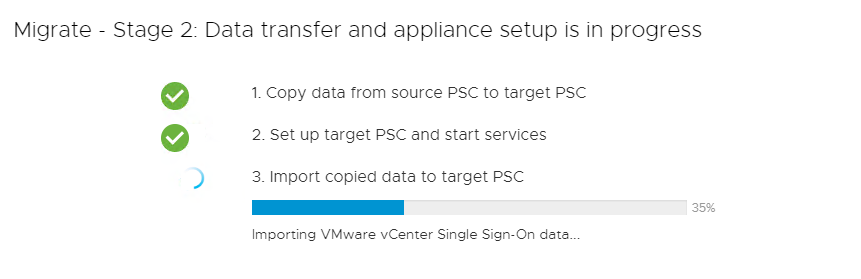
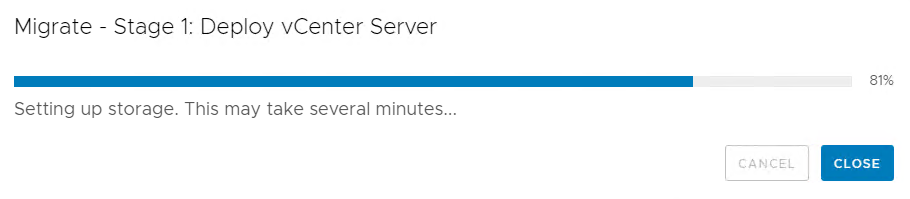
The data transfer and cut over will now commence
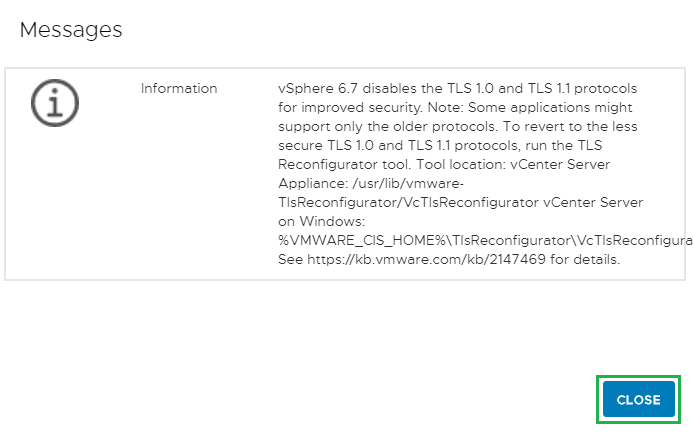
The following information messages will be displayed outlining some changes. Click Close
Click Close to complete the process

Now it is time to migrate the vCenter Server. Launch the migration assistant on the vcenter server and enter the SSO password.
The VMware-Migration-Assistant is located at E:\Vmware VCSA\migration-assistant
If you have Update Manager on a separate server then start the migration assistant on that server also.
One thing to note is that if Update Manager is on a separate server and the migration assistant has issues then uninstall and remove Update Manager all together. It will be part of the new appliance once deployed.
Next lets run the vCenter Appliance installer from another management server
The installer located at E:\Vmware VCSA\vcsa-ui-installer\win32\installer
Click on Migrate
Then click Next
Accept the license agreement and click Next
Enter the Source vCenter Server details and click Next
Click Yes on the certificate prompt
Then enter the ESXi host or vCenter details to deploy the new appliance then click Next
Click Yes on the certificate prompt
Select the Datacenter and click Next

Select the host to deploy the appliance, then click Next
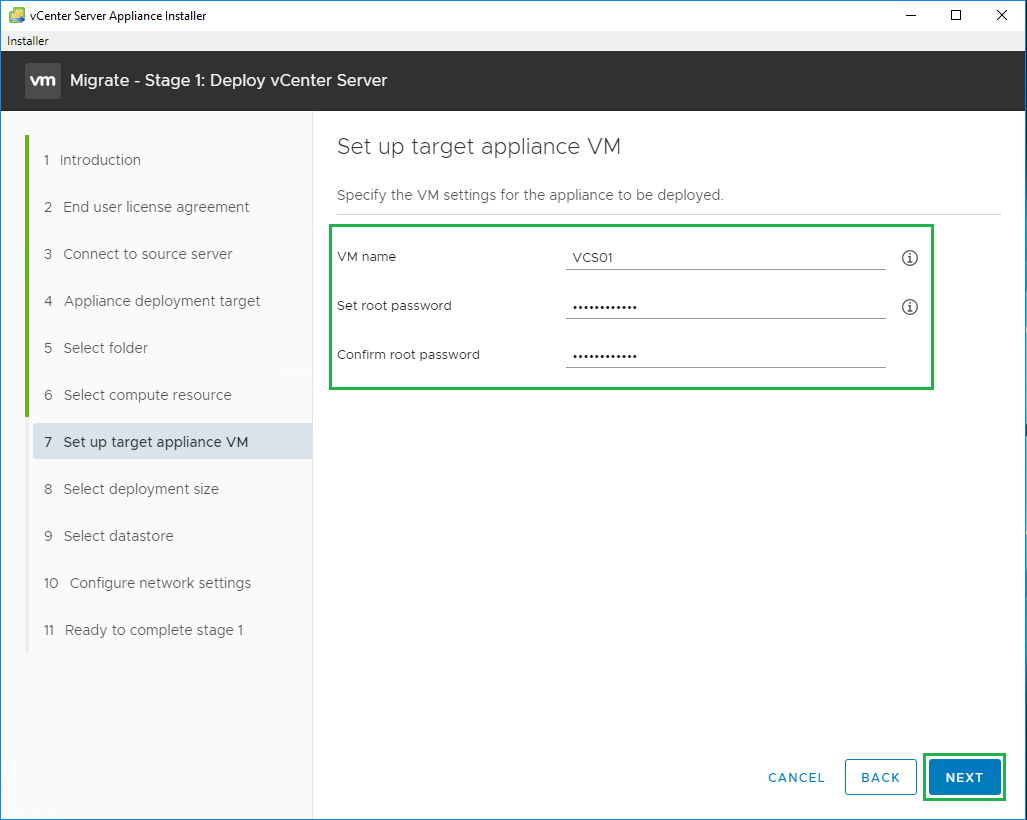
Enter the name for the new vCenter Server and the root password, then click Next
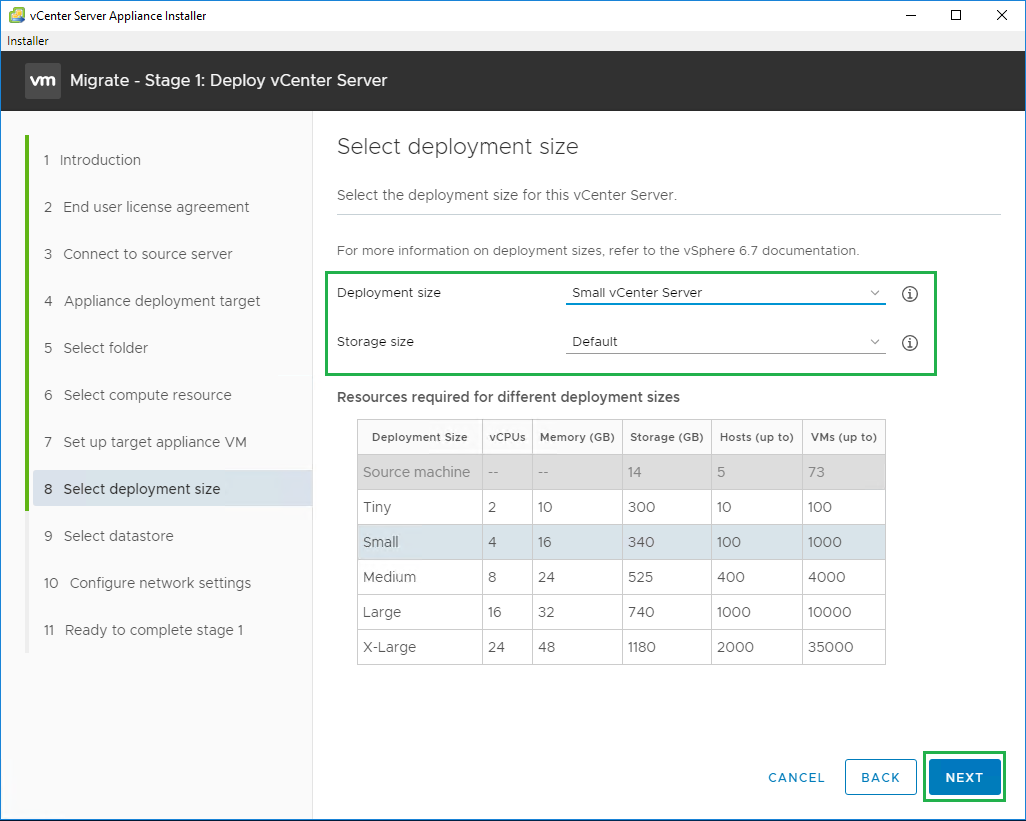
Select your deployment size and click Next to continue
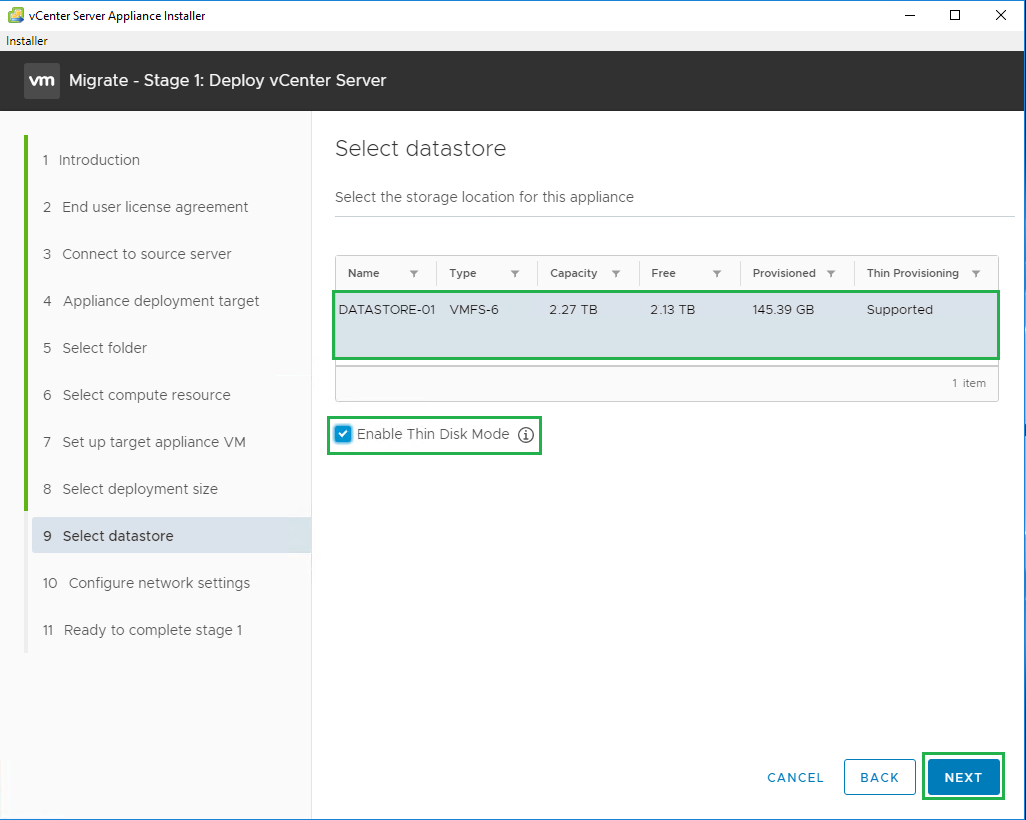
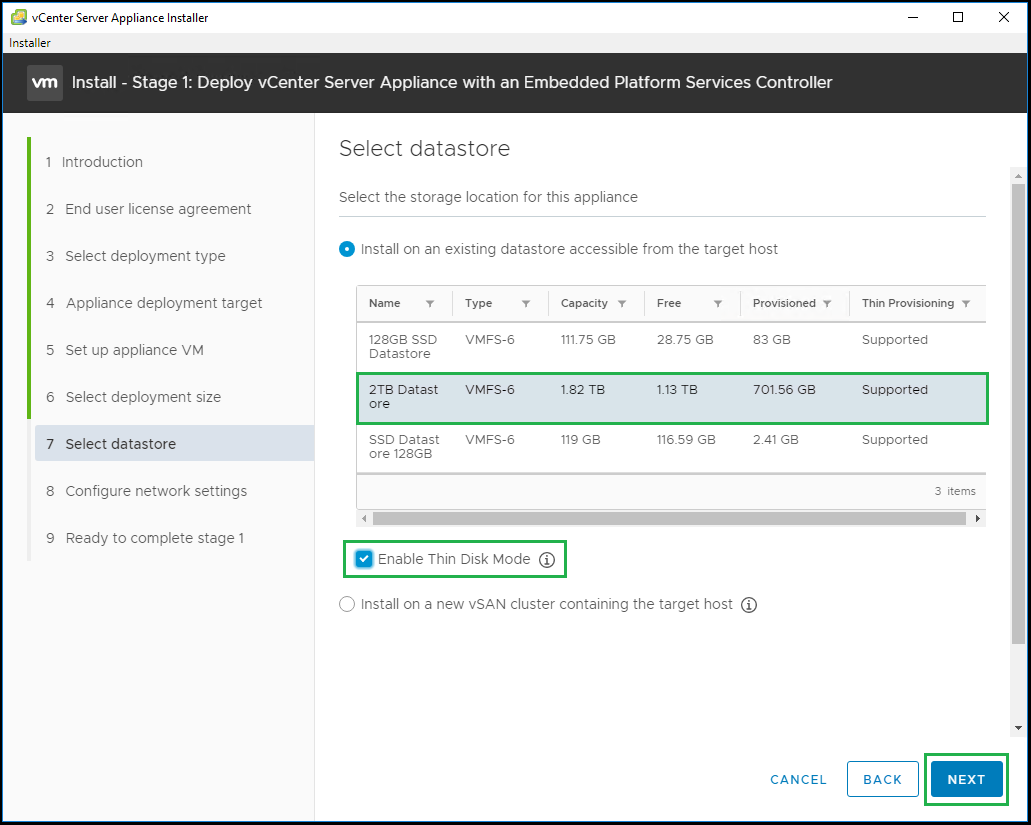
Select the datastore and Enable thin disk mode, then click Next
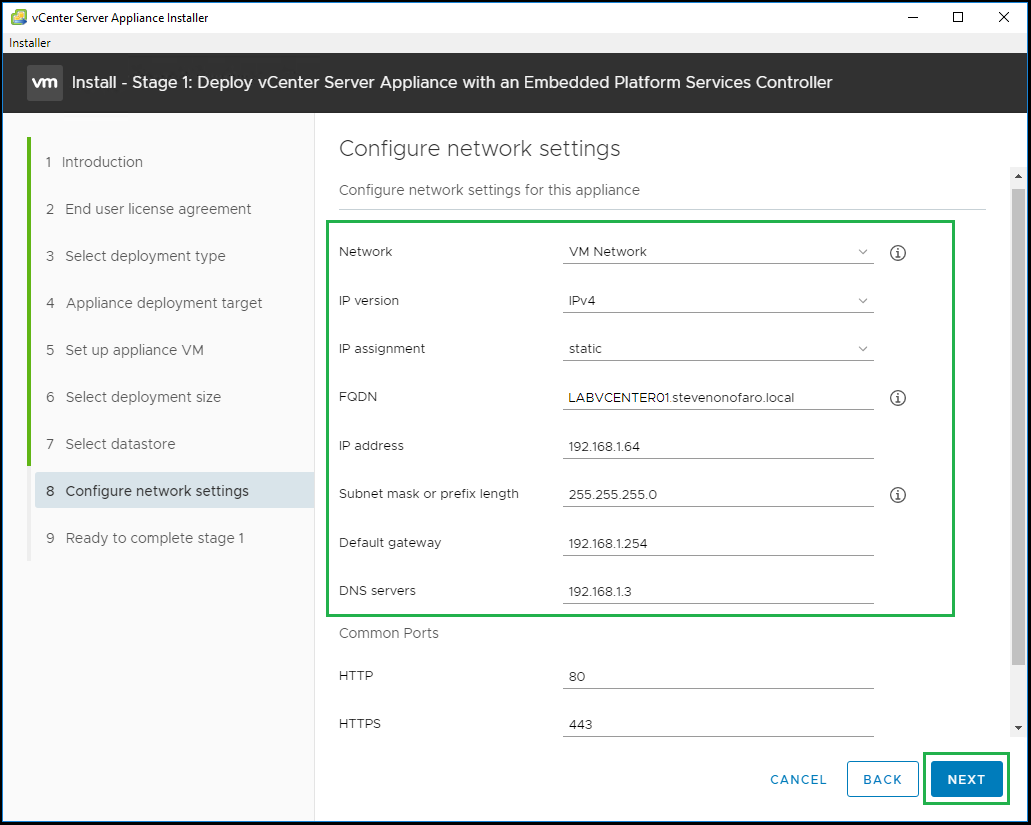
Configure the network settings for the VM, this will be a temporary address for the initial deployment. The correct address will come across when the migration starts
Then click Next
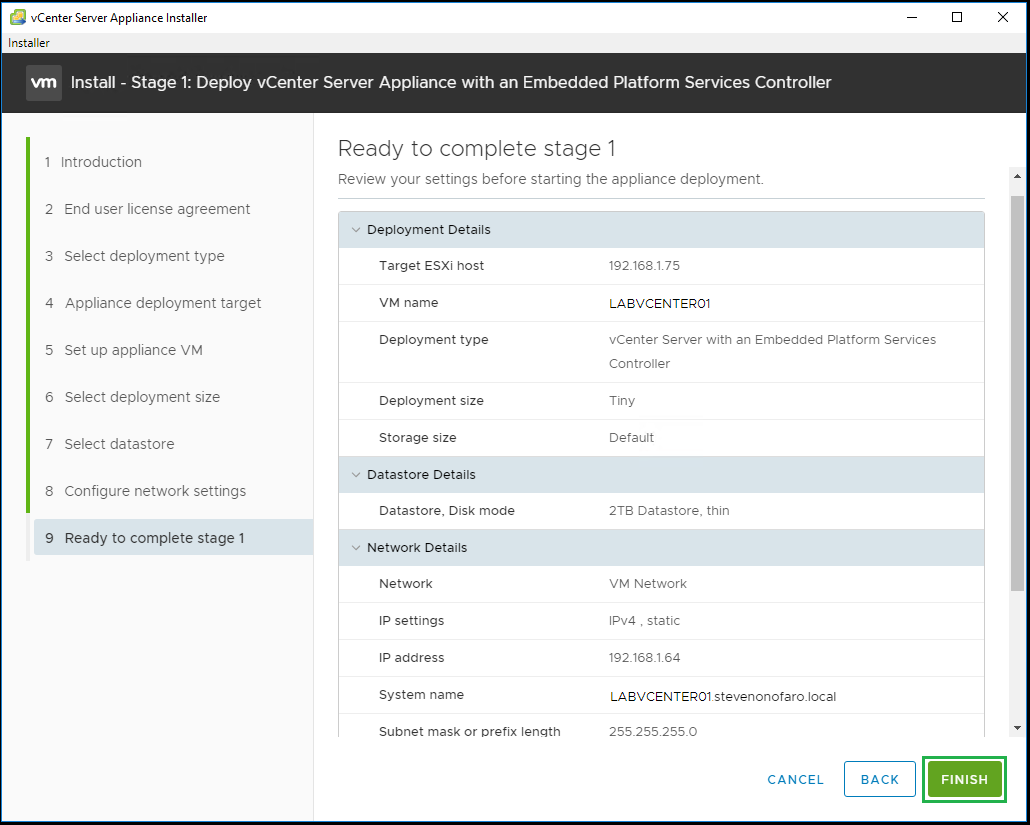
Review your settings and click Finish to complete Stage 1
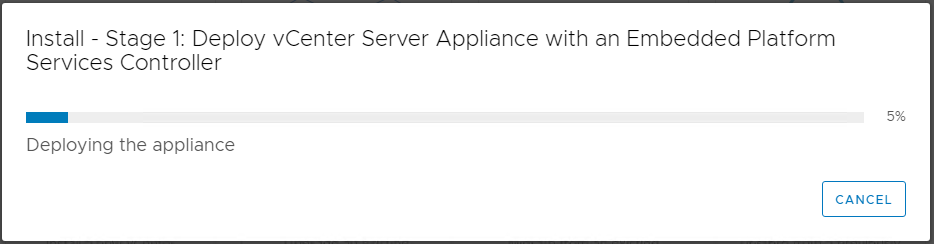
The new appliance is now being deployed, click Close
The new Appliance has now been deployed. Click Continue to move onto Step 2
Then its time to start Step 2. On the Introduction screen click Next
The installer will now connect to the source vcenter server and kick off the pre-migration steps
The Enter your credentials to join the server to the domain and click Next
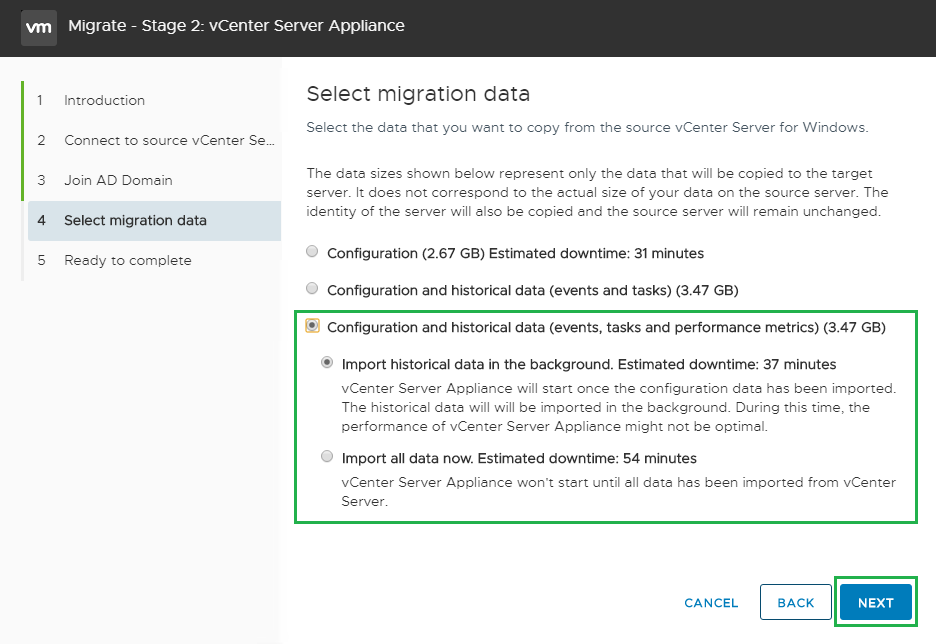
Select the option you prefer for migrating the vCenter Data, then click Next
Review your settings then click Finish
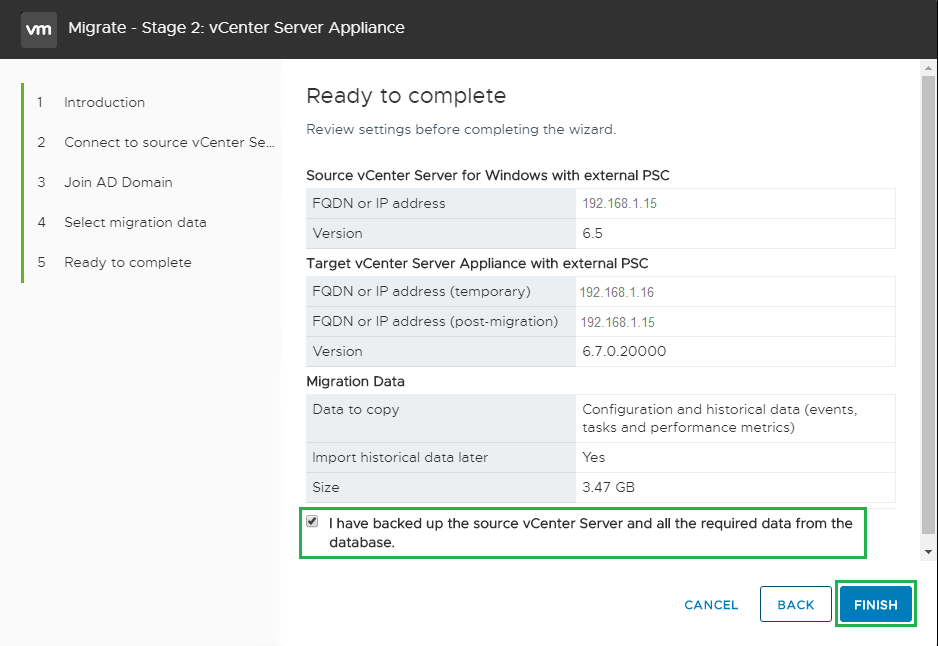
Then click Ok to begin the Migration
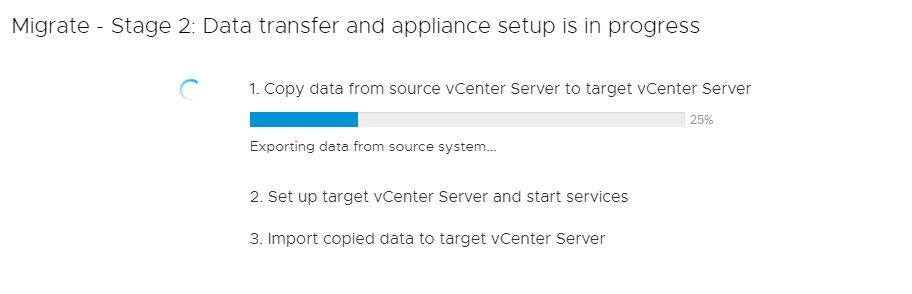
The Migration will begin and you can monitor its progress as it moves through each of the stages
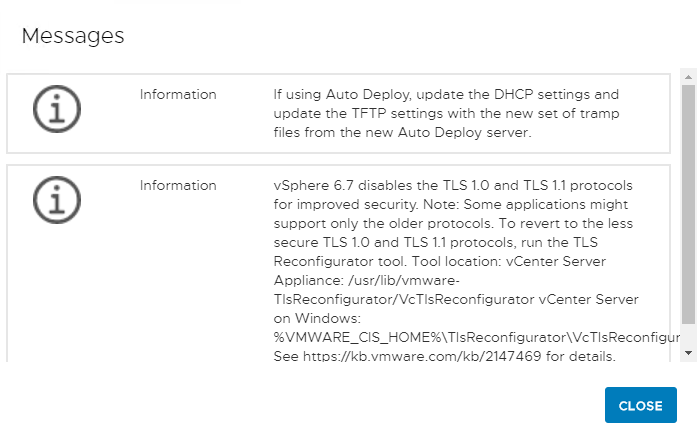
Once Complete you will see the information screen outlining some of the changes in vCenter 6.7. Click Close to continue
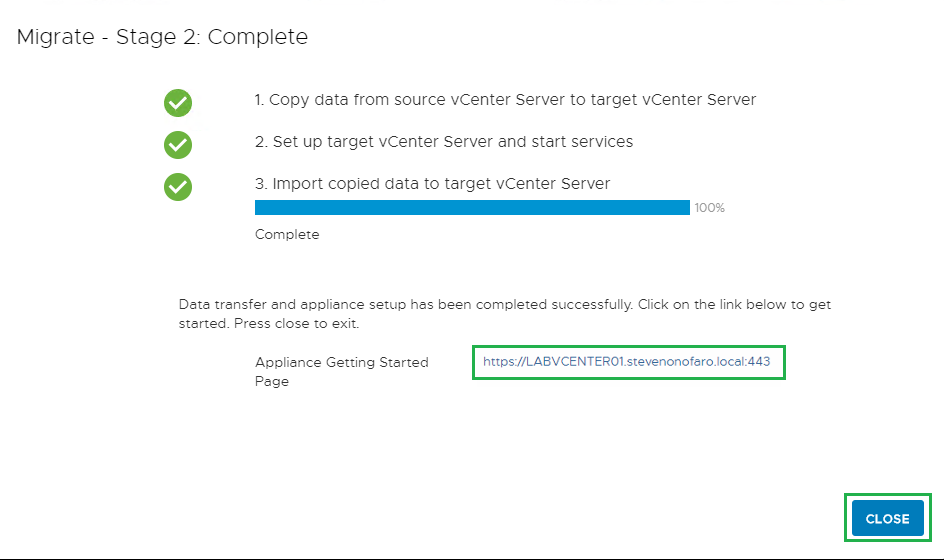
The migration is now complete, click on the link located below to access your vCenter 6.7 Server Appliance
I hope this post has helped you with your vCenter migration project!
Subscribe above for new post notifications!
-
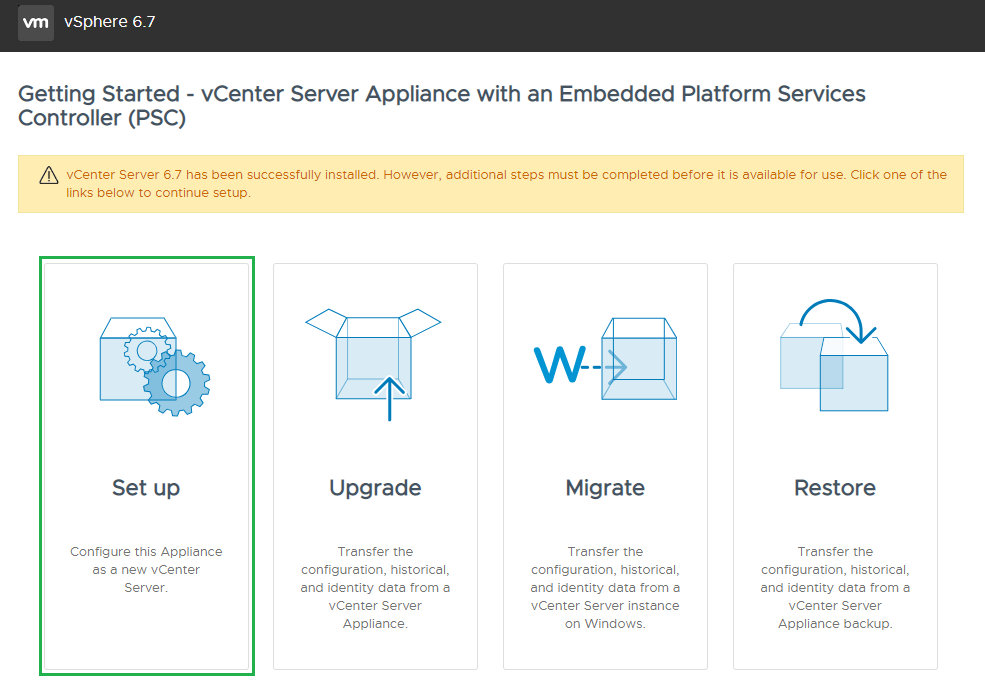
vCenter 6.7 Server Appliance – Install Guide
I thought I would take it back to basics for this next post. Getting vCenter installed is a must do job for most IT Admins out there so below is a an install guide for the vCenter 6.7 Appliance. This will also help us build a foundation for some future posts if your following along at home!
First off download the vCenter 6.7 Appliance ISO and mount it to your management server.
Then launch the installer located at E:\Vmware VCSA\vcsa-ui-installer\win32\installer
Then when the installer launches click on Install
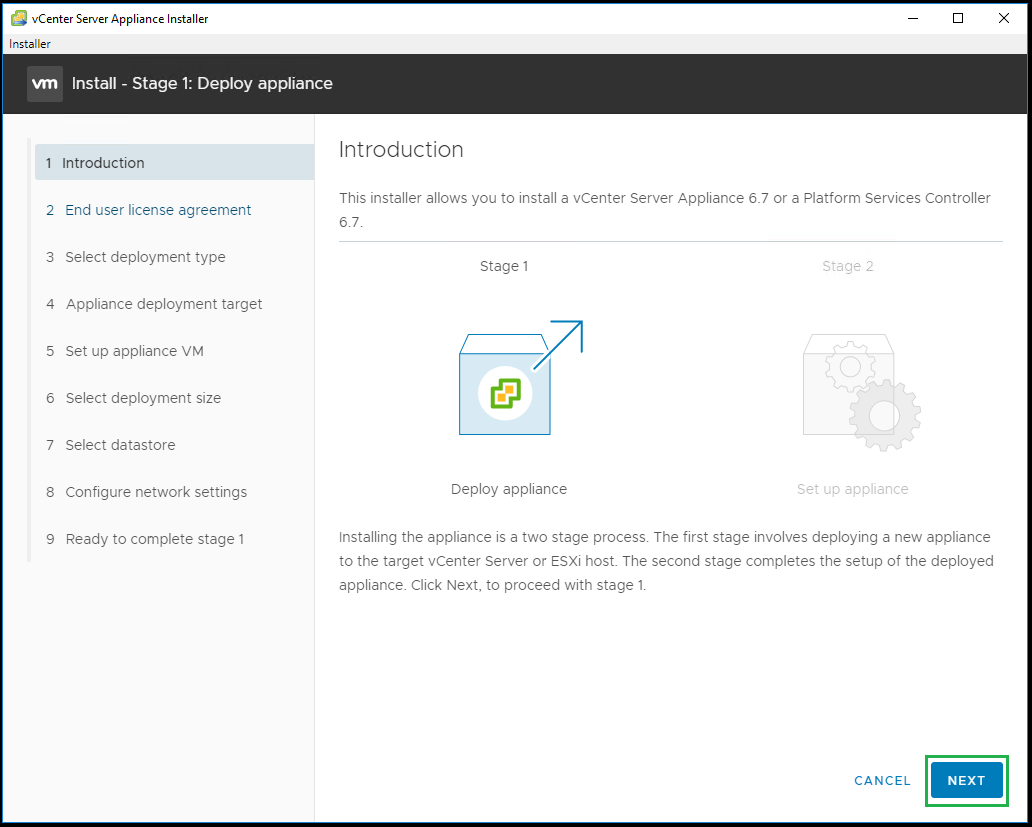
At the Introduction screen click Next to continue
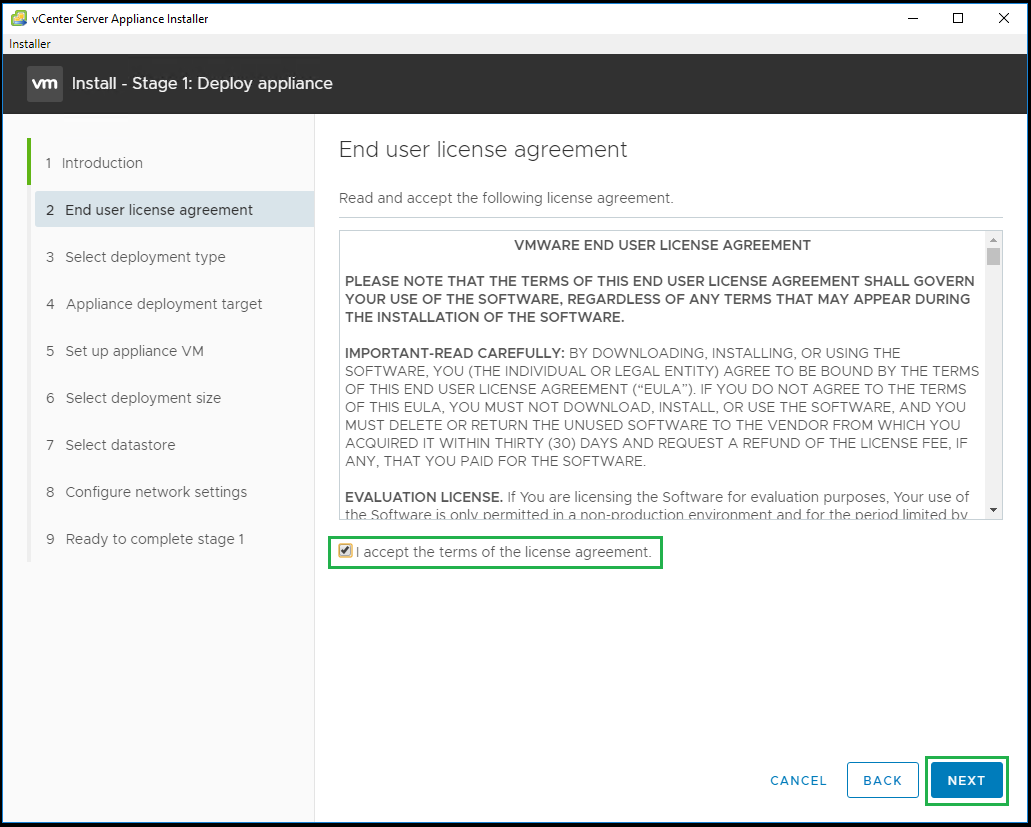
Accept the license agreement and click Next
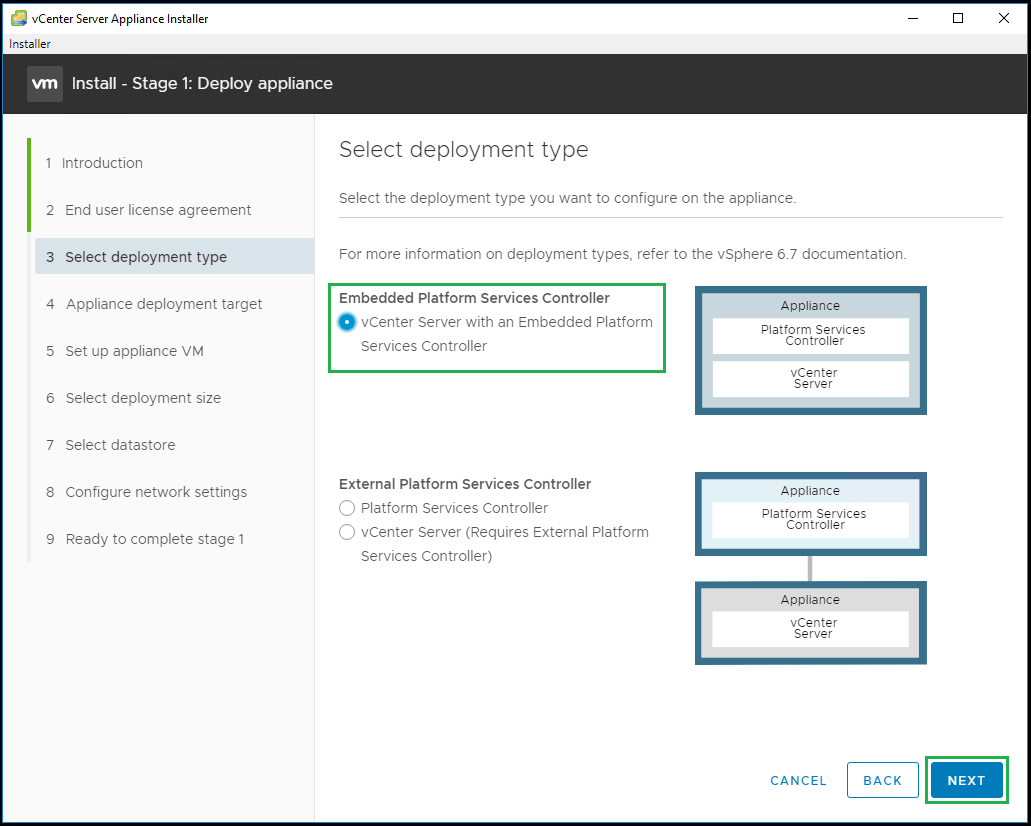
For this deployment we are going to install the Platform Services Controller and the vCenter Server on the same appliance. Select the first option and click Next
Next enter the ESXi host details where you would like to deploy the new vCenter Server, then click Next to continue

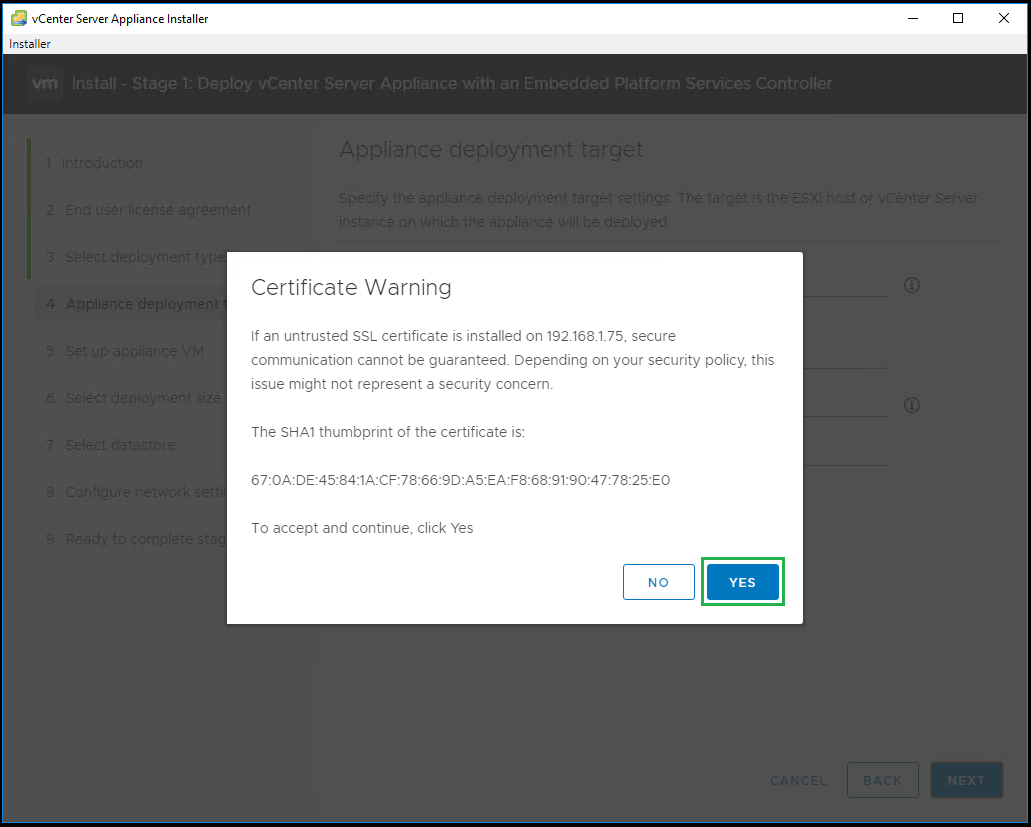
Accept the Certificate by clicking on Yes
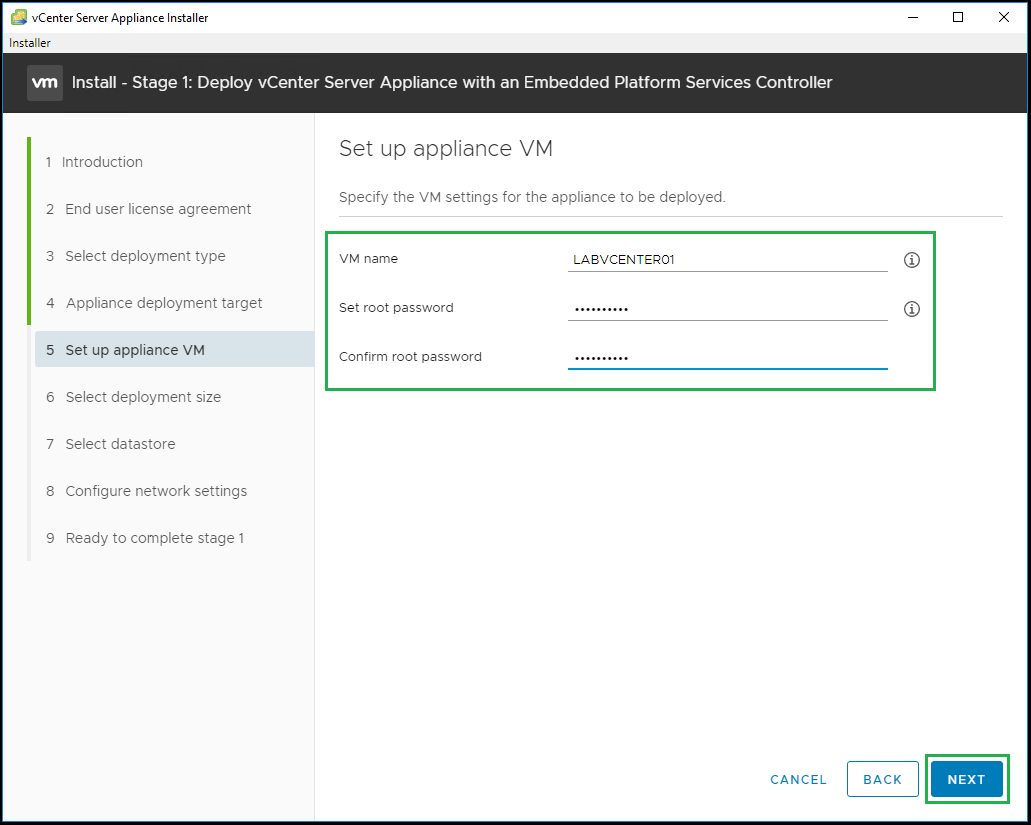
Enter the new vCenter Appliance name and root password
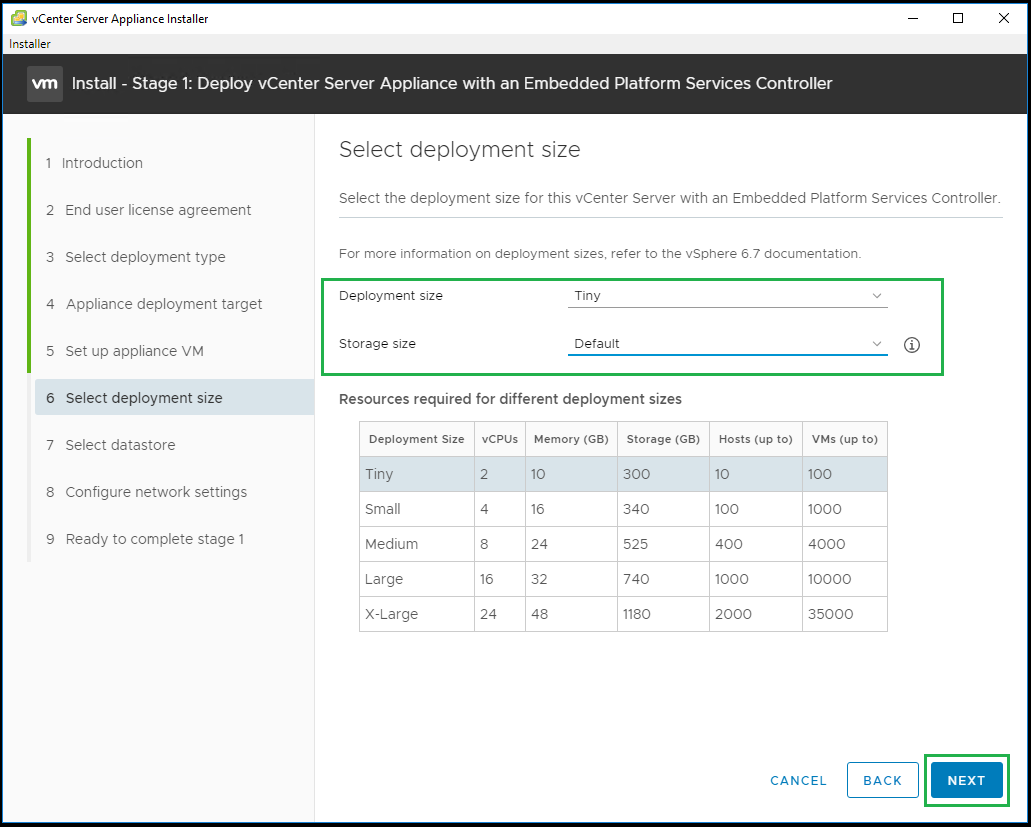
Select the deployment size that suits your requirements, you also have the option to increase the default storage allocation that comes with that deployment size. For this install I will use the default value.
Next select the Datastore where you would like to deploy the appliance
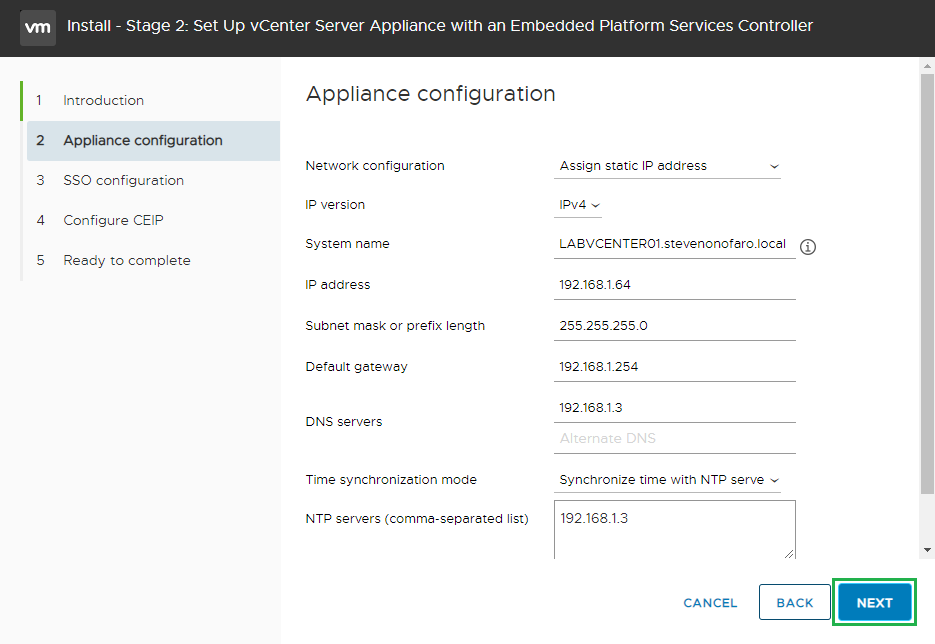
Now it’s time to configure the network settings for the new vCenter Server. Complete each of the required fields and click Next
Review your settings and click Finish
The new vCenter appliance will now start to deploy
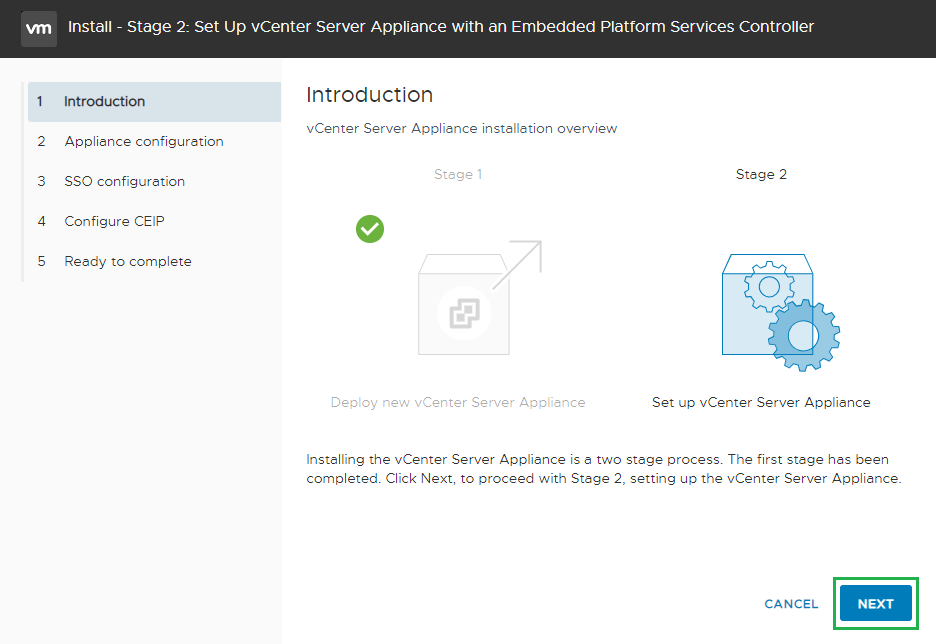
Stage 1 is now complete, next we need to move to Stage 2
Next login to the vCenter Web Interface on port 5480 to complete the setup. So in our example it will be https://192.168.1.64:5480
Click on Set up to continue
Then on the Introduction screen click Next
Review your settings and click Next
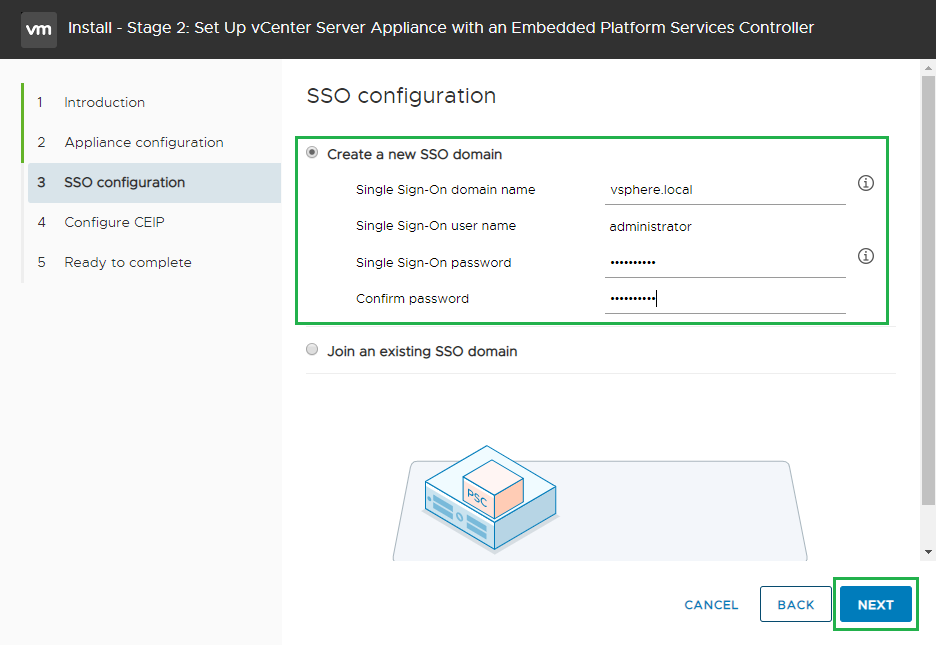
Specify your SSO domain name and password and click Next
Select whether or not you would like to join the CEIP and click Next
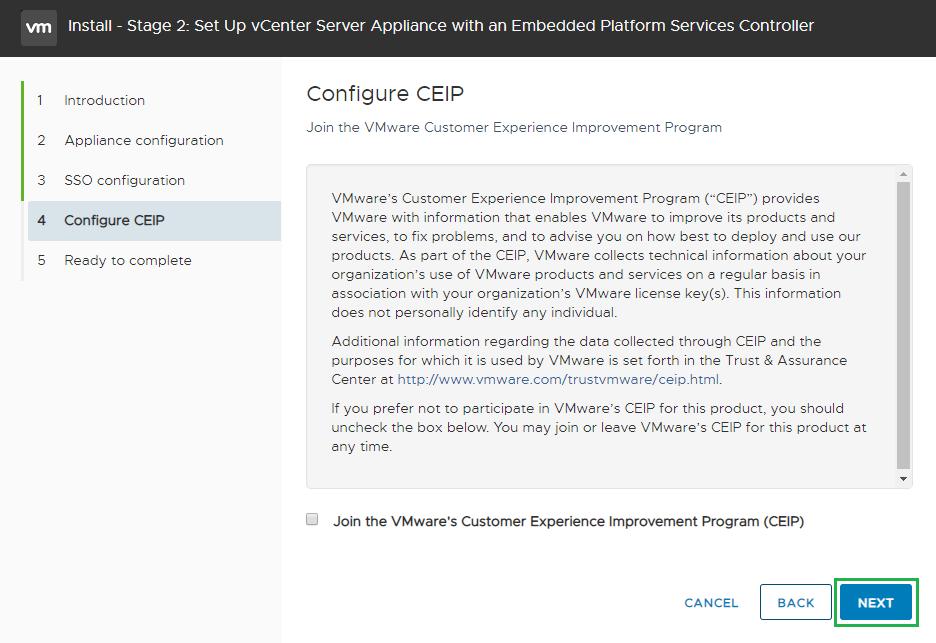
Click Ok to continue

Stage 2 is now complete, click on the link below to access your newly deployed vCenter Server Appliance.
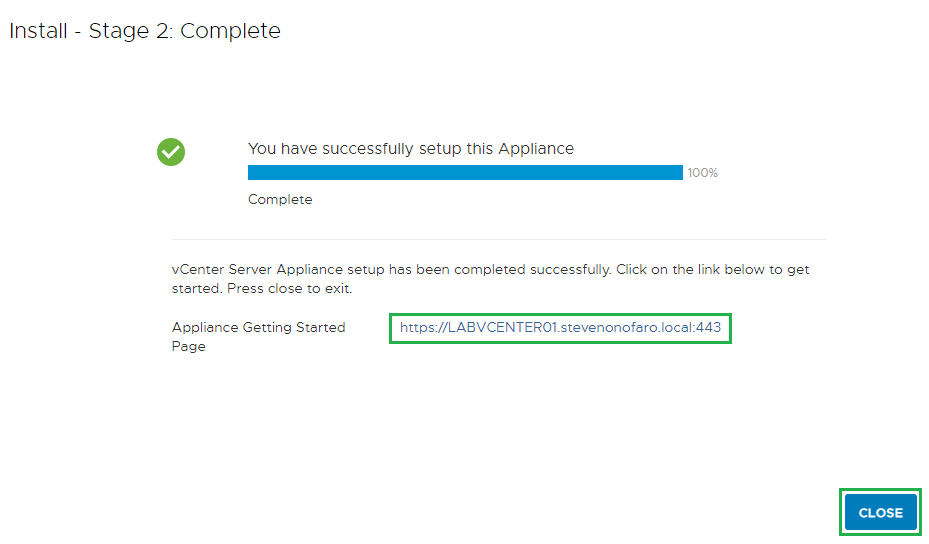
As always I hope this has helped you with your vCenter 6.7 Installation. If you are looking to migrate from a previous windows based vCenter to an Appliance check out my next post!
Subscribe above for new post notifications!
-
Veeam Enterprise Manager 9.5 Update 4 – How to modify the default theme
In a previous post I walked you through how to modify the default theme of Enterprise Manager 9.5 Update 3. Recently I upgraded to Enterprise Manager 9.5 Update 4 and the portal itself looks a whole lot better. The only downside is that it set all of my theme changes back to their defaults. Don’t worry though I have prepared the following guide to help you customize the look and feel to suit your business needs!
This was the main heading when you logged into the previous 9.5 Update 3 release.

This is new Enterprise Manager 9.5 Update 4 main menu look.

We are going to edit the following files to change the default Veeam green to blue for this example. Take a backup of each file before continuing,
C:\Program Files\Veeam\Backup and Replication\Enterprise Manager\WebApp\scripts\build\production\MainApp\resources\MainApp-all_1.css
C:\Program Files\Veeam\Backup and Replication\Enterprise Manager\WebApp\scripts\build\production\MainApp\resources\MainApp-all_2.css
C:\Program Files\Veeam\Backup and Replication\Enterprise Manager\WebApp\scripts\build\production\MainApp\resources\MainApp-all_3.css
C:\Program Files\Veeam\Backup and Replication\Enterprise Manager\WebApp\scripts\build\production\MonthlyReportApp\resources\MonthlyReportApp-all.css
C:\Program Files\Veeam\Backup and Replication\Enterprise Manager\WebApp\static\assets\errors.css
C:\Program Files\Veeam\Backup and Replication\Enterprise Manager\WebApp\scripts\build\production\VCloud\resources\VCloud-all.css
C:\Program Files\Veeam\Backup and Replication\Enterprise Manager\WebApp\scripts\build\production\VSphere\resources\VSphere-all.css
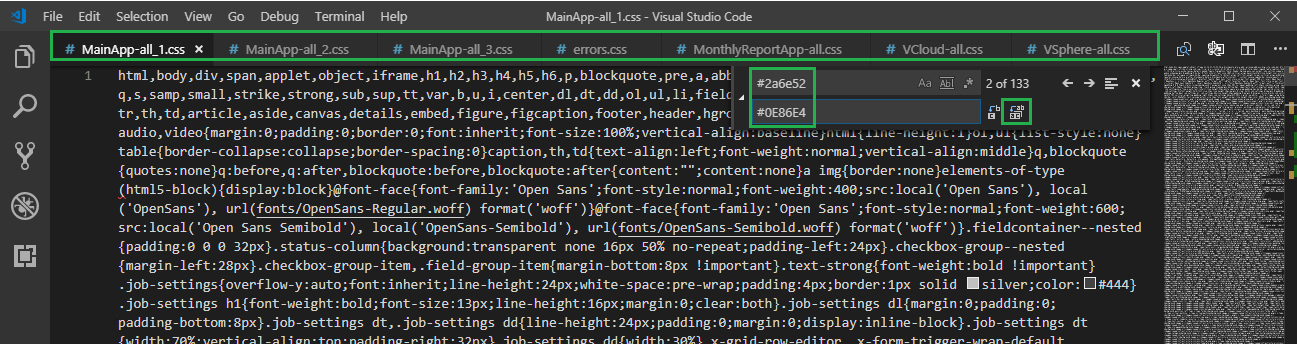
Once again I have used visual studio code to make the changes to each of the files. Click on File then Open File to open each one in a different tab then select Edit from the drop down menu then Replace.
Enter the default green #2a6e52 colour code at the top and then your new colour code #0E86E4 below, then click the Replace All icon to the right. Click on each of the CSS file tabs and click the Replace All button.
Then select File and Save All.
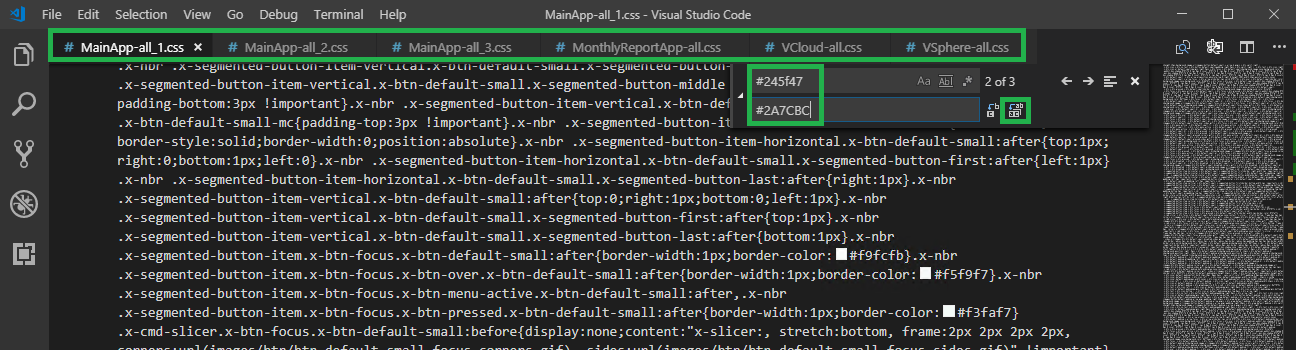
Next we have a few more codes to change, enter the other default green #245f47 colour code at the top and then your new colour code #2A7CBC below, then click the Replace All icon to the right.
Click on each of the CSS file tabs and click the Replace All button. Note the second two green colour codes don’t appear in the errors.css file.
Then select File and Save All.
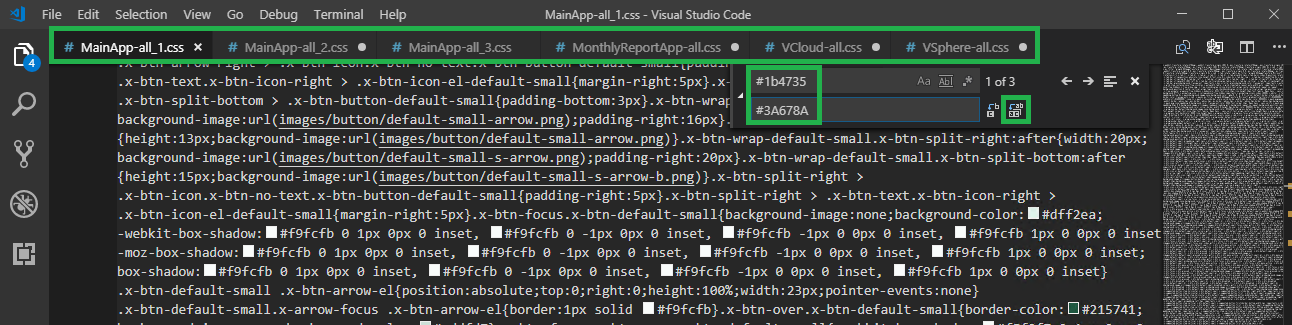
Then again in the Find box change the colour code to #1b4735 and then change the Replace code to #3A678A, then click the Replace All icon to the right.
Click on each of the CSS file tabs and click the Replace All button. A few extra sneaky green colour codes have been added this time, apologies in advance!
Then select File and Save All.
In the Find box change the colour code to #215741 and then change the Replace code to #204059, then click the Replace All icon to the right.
Click on each of the CSS file tabs and click the Replace All button. Note that MainApp-all_3.css does not have this colour code present.

In the Find box change the colour code to #4e846e and then change the Replace code to #2A7CBC, then click the Replace All icon to the right.
Click on each of the CSS file tabs and click the Replace All button. Note that MainApp-all_2.css and MainApp-all_3.css does not have this colour code present.

In the Find box change the colour code to #54b948 and then change the Replace code to #2A7CBC, then click the Replace All icon to the right.
Click on each of the CSS file tabs and click the Replace All button. Note that MainApp-all_2.css and MainApp-all_3.css does not have this colour code present.
Then open the following css file,
C:\Program Files\Veeam\Backup and Replication\Enterprise Manager\web\css\prettify.css
In the Find box change the colour code to #066 and then change the Replace code to #3A678A, then click the Replace All icon to the right. Click on each of the CSS file tabs and click the Replace All button.
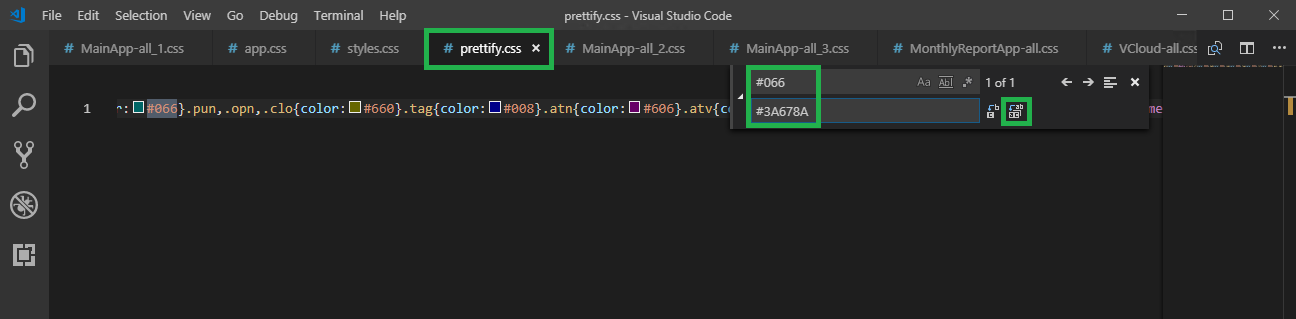
Then select File and Save All.
Now you are ready to relaunch Enterprise Manager and view the new updated menu colour scheme.

Next we need to modify the default green colour of the Main Menu items when you hover over them.

Once again time to change another colour code so we can repeat the same process.
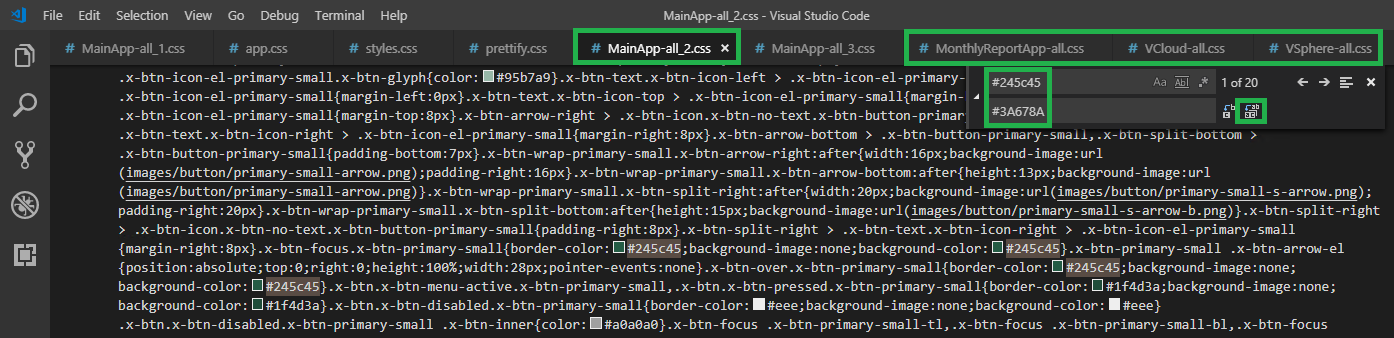
Now this colour code was fun to locate! In the Find box change the colour code to #245c45 and then change the Replace code to #3A678A, then click the Replace All icon to the right. This code only needs to be changed on the MainApp-all_2.css, MonthlyReportApp-all.css, Vcloud-all.css and vSphere-all.css.
Then select File and Save All.
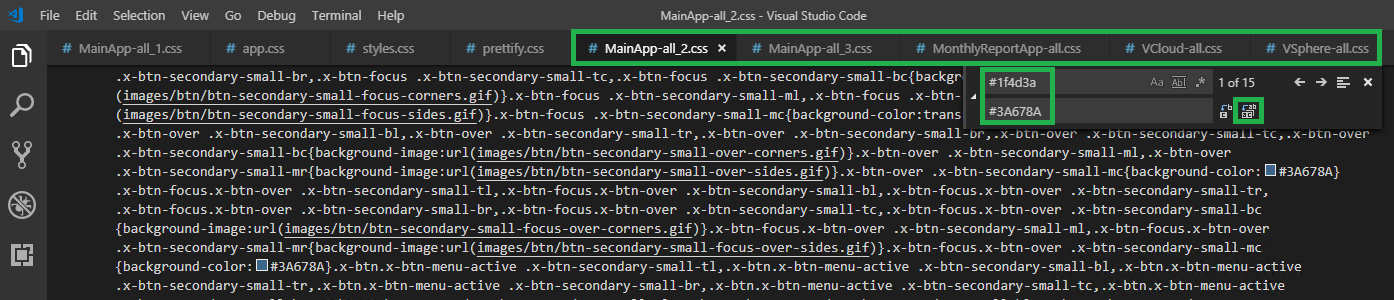
Then in the Find box change the colour code to #1f4d3a and then change the Replace code to #3A678A, then click the Replace All icon to the right. This code only needs to be changed on the MainApp-all_2.css, MonthlyReportApp-all.css, Vcloud-all.css and vSphere-all.css.
Then select File and Save All.
Then refresh the Enterprise Manager page, now when we hover over the buttons the green background is gone and it has changed to blue.

Now it’s time to remove the icon that displays on the left hand side of the menu. The icon itself is very small and you can replace the image with anything you like but for this example I am just going to remove it.

Browse to the following directory and take a backup copy of the png file.
C:\Program Files\Veeam\Backup and Replication\Enterprise Manager\WebApp\scripts\build\production\MainApp\resources\images\veeam\icons\logo32.png
Rename logo32.png to old_logo32.png
Then refresh the page and the icon will no longer appear.

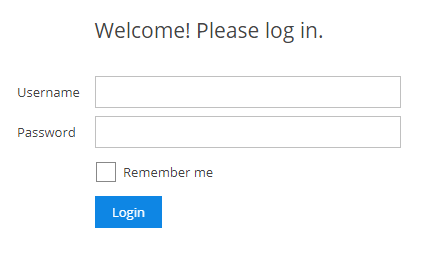
Now lets edit the logon screen welcome message.
Open the following two files in Visual Studio Editor or just in notepad if you want to be fancy.
C:\Program Files\Veeam\Backup and Replication\Enterprise Manager\WebApp\scripts\build\production\MainApp\login\app.js
C:\Program Files\Veeam\Backup and Replication\Enterprise Manager\WebApp\scripts\build\production\VCloud\login\app.js
Then click Edit, Replace and in the Find box enter Welcome! Please log in. and in the Replace box enter the text you would like to display then click the Replace All button.

Then the same again for the second app.js file located under the vCloud directory. Once complete select File and Save All.
Refresh your browser and the logon message should be updated.
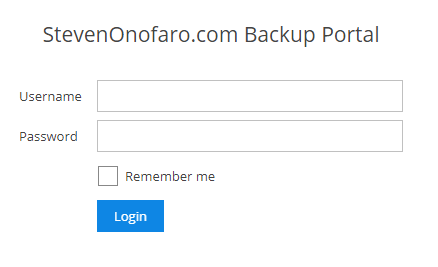
At the top of the page the text Veeam Backup Enterprise Manager is displayed. This can also be edited from one of the above app.js files. Open the following file,
C:\Program Files\Veeam\Backup and Replication\Enterprise Manager\WebApp\scripts\build\production\MainApp\login\app.js

In the Find box enter Veeam Backup Enterprise Manager and in the Replace box enter the text you would like to display then click the Replace All button.
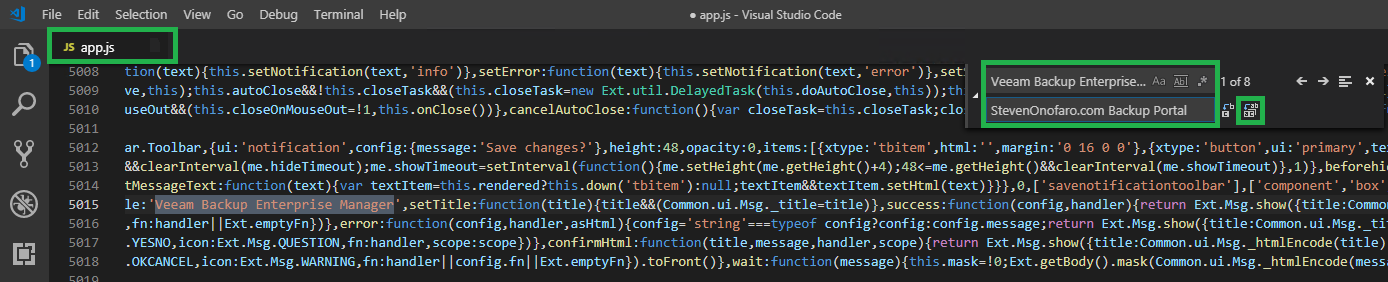
Then select File and Save.
Next we have 2 more files to edit in order for the Tenant Portals to also be updated. They display the text Self-Service Backup Portal when the Tenants login. Open the web.config file from the following location,
C:\Program Files\Veeam\Backup and Replication\Enterprise Manager\WebApp\Web.config
In the Find box enter Veeam Backup Enterprise Manager and in the Replace box enter the text you would like to display then click the Replace All button.
Then again in the Find box enter Self-Service Backup Portal and in the Replace box enter the text you would like to display then click the Replace All button.

Then select File and Save.
Next we need to open the following file,
C:\Program Files\Veeam\Backup and Replication\Enterprise Manager\WebApp\scripts\build\production\VCloud\resources\localization.js
In the Find box enter Self-Service Backup Portal and in the Replace box enter the text you would like to display then click the Replace All button.
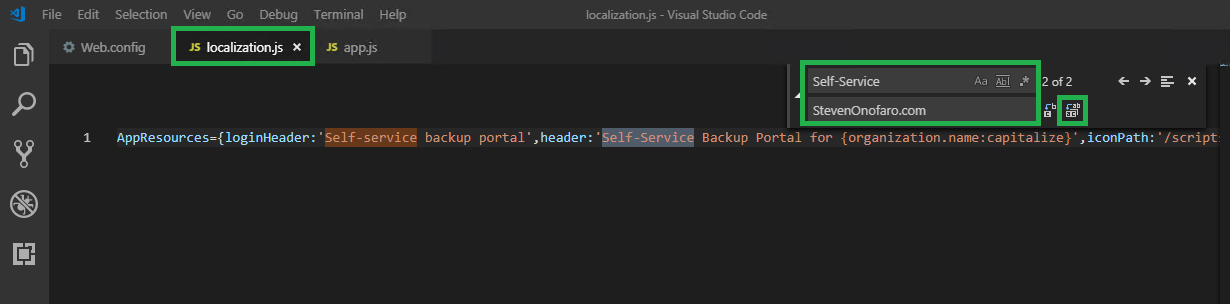
Then select File and Save.
Then close and open your browser and the portal should be updated! You may need to initially clear your browser cache or open incognito mode for it change.
I hope this post has helped you put your own personal touch on the Enterprise Manager Portal. If you are not using it then it’s time to get on board because it’s a great product!
Especially when it comes to vCloud Director Integration!
As always use the subscribe box above for new post notifications and follow me on twitter @steveonofaro
-
Veeam Cloud Connect – Connecting to a Service Provider
Veeam Cloud Connect is a great way to extend your Company backups to a secondary site hosted by your local Service Provider. You can even do away with rotating tapes and configure backup copy jobs to a Cloud Connect Repository instead. There is no need for a VPN or to configure any advanced networking as the connection itself can be established from any internet connection.
In the below example I will walk you through setting up a backup repository with a Service Provider.
First you can use the Veeam Service Provider Directory to locate a provider you would like to use. You can find the link here
Get in touch with the Service Provider (of your choice) and purchase the required storage you need for your backup repository. They will be able to assist you to work out the space required. They will then send you the url to connect to the service along with your login credentials.
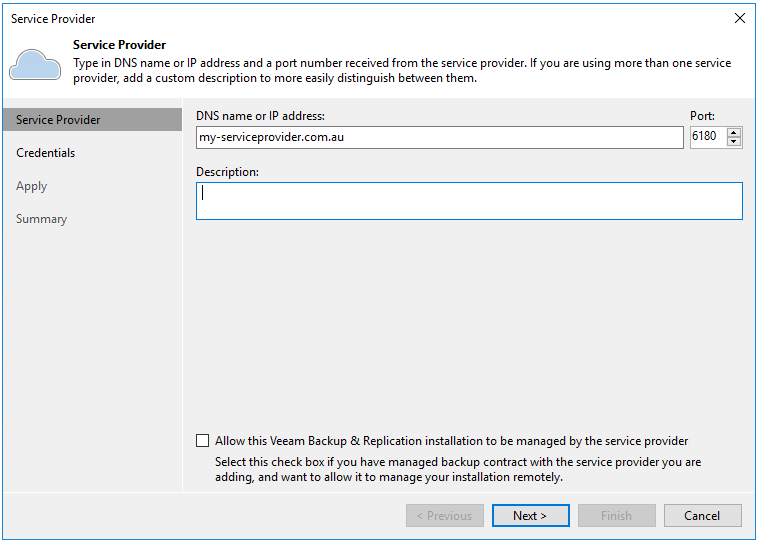
Open Veeam Backup and Replication and click on Backup Infrastructure, then click on Service Providers.

From here you can Add a Service Provider or Search for a Service Provider. Since we already know our details click Add Service Provider.

Type in the address to connect to the Service Provider and click Next.
Add in your user credentials supplied by the service provider and click Apply.
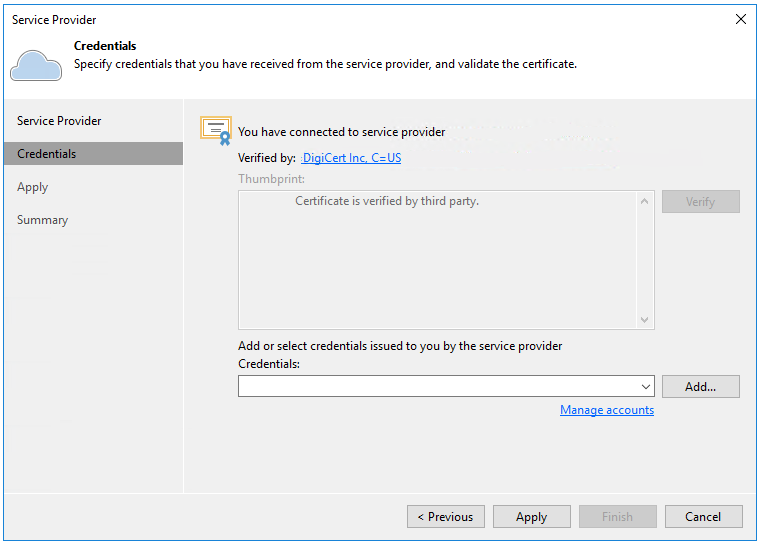
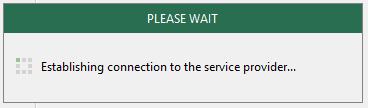
The connection will now be established with the Service Provider.
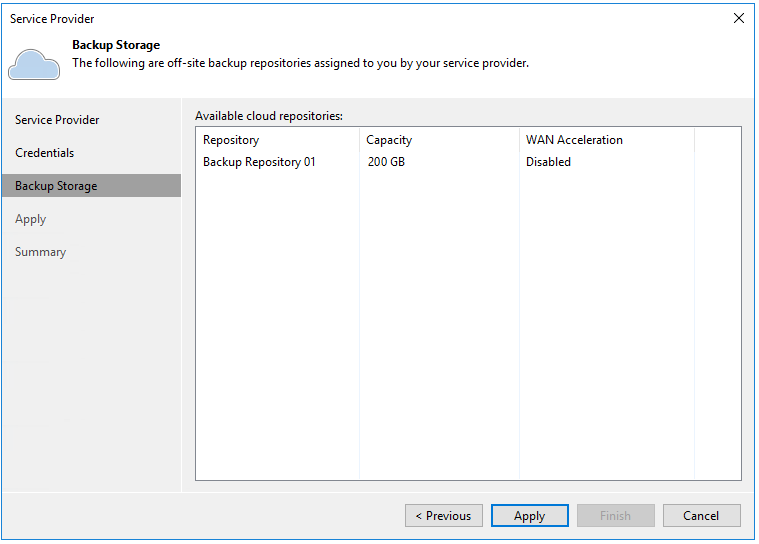
Your backup repository settings will be detailed on the screen below. Click Apply to save the configuration.
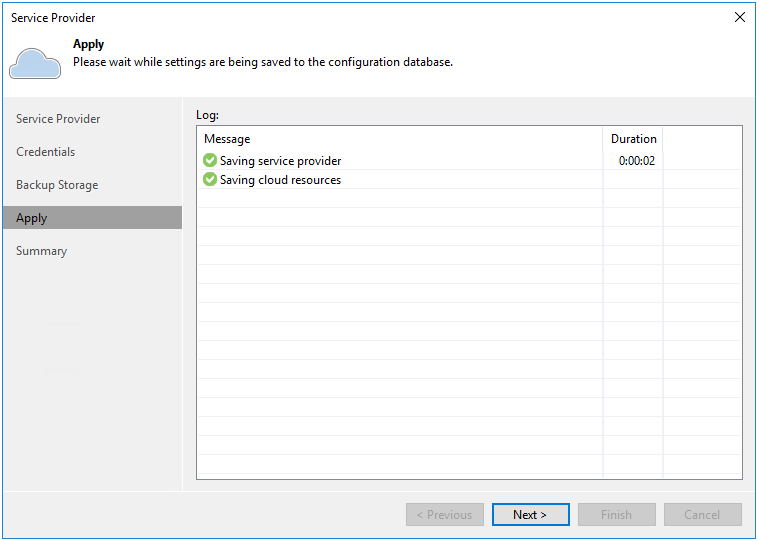
Your connection settings will now be saved. Once complete click Next.
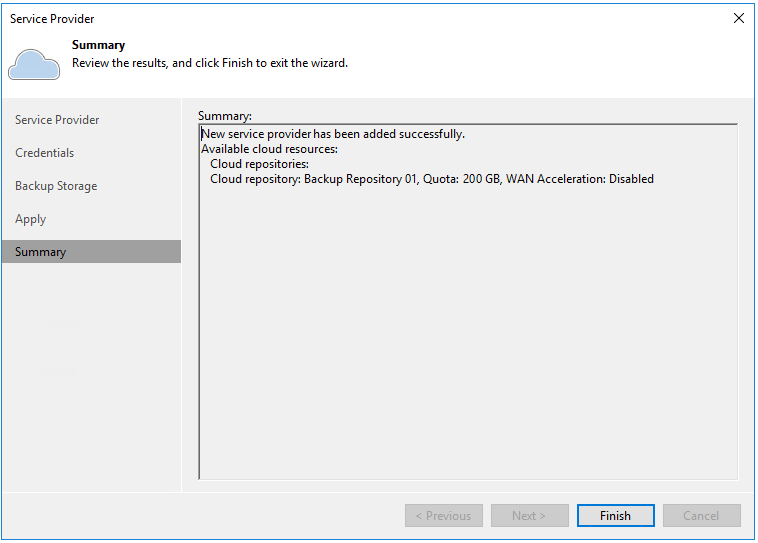
Review the settings and click Finish.
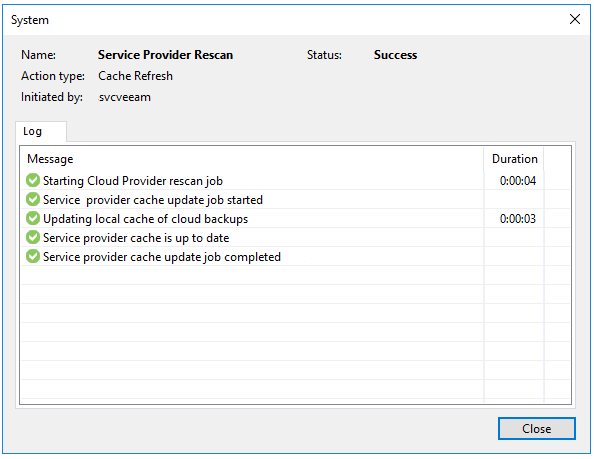
The Repository will be re-scanned and once complete click Close.
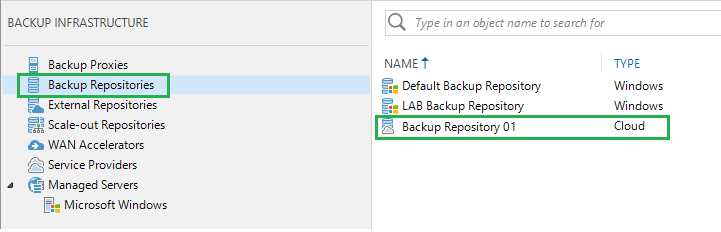
The new Cloud based Backup Repository will now be available for you to consume!
-
Subscribe
Subscribed
Already have a WordPress.com account? Log in now.
